Salut les gourmands!
There exists a moment in French bakeries just before dawn when the first batch of baguettes emerges from stone ovens—their crusts crackling like distant thunder, golden and shattered into a thousand bronze fragments, releasing steam that carries the soul of wheat fermented and transformed. I experienced this awakening during a summer apprenticeship in a Lyon boulangerie, where a master baker named Marcel taught me that a perfect baguette isn’t merely bread but an expression of patience, precision, and profound respect for the simplest ingredients: flour, water, salt, and time.
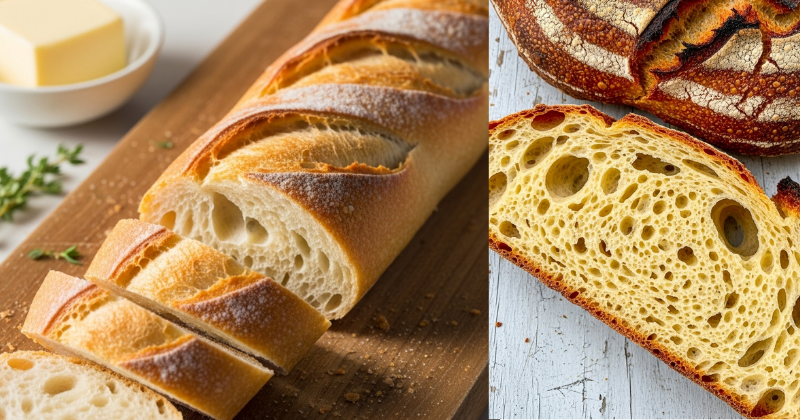
This crispy French baguettes recipe represents that teaching distilled into accessible steps for home bakers. You’ll discover that creating authentic baguettes with their characteristic honeycomb crumb, blistered crust, and nutty-sweet flavor doesn’t require professional equipment or decades of experience. What it demands is understanding the science behind gluten development, fermentation dynamics, and the alchemy occurring when high heat meets properly hydrated dough.
Whether you’re preparing for a dinner party, seeking to master a foundational bread technique, or simply craving that incomparable texture of fresh baguette torn apart with your hands, this recipe guides you through every critical stage—from autolyse to scoring—transforming your kitchen into a small corner of a Parisian boulangerie.

Présentation de la Recette: The Baguette Journey
Before flour meets water, understanding the temporal and technical landscape of baguette creation establishes realistic expectations and builds confidence for the process ahead.
Temps de Préparation Active: 30-45 minutes spread across multiple stages—mixing, folding, shaping. This isn’t continuous work but rhythmic intervals of attention between long periods where dough develops independently.
Temps de Fermentation: 12-18 hours total, including overnight cold fermentation that develops complex flavors impossible to achieve through rapid methods. This extended timeline is non-negotiable—time itself is an ingredient, its passage creating taste.
Temps de Cuisson: 25-30 minutes in a blazingly hot oven that recreates the fierce heat of professional deck ovens.
Temps Total: Approximately 18-24 hours from initial mixing to removing golden loaves from your oven, though active involvement comprises less than an hour.
Rendement: 3 classic baguettes (approximately 250g each) or 2 larger batards if you prefer substantial loaves.
Niveau de Difficulté: Intermediate. The techniques are learnable and the recipe forgiving of minor variations, but success requires attention to hydration levels, fermentation timing, and shaping technique. Your first attempt teaches you the process; your third attempt produces bakery-quality results.
The Soul of French Bread
French baguettes, protected by decree since 1993, must contain only flour, water, salt, and yeast or levain—no fats, no sugar, no dough conditioners that commercial operations use to shortcut proper fermentation. This purity means every nuance of flavor derives from fermentation’s slow magic and the Maillard reactions occurring during high-heat baking.
The baguette’s iconic shape—long, slender, dramatically scored—isn’t aesthetic whimsy but functional design maximizing crust-to-crumb ratio. That crackling exterior, thin enough to shatter at the gentlest pressure yet substantial enough to protect the tender interior, represents the holy grail of bread baking.
Ingrédients: The Elemental Foundation
Baguette excellence begins with ingredient selection—seemingly simple components that reveal profound complexity through fermentation and fire.
For the Dough:
- 500g bread flour (high-protein, 11-13% protein content preferred)—the structural foundation providing gluten strength
- 350g water (70% hydration), room temperature (20-22°C/68-72°F)—higher hydration creates open crumb structure
- 10g fine sea salt (2% of flour weight)—flavor enhancement and gluten strengthening
- 2g instant yeast (0.4% of flour weight) OR 100g active sourdough starter for traditional levain version
- Optional: 1g diastatic malt powder (improves crust color and fermentation)
For Baking:
- Semolina flour or cornmeal for dusting (prevents sticking during final proof)
- Ice cubes or water spray for steam generation (creates crispy crust)
Ingredient Selection Philosophy:
Flour Considerations: Bread flour’s higher protein content develops stronger gluten networks capable of trapping fermentation gases, creating the dramatic air pockets characteristic of authentic baguettes. All-purpose flour can substitute but produces denser crumb with less dramatic hole structure. French T65 flour represents the authentic choice—slightly coarser than American bread flour with subtle mineral complexity, though it’s challenging to source outside specialty suppliers.
Water Quality: Chlorine in tap water can inhibit yeast activity. If your water tastes heavily chlorinated, let it stand uncovered overnight to allow chlorine evaporation, or use filtered water. Water temperature matters enormously—cold water slows fermentation, hot water kills yeast. Room temperature water creates ideal conditions for controlled fermentation.
Salt Selection: Fine sea salt distributes evenly throughout dough. Coarse salt requires longer mixing to dissolve completely. Salt strengthens gluten but inhibits yeast if added too early—this recipe’s delayed salt addition (after autolyse) maximizes both gluten development and fermentation activity.
Yeast vs. Levain: Instant yeast produces reliable, predictable results perfect for beginners. Sourdough starter creates more complex flavors with pronounced tanginess but requires active starter maintenance and extends fermentation times. Both paths lead to excellent baguettes—choose based on your experience level and available time.
Préparation: The Transformation Ritual
Baguette creation unfolds through distinct phases, each serving specific purposes in developing structure, flavor, and that elusive perfect texture.
Phase 1: L’Autolyse—The Flour Awakening (20-30 minutes)
Step 1: The Initial Marriage
In a large mixing bowl, combine 500g bread flour with 350g room temperature water. Using your hand like a claw, mix until no dry flour remains. The dough will appear shaggy, rough, and unrefined—this is correct. You’re not developing gluten yet, merely hydrating flour particles, allowing enzymes naturally present in wheat to begin their work.
Cover bowl with damp towel or plastic wrap. Rest for 20-30 minutes at room temperature. This pause—the autolyse—represents one of bread baking’s most elegant techniques. During this rest, flour proteins (glutenin and gliadin) absorb water and begin spontaneously bonding into gluten networks without mechanical mixing. Enzymes break down complex starches into simple sugars that yeast will later consume. The result: dough that’s easier to work, develops gluten faster, and produces bread with improved flavor and texture.
I remember Marcel describing autolyse as “letting the dough introduce itself to itself”—a poetic rendering of biochemistry that captures the patience fundamental to exceptional bread.
Phase 2: Incorporation—Adding Life and Flavor
Step 2: Salt and Yeast Integration
After the autolyse rest, sprinkle 10g fine sea salt and 2g instant yeast across the dough surface. Now begins the mixing proper—use wet hands (prevents sticking) to squeeze, fold, and compress dough repeatedly for 3-4 minutes. The dough transforms from slack and extensible to smoother and more cohesive as gluten networks strengthen through mechanical development.
The technique: imagine you’re squeezing dough through your fingers like making a fist, then folding it back onto itself. Rotate the bowl 90 degrees and repeat. This pincer method incorporates ingredients while beginning gluten development without the aggressive kneading that can oxidize dough and create dense crumb.
After 3-4 minutes, the dough should feel smoother though still quite sticky and soft—this high hydration creates baguettes’ characteristic open crumb but makes handling challenging. Resist the urge to add flour. Sticky dough is happy dough in baguette making.
Step 3: Bulk Fermentation with Stretch and Folds
Transfer dough to lightly oiled container with room for expansion (dough will grow 50-75% during bulk fermentation). Cover and let rest 30 minutes at room temperature (ideally 24-26°C/75-78°F).
Now begins the series of stretch and folds—a technique replacing traditional kneading that develops gluten while maintaining dough’s delicate gas bubble structure:
Stretch and Fold Technique:
- Wet your hand to prevent sticking
- Reach under one side of the dough
- Stretch it upward until you feel resistance (don’t tear)
- Fold it over the center
- Rotate container 90 degrees
- Repeat for all four sides (north, east, south, west)
- Flip dough so smooth side faces up
Perform this stretch-and-fold sequence every 30 minutes for the first 2 hours of bulk fermentation (4 sets total). Between sets, keep dough covered to prevent surface drying.
Watch the transformation: initially slack dough becomes increasingly smooth, elastic, and capable of holding shape. Gas bubbles become visible through container sides—evidence of yeast consuming sugars and producing carbon dioxide that will leaven your bread.
Phase 3: Cold Fermentation—Where Flavor Develops
Step 4: Overnight Retardation
After completing your stretch and folds (approximately 2 hours of bulk fermentation), cover container tightly and refrigerate for 12-16 hours. This cold fermentation—what professionals call retardation—represents the secret to complex, nuanced baguette flavor.
At refrigerator temperatures (2-4°C/35-40°F), yeast activity slows dramatically while enzymatic activity continues. Enzymes break down proteins into amino acids and starches into sugars, creating the building blocks of flavor. Long, cold fermentation produces bread with nutty, slightly sweet, subtly tangy notes impossible to achieve through rapid room-temperature rising.
During this cold rest, dough also becomes easier to handle and shape—the chilled temperature firms the high-hydration dough, making the shaping process more manageable for home bakers.
This is the stage where patience transforms into taste. I often mix dough in the evening, perform stretch and folds while preparing dinner, then refrigerate overnight. Morning brings dough ready for shaping—a perfect rhythm for fresh bread by afternoon.
Phase 4: Shaping—Sculpture Meets Science
Step 5: Pre-Shaping and Bench Rest
Remove dough from refrigerator 30-60 minutes before shaping (the exact timing depends on your kitchen temperature—you want dough slightly cool but pliable). Turn dough onto lightly floured work surface. The surface should feel smooth, smell pleasantly yeasty with subtle alcoholic notes, and show visible gas bubbles.
Divide dough into three equal pieces (approximately 285g each) using bench scraper or sharp knife. For each piece, gently gather edges toward center, creating rough rounds. Don’t deflate completely—you’re organizing, not punishing the dough.
Let pre-shaped rounds rest 20-30 minutes, covered with towel. This bench rest allows gluten to relax after the stress of division and pre-shaping, making final shaping easier and preventing tearing.
Step 6: Final Baguette Shaping
Baguette shaping requires practice—your first attempts may produce irregular logs rather than elegant cylinders, but technique improves rapidly with repetition.
For each pre-shaped round:
- Flatten gently into rectangular shape approximately 8 inches long, long edge facing you, using fingertips to press out largest gas bubbles (small bubbles remain—they create crumb structure)
- First fold: Take the edge farthest from you, fold it to the center. Use heel of your hand to seal this fold by pressing firmly along the seam
- Second fold: Fold dough in half lengthwise, bringing the near edge to meet the far edge. Seal firmly along entire length using heel of hand—this seam becomes the bottom of your baguette
- Rolling: With both hands positioned at center of dough log, use gentle rocking motion to roll dough back and forth while simultaneously moving hands toward ends. Apply slight downward pressure. The dough elongates gradually—target length of 14-16 inches
The motion resembles playing a rolling pin like a musical instrument—gentle, rhythmic, patient. Rushed rolling tears dough surface or creates irregular thickness. Proper rolling produces uniform cylinders with smooth, unbroken surface skin that will support dramatic oven spring.
Petit conseil pro: If dough resists elongation and keeps springing back, let it rest 5 minutes. Gluten needs time to relax. Fighting stubborn dough creates tears and frustration—patience creates perfect baguettes.
Phase 5: Final Proof—The Last Rise
Step 7: Couche Preparation and Proofing
Traditional French bakers proof baguettes in linen couches—heavy flax fabric supporting dough while allowing air circulation. Home bakers can approximate this using:
- Heavy kitchen towel dusted generously with flour
- Baguette pan if you own one
- Parchment paper pleated between dough logs to maintain separation
Place shaped baguettes seam-side down if using couche/towel (seam-side up if using parchment on baking sheet). Create pleats in fabric between baguettes to prevent them touching during proof. Dust tops generously with flour—this prevents sticking and creates contrast with scores.
Cover loosely with plastic wrap or towel. Proof at room temperature 45-75 minutes. Exact timing depends on kitchen temperature and dough vigor—warmer kitchens proof faster.
The Poke Test: Gently press dough with floured finger. Properly proofed dough springs back slowly, leaving slight indentation. Under-proofed dough springs back immediately and vigorously. Over-proofed dough doesn’t spring back—finger depression remains. Under-proofing is safer than over-proofing; you can extend baking time for under-proofed loaves, but over-proofed baguettes collapse irreversibly.
During final proof, preheat your oven—this step deserves its own focus given its critical importance.
Phase 6: Oven Preparation—Creating the Inferno
Step 8: Maximum Heat and Steam Setup
Place baking stone or heavy baking sheet on middle oven rack. Place a shallow metal pan (cast iron skillet works perfectly) on the oven floor or lowest rack. Preheat oven to maximum temperature—typically 500°F/260°C—for 45-60 minutes.
This extended preheat ensures baking surface reaches thermal equilibrium. Insufficient preheating produces pale, soft crusts instead of shattering golden exteriors. The stone/steel stores enormous thermal energy that transfers instantly to dough, creating the rapid bottom-heat crucial for oven spring.
The steam setup (that pan on the oven floor) will receive ice cubes or boiling water just as you load baguettes, creating humid oven environment. Steam keeps crust flexible during early baking, allowing maximum expansion before crust sets. It also promotes starch gelatinization on dough surface, creating glossy, crisp crust.
Step 9: Scoring—The Baker’s Signature
Just before loading baguettes, score them using razor blade, lame (baker’s scoring tool), or extremely sharp knife. The classic baguette scoring pattern: 4-5 diagonal slashes at 30-degree angle, overlapping slightly, each cut approximately 3 inches long and 1/4 inch deep.
Hold blade at 30-degree angle to dough surface (not perpendicular). Use confident, swift motion—hesitation creates ragged cuts instead of clean slashes. Each score should reveal paler interior dough color.
These scores aren’t decorative—they’re functional weak points controlling where expanding dough will tear during oven spring. Unscored loaves expand chaotically, creating irregular shapes. Properly scored baguettes expand predictably, creating the dramatic “ear” (raised crust lip along score lines) that signifies artisan quality.
Marcel taught me that scoring reveals the baker’s confidence: “Hesitant scores reflect hesitant baker. Your blade should move like you know exactly where the dough wants to open.”
Phase 7: Baking—The Final Transformation
Step 10: Loading and Steam Generation
Working quickly to minimize heat loss:
- Transfer baguettes to parchment paper if not already on it (or use baker’s peel dusted with semolina)
- Open oven, slide baguettes onto preheated stone/sheet
- Immediately add 1 cup ice cubes or 1 cup boiling water to steam pan
- Close oven door quickly—you’re trapping steam
The oven will hiss and fog dramatically—this is perfect. That steam environment will persist for the first 10-12 minutes of baking, allowing dough to expand fully before crust hardens.
Step 11: Temperature Reduction and Baking
After 5 minutes, reduce oven temperature to 450°F/230°C. This two-stage temperature approach mimics professional ovens: initial blast heat for oven spring, then sustained high heat for crust development and interior baking.
Bake total of 25-30 minutes until baguettes achieve deep golden-brown color—don’t fear dark crusts. Pale baguettes taste bland; properly caramelized crusts deliver nutty, complex flavors from Maillard reactions and caramelization.
The Sound Test: Tap bottom of baguette with knuckles. Properly baked bread sounds hollow, like knocking on a door. Dull, dense sound indicates insufficient baking—return to oven for 5 more minutes.
Step 12: The Hardest Step—Cooling
Transfer baked baguettes to wire rack. Listen—they’ll crackle and sing as internal moisture escapes through shattering crust, a phenomenon French bakers call “le chant du pain” (the song of bread).
Resist cutting for at least 20-30 minutes. Interior crumb is still setting as steam redistributes. Cutting too early produces gummy texture instead of tender, properly structured crumb. This waiting period tests willpower—the aroma is intoxicating, the visual appeal undeniable—but patience ensures optimal texture.
Petit Conseil Pro: The Secrets Behind Perfect Baguettes
Through years of baguette obsession and countless loaves ranging from spectacular to spectacularly failed, I’ve accumulated insights that separate good from transcendent results.
The Hydration Dance
This recipe’s 70% hydration creates open, irregular crumb structure—the mark of artisan bread. But hydration is contextual: humid climates may require reducing water by 10-20g, while arid environments might demand an extra 10-15g. Your dough should feel quite sticky and soft but cohesive after mixing. If it’s soupy and won’t hold any shape, reduce water next time. If it’s stiff and tight, increase water.
Temperature Obsession
Professional bakers monitor dough temperature obsessively. Ideal dough temperature after mixing: 24-26°C (75-78°F). Too cold and fermentation crawls; too hot and it races out of control, producing alcohol off-flavors. Adjust water temperature to compensate for ambient conditions: in summer, use cool water (even refrigerated); in winter, use warm water (not hot—never above 35°C/95°F or you risk killing yeast).
Flour Variations
Different flour brands absorb water differently based on protein content and grain particle size. When trying new flour, hold back 20g water, adding gradually until achieving proper dough consistency. Document your adjustments—creating personal recipes based on your specific ingredients and conditions.
The Steam Revelation
Adequate steam is non-negotiable for crispy baguettes. Beyond the initial ice/water addition, some bakers spray oven walls with water bottles before closing door (careful—hot oven surfaces can crack if sprayed directly). Others place a cast iron pan filled with lava rocks in the oven during preheat, pouring boiling water over rocks when loading bread for dramatic steam generation.
Scoring Confidence
Practice scoring on raw dough you’ll discard. The motion should be swift and assured—imagine you’re drawing on paper with a marker, not sawing through wood. The blade should be sharp enough that it glides through surface with minimal resistance. Replace razor blades frequently; dull blades tear rather than cut.
The Levain Alternative
For sourdough baguettes, replace commercial yeast with 100g (20% of flour weight) active, ripe sourdough starter. Add starter during initial mixing with water. Extend bulk fermentation to 3-4 hours (with stretch and folds) before cold retardation. Final proof will take longer—90-120 minutes. The resulting baguettes carry complex tanginess and keep fresh longer than yeast versions.
Accompagnements Suggérés: Celebrating Your Creation
Fresh baguette deserves presentation and pairings that honor the effort invested in its creation.
Classic French Service
Le Petit Déjeuner: Slice still-warm baguette lengthwise, spread with French butter (cultured butter with higher fat content and tangy flavor), top with strawberry or apricot jam. Accompany with café au lait. This breakfast sustained generations of French workers—simple, satisfying, perfect.
Cheese Course: Arrange sliced baguette alongside selection of French cheeses: creamy Camembert, nutty Comté, tangy chèvre, pungent Roquefort. Room-temperature cheeses spread beautifully on torn baguette pieces. Add cornichons, whole-grain mustard, and fresh grapes for complete cheese board.
Charcuterie Platter: The baguette’s neutral flavor and textural contrast complement cured meats beautifully. Serve with pâté, saucisson sec, jambon de Bayonne, rillettes. The interplay of crusty bread, rich meats, and sharp mustard creates perfect flavor balance.
Contemporary Applications
Gourmet Sandwiches: Split baguette lengthwise, spread with aioli or tapenade, layer with sliced ripe tomatoes, fresh mozzarella, basil, prosciutto. The crispy crust and tender crumb create ideal sandwich architecture—substantial enough to hold fillings without becoming soggy.
Bruschetta Platform: Slice baguette into rounds, toast lightly, rub with garlic clove, drizzle with excellent olive oil. Top with diced tomatoes and basil, or white beans with rosemary, or roasted red peppers with anchovies. The possibilities expand infinitely.
Soup Companion: Few pairings surpass fresh baguette torn into chunks and dunked into hot French onion soup, bouillabaisse, or creamy potato-leek soup. The bread absorbs broth while maintaining some structural integrity—comfort food elevated to art.
Croutons and Breadcrumbs: Day-old baguette transforms into exceptional croutons (cube, toss with olive oil and herbs, toast until golden) or breadcrumbs (pulse in food processor, freeze for up to 3 months). Nothing goes to waste.
The Ritual of Sharing
French culture centers around shared meals, and breaking bread together carries deep symbolic meaning. Present your fresh baguettes whole at the table, allowing diners to tear pieces rather than cutting with knife—this tradition emphasizes community and informality.
The act of tearing releases aroma, creates irregular pieces perfect for mopping plates, and connects eaters to bread’s handmade nature. Each person controls their portion, engaging directly with the bread’s texture and warmth.
La Science Derrière la Magie: Understanding the Process
For those who crave deeper understanding of the transformations occurring in your dough, exploring the underlying science enriches appreciation and troubleshooting capability.
Gluten Development Dynamics
Wheat flour contains two proteins: glutenin (provides elasticity) and gliadin (provides extensibility). When hydrated and subjected to mechanical force, these proteins bond into gluten networks—three-dimensional matrices that trap fermentation gases. The stretch and fold technique develops gluten while preserving dough’s delicate bubble structure, unlike aggressive kneading that can deflate carefully created gas pockets.
Fermentation Chemistry
Yeast (Saccharomyces cerevisiae) consumes simple sugars through anaerobic respiration, producing carbon dioxide and ethanol as byproducts. The CO2 inflates gluten networks, creating rise. The ethanol contributes to flavor complexity. During extended fermentation, enzymes break down complex molecules: proteases degrade proteins into flavorful amino acids, amylases convert starches into sugars. This enzymatic activity creates bread’s complex flavor profile—sweetness, nuttiness, subtle tang—impossible to achieve through rapid rising.
The Maillard Reaction and Caramelization
At temperatures above 140°C (284°F), two crucial reactions occur on bread surfaces. The Maillard reaction—interaction between amino acids and reducing sugars—creates hundreds of flavor compounds contributing to bread’s savory, complex taste and golden-brown color. Caramelization—thermal decomposition of sugars—produces additional flavors and deeper color. These reactions explain why well-baked bread tastes infinitely better than pale, under-baked loaves.
Steam’s Triple Function
Steam in early baking serves multiple purposes: it keeps crust flexible, allowing maximum expansion before setting; it gelatinizes surface starches, creating glossy appearance; and it delays crust formation, extending the period during which dough can expand freely. This explains why steamed loaves achieve better volume and more attractive appearance than bread baked in dry ovens.
Troubleshooting: Navigating Challenges
Even experienced bakers encounter occasional failures. Understanding common problems and their solutions prevents discouragement and accelerates improvement.
Problem: Dense, Heavy Crumb
Causes: Insufficient fermentation, weak gluten development, or over-proofing that collapsed gluten structure
Solutions: Extend bulk fermentation until dough clearly increases in volume and shows visible bubbles. Ensure proper stretch and fold technique. Monitor final proof carefully—use poke test to confirm readiness.
Problem: Pale, Soft Crust
Causes: Insufficient oven temperature, inadequate steam, or under-baking
Solutions: Verify oven temperature with oven thermometer (many home ovens run 25-50°F cooler than displayed). Enhance steam generation. Bake longer—don’t fear dark crusts.
Problem: Flat Baguettes Without Oven Spring
Causes: Over-proofed dough that exhausted rising power, insufficient steam, or dull scoring blade
Solutions: Reduce final proof time—slightly under-proofed is safer than over-proofed. Improve steam generation. Ensure razor-sharp scoring blade making clean cuts.
Problem: Irregular Shape or Blowouts
Causes: Insufficient shaping tension, air pockets trapped during shaping, or inadequate scoring
Solutions: Practice shaping technique, ensuring you create surface tension. Gently press out large air pockets during shaping while preserving smaller bubbles. Score decisively and deeply enough to direct expansion.
Problem: Gummy Interior
Causes: Under-baking or cutting bread too soon
Solutions: Bake until deeply golden and hollow-sounding when tapped. Cool completely before slicing—internal crumb is still setting during cooling.
À Vos Tabliers: Your Baguette Journey Begins
The flour waits in your pantry. The oven stands ready. Between you and perfect, crackling baguettes lies only time, attention, and willingness to embrace a process that humans have refined over centuries.
Your first baguettes may emerge misshapen, pale, or dense—this is the learning curve every baker travels. But even imperfect baguettes taste infinitely better than grocery store bread, and each attempt builds muscle memory, intuition, and understanding that transforms technical steps into natural rhythm.
I encourage you to document your journey—photograph your results, note your observations, track your adjustments. Baguette making is iterative; you’re developing not just bread but skill that compounds with practice. By your fifth batch, you’ll notice dramatic improvement. By your twentieth, you’ll shape dough without conscious thought, reading fermentation timing instinctively, scoring with confident precision.
Share your results in the comments below. What challenged you? What surprised you? Did your kitchen fill with that indescribable aroma of fresh bread that makes all effort worthwhile? Your experiences contribute to our collective knowledge and inspire others beginning their own bread journeys.
Remember Marcel’s words: “The dough is always teaching, but only patient bakers learn.” Listen to your dough. Watch how it responds to your touch, how it grows and transforms. Each batch speaks, revealing secrets about hydration, fermentation, and timing that recipes can guide toward but never fully capture.
À vos tabliers et bon appétit!