Salut les gourmands!
There’s something magical about biting into a perfectly crafted chocolate tart. That first moment when your fork breaks through the glossy ganache, revealing the delicate pastry beneath, is pure culinary poetry. I still remember the first time I tasted an authentic chocolate tart in a tiny Parisian pâtisserie – the rich, velvety chocolate against the buttery crust created an experience I’ve been chasing ever since.
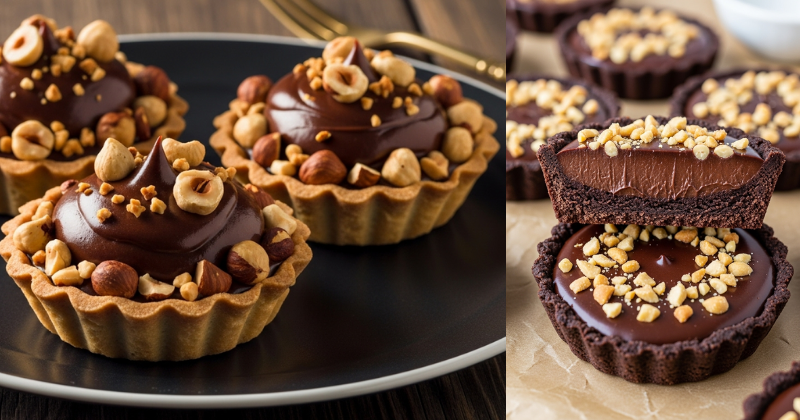
Today, I’m sharing my perfected recipe for classic chocolate tarts that brings that same sophistication right into your kitchen. These elegant individual tarts combine a crisp, buttery sweet pastry shell with a silky chocolate ganache that’s neither too sweet nor too bitter – just perfectly balanced. Whether you’re planning an intimate dinner party or simply treating yourself to something extraordinary, these chocolate tarts deliver restaurant-quality results with techniques anyone can master.
What makes this recipe special is the attention to detail in every layer. We’ll explore the science behind achieving that perfect snap in the pastry, the ideal temperature for ganache that’s smooth as silk, and the little tricks that transform good chocolate tarts into unforgettable ones.

Presentation of the Recipe
Preparation time: 40 minutes (plus 1 hour chilling time)
Cooking time: 20 minutes
Total time: 2 hours
Servings: 6 individual tarts
Difficulty level: Intermediate
Origin: French pâtisserie tradition
These classic chocolate tarts represent the pinnacle of French pastry-making – deceptively simple in concept, yet requiring precision and care in execution. The beauty of this recipe lies in its pure ingredients: butter, chocolate, cream, and eggs working in perfect harmony to create something transcendent.
The tart shell, known as pâte sucrée in French pastry terminology, provides a sweet, cookie-like base that remains crisp even after filling. Meanwhile, the chocolate ganache filling achieves that coveted texture – firm enough to slice cleanly, yet melting instantly on your tongue. This is the kind of dessert that makes people close their eyes and savor every bite.

Understanding the Science Behind Perfect Chocolate Tarts
Before we dive into the recipe, let’s explore what makes these tarts work so beautifully. The pastry dough relies on a technique called “sablage” – coating the flour particles with fat before adding liquid. This creates a tender, crumbly texture rather than a tough, elastic one. The cold butter creates tiny pockets that, when baked, result in that signature crisp texture.
The ganache is an emulsion – a stable mixture of two ingredients that don’t naturally want to combine (fat from chocolate and water from cream). When prepared correctly, the cocoa butter in chocolate and the fat in cream create a smooth, glossy mixture with incredible mouthfeel. Temperature is crucial here: too hot, and the emulsion breaks; too cool, and it won’t blend properly.
The ratio of chocolate to cream determines the final texture. For tarts, we want a firmer ganache than you’d use for truffles, so we use slightly less cream. This allows the filling to set beautifully while maintaining that luxurious, melting quality.
Ingredients
For the Sweet Pastry (Pâte Sucrée):
- 250g (2 cups) all-purpose flour, plus extra for dusting
- 100g (½ cup) powdered sugar, sifted
- 125g (½ cup + 1 tablespoon) cold unsalted butter, cubed
- 1 large egg yolk
- 2-3 tablespoons cold whole milk
- ¼ teaspoon fine sea salt
- ½ teaspoon pure vanilla extract
For the Chocolate Ganache Filling:
- 300g (10.5 oz) high-quality dark chocolate (60-70% cocoa), finely chopped
- 300ml (1¼ cups) heavy cream (35% fat content)
- 30g (2 tablespoons) unsalted butter, at room temperature
- 2 tablespoons honey or light corn syrup (for extra shine and smooth texture)
- Pinch of flaky sea salt
For Decoration (Optional):
- Cocoa powder for dusting
- Fresh berries (raspberries work beautifully)
- Edible gold leaf
- Whipped cream or crème fraîche
- Fresh mint leaves
Petit conseil pro: The quality of your chocolate makes or breaks this recipe. Choose a chocolate you’d enjoy eating on its own – brands like Valrhona, Callebaut, or even high-quality supermarket chocolate (minimum 60% cocoa) work wonderfully. Avoid chocolate chips, as they contain stabilizers that prevent proper melting.
Preparation
Stage 1: Creating the Perfect Sweet Pastry
Step 1: Begin by preparing your workspace. Clear a clean, cool surface for working with the dough. In a large mixing bowl, combine the flour, powdered sugar, and salt, whisking them together until evenly distributed. This aeration helps create a lighter pastry.
Step 2: Add the cold, cubed butter to the flour mixture. Using your fingertips or a pastry cutter, work the butter into the flour until the mixture resembles coarse breadcrumbs with some pea-sized pieces of butter still visible. This technique, called “rubbing in,” should be done quickly to prevent the butter from warming up. The mixture should look sandy and hold together when squeezed.
Step 3: In a small bowl, whisk together the egg yolk, vanilla extract, and 2 tablespoons of cold milk. Create a well in the center of your flour-butter mixture and pour in the egg mixture. Using a fork, gradually incorporate the dry ingredients into the wet, working from the center outward.
Step 4: When the dough starts coming together but still looks slightly shaggy, use your hands to gently gather it into a ball. If it feels too dry and won’t hold together, add the remaining tablespoon of milk, a teaspoon at a time. The dough should be cohesive but not sticky. Avoid overworking – this develops gluten and makes the pastry tough.
Step 5: Shape the dough into a flat disc, wrap it tightly in plastic wrap, and refrigerate for at least 1 hour, or up to 2 days. This resting period allows the gluten to relax and the butter to firm up, making the dough easier to roll and preventing shrinkage during baking.
Stage 2: Blind Baking the Tart Shells
Step 6: Preheat your oven to 180°C (350°F). Lightly butter six individual tart tins (10cm/4-inch diameter) with removable bottoms. This size is perfect for elegant individual servings, but you can also use one 23cm (9-inch) tart tin.
Step 7: Remove the chilled dough from the refrigerator and let it sit for 5 minutes to soften slightly. On a lightly floured surface, roll out the dough to about 3mm (⅛-inch) thickness. Roll from the center outward, rotating the dough quarter-turns to maintain an even thickness and prevent sticking.
Step 8: Cut circles of dough about 2cm (1 inch) larger than your tart tins. Gently press the dough into each tin, ensuring it fits snugly into the corners without stretching. Trim any excess dough by rolling your rolling pin across the top of the tin. Prick the bottom of each tart shell several times with a fork to prevent puffing during baking.
Step 9: Line each tart shell with parchment paper and fill with pie weights, dried beans, or rice. This “blind baking” technique prevents the pastry from puffing up and ensures a flat base for the ganache. Place the tart tins on a baking sheet for easy handling.
Step 10: Bake for 15 minutes, then carefully remove the parchment and weights. Return to the oven for another 5-7 minutes until the pastry is golden and looks dry. The edges should be slightly darker than the center. Remove from the oven and let cool completely in the tins. The tart shells can be made a day ahead and stored in an airtight container.
Stage 3: Preparing the Silky Chocolate Ganache
Step 11: While the tart shells are cooling, prepare your ganache. Place the finely chopped chocolate in a heatproof bowl. The smaller the chocolate pieces, the more evenly they’ll melt. Add the honey or corn syrup to the chocolate – this ingredient is a secret weapon for achieving that professional glossy finish.
Step 12: In a small saucepan, heat the cream over medium heat until it just begins to simmer. You’ll see small bubbles forming around the edges, and steam rising from the surface. Don’t let it boil vigorously – we want it hot enough to melt the chocolate, but not so hot that it breaks the emulsion.
Step 13: Pour the hot cream over the chopped chocolate in three additions, letting each addition sit for 30 seconds before stirring. This gradual approach helps create a stable emulsion. After adding all the cream, let the mixture sit undisturbed for 2 minutes, allowing the residual heat to melt the chocolate completely.
Step 14: Starting from the center of the bowl, stir gently in small circles, gradually widening your circles to incorporate all the chocolate. Use a spatula or wooden spoon, not a whisk, which can incorporate too much air and create bubbles. The ganache should become smooth, glossy, and homogeneous. This process, called “emulsification,” is crucial for the perfect texture.
Step 15: Once the ganache is completely smooth, add the room-temperature butter and pinch of sea salt. Stir gently until the butter melts completely and is fully incorporated. The butter adds extra richness and gives the ganache a beautiful sheen. Let the ganache cool slightly until it reaches about 35°C (95°F) – it should be warm but not hot.
Stage 4: Assembly and Finishing
Step 16: Arrange your cooled tart shells (still in their tins) on a clean work surface or baking sheet. Pour the slightly cooled ganache into each shell, filling them almost to the top. The ganache should be fluid enough to self-level, creating a perfectly smooth surface. If you notice any air bubbles, gently tap the tins on the counter to release them.
Step 17: Let the tarts sit at room temperature for 30 minutes to begin setting, then transfer them to the refrigerator for at least 2 hours, or until the ganache is completely firm. The ganache will develop a matte finish as it sets, which is perfectly normal.
Step 18: About 30 minutes before serving, remove the tarts from the refrigerator. Chocolate tarts are best enjoyed at cool room temperature, when the flavors are most pronounced and the texture is at its silkiest. Carefully remove the tarts from their tins by pushing up from the bottom.
Step 19: For a professional finish, you can warm a sharp knife under hot water, dry it thoroughly, and gently run it around the edge of each tart for a clean, polished look. Dust lightly with cocoa powder using a fine-mesh sieve, or arrange fresh berries on top for a pop of color and complementary tartness.
Step 20: Serve your chocolate tarts on individual dessert plates, perhaps with a small dollop of lightly sweetened whipped cream or crème fraîche on the side. The contrast between the rich chocolate and the light, tangy cream is sublime.
Petit Conseil Pro: Mastering the Details
Temperature is everything: Working with chocolate requires attention to temperature. If your ganache looks grainy or separated, it’s likely too cool. Gently warm it over a double boiler while stirring constantly, and it should come back together. If it looks oily or has pools of fat, it’s too warm – let it cool slightly and stir gently.
Prevent pastry shrinkage: The key to preventing your tart shells from shrinking during baking is proper resting time. Always chill the dough before rolling, and if you have time, freeze the lined tart tins for 15 minutes before baking. This firms up the butter, which helps maintain the shape.
Make-ahead magic: These tarts are perfect for entertaining because they must be made ahead. The tart shells can be baked up to 2 days in advance and stored at room temperature. The filled tarts keep beautifully in the refrigerator for up to 4 days, though the pastry will gradually soften.
Flavor variations: Once you’ve mastered the classic version, try infusing the cream with different flavors. Earl Grey tea, orange zest, fresh mint, or a cinnamon stick added to the cream while heating (then strained out) can create sophisticated variations. A tablespoon of your favorite liqueur (Grand Marnier, Cointreau, or Frangelico) stirred into the finished ganache adds adult sophistication.
Storage wisdom: Store finished tarts covered loosely with plastic wrap in the refrigerator. Don’t seal them too tightly, as condensation can make the pastry soggy. If you’re decorating with berries, add them just before serving to prevent bleeding.
The Cultural Journey of Chocolate Tarts
The chocolate tart, or “tarte au chocolat,” holds a special place in French pâtisserie tradition. Unlike the more rustic pies of other cultures, French tarts celebrate precision and refinement. The combination of buttery pastry with rich chocolate filling represents the French philosophy of allowing quality ingredients to shine through simple, elegant preparation.
Historically, chocolate was a luxury ingredient reserved for special occasions. Early chocolate desserts in 18th-century France were primarily beverages or simple mousses. As chocolate became more accessible and pastry techniques evolved, pâtissiers began creating more elaborate chocolate desserts. The chocolate tart as we know it today emerged in the mid-20th century, combining the traditional tart-making techniques with the increasingly popular chocolate ganache.
The beauty of classic chocolate tarts lies in their versatility. They’re equally at home at a casual dinner party or an elegant celebration. They can be dressed up with elaborate decorations or served simply with just a dusting of cocoa. They satisfy both the casual chocolate lover and the discerning gastronome.
Suggested Accompaniments
These chocolate tarts are stunning on their own, but certain accompaniments can elevate the experience even further:
Fresh berries: Raspberries are the classic pairing – their tartness cuts through the rich chocolate beautifully. Strawberries and blackberries also work wonderfully. Arrange them artfully on top or serve alongside.
Whipped cream or crème fraîche: A small dollop of lightly sweetened cream adds a luxurious lightness. I prefer crème fraîche for its subtle tang, which balances the chocolate’s richness.
Coffee or espresso: A perfectly brewed espresso or strong coffee alongside a chocolate tart is a match made in heaven. The bitter notes in coffee complement the chocolate’s complexity.
Salted caramel sauce: For those who love sweet-salty combinations, a small drizzle of salted caramel adds another dimension of flavor.
Vanilla ice cream: While delicious, I’d recommend serving it on the side rather than on top, as the temperature contrast between cold ice cream and cool tart is more pleasant than mixing them together.
Port or dessert wine: For adult gatherings, a glass of ruby port, late-harvest Zinfandel, or even a chocolate stout beer creates a sophisticated pairing.
The Health Benefits Hidden in Dark Chocolate
While chocolate tarts are certainly an indulgence, it’s worth noting that high-quality dark chocolate offers genuine health benefits. Dark chocolate (60% cocoa or higher) is rich in flavonoids, powerful antioxidants that support cardiovascular health by improving blood flow and reducing inflammation.
The cocoa in dark chocolate contains theobromine, a natural compound that provides a gentle energy boost without the jitters associated with caffeine. It also contains phenylethylamine, often called the “love chemical,” which triggers the release of endorphins and contributes to that feeling of happiness after eating chocolate.
Of course, these benefits come with moderation – a single elegant tart serving is a perfect portion for enjoying chocolate’s pleasures without overindulgence. The key is choosing quality over quantity: one sublime chocolate tart beats a handful of mediocre chocolate candies any day.
Troubleshooting Common Challenges
Problem: Pastry is tough or chewy
Solution: This happens when the dough is overworked, developing too much gluten. Handle the dough gently and minimally, and ensure you’re using cold butter.
Problem: Tart shells shrink during baking
Solution: Insufficient chilling time is usually the culprit. Always refrigerate the dough for at least an hour before rolling, and consider freezing the lined tart tins for 15 minutes before baking.
Problem: Ganache is grainy or separated
Solution: Temperature issues cause this. If too cool, gently warm over a double boiler while stirring. If the chocolate was too hot when the cream was added, the cocoa butter can separate – stir in a tablespoon of cold cream to bring it back together.
Problem: Ganache has air bubbles
Solution: Stir gently rather than whisking when making ganache, and tap the filled tart tins on the counter to release bubbles before refrigerating.
Problem: Pastry is soggy
Solution: Ensure the tart shells are completely baked before filling – they should look dry and be golden brown. Also, make sure they’re completely cool before adding the ganache.
À Vos Tabliers!
There’s something deeply satisfying about creating a dessert that looks like it came from a professional pâtisserie. These classic chocolate tarts prove that with good ingredients, attention to detail, and a bit of patience, you can achieve restaurant-quality results in your own kitchen.
The process of making these tarts is as rewarding as eating them – the meditative quality of rolling pastry, the transformation of simple ingredients into glossy ganache, the anticipation as the tarts chill and set. Each step connects you to generations of pastry chefs who’ve perfected these techniques.
I’d love to hear how your chocolate tarts turn out! Did you add any personal touches? Which accompaniments did you choose? Share your experience in the comments below, and don’t forget to post photos of your beautiful creations – there’s nothing quite like seeing these elegant tarts come to life in kitchens around the world.
Whether you’re making these for a special celebration or simply because you deserve something extraordinary, I hope this recipe brings as much joy to your kitchen as it has to mine.
Bon appétit!