Salut les gourmands!
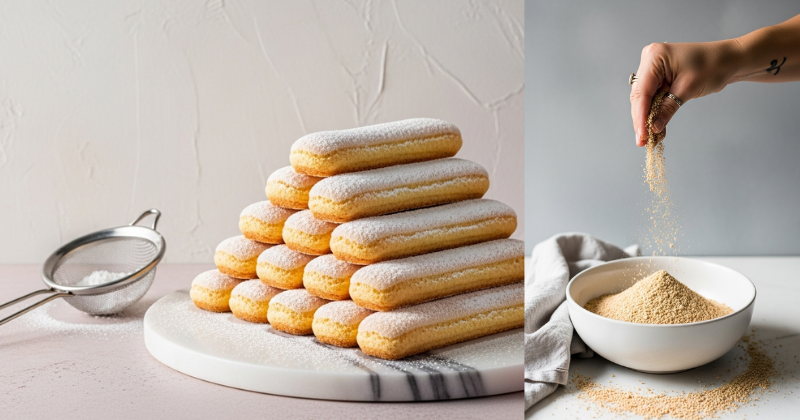
Every Christmas, when my Italian nonna would start preparing her legendary tiramisu, I knew the secret wasn’t just in the mascarpone; it was in the cookies. Store-bought ladyfingers (or Savoiardi, as she called them) are fine, but they often lack that airy, delicate crunch and the subtle sweetness that makes the difference between a good tiramisu and an unforgettable one. Making Homemade Ladyfingers might sound intimidating—like something only a pastry chef could master—but I promise you, it’s an achievable process built on simple techniques. Once you taste these light, spongy cookies, dusted with a fine layer of powdered sugar, you’ll transform your baking game forever. These elegant biscuits are the authentic foundation for tiramisu, trifles, or simply enjoyed dipped in your morning coffee. Are you ready to discover the pleasure of baking these classic Italian sponge cookies from scratch? Let’s get started on the recipe that will have your family asking, “Did you really make those yourself?”

The Delightfully Simple Homemade Ladyfingers Recipe Breakdown
You’ll be surprised at how few ingredients and how little time you need to create these beautiful, delicate biscuits. The magic lies entirely in the technique of whipping the eggs.
Presentation: Time, Portions, and Difficulty
- Prep Time: 20 minutes (mostly whipping time)
- Bake Time: 10–12 minutes per batch
- Total Time: Approximately 1 hour
- Yields: About 30-35 ladyfingers
- Difficulty: Easy to Medium (requires careful folding, but no specialized equipment needed outside of a stand mixer or hand mixer).
My nonna used to say, “Patience is the spice of baking, especially with eggs.” It’s true! Don’t rush the whipping step, and you’ll achieve perfect results every time.
The Essential Ingredients for Airy Ladyfingers
The key to these light cookies is the precise ratio of air, sugar, and flour. Use a fine-quality all-purpose flour for the best texture.
- Eggs: 3 large eggs, separated (the whites and yolks must be perfectly separated!)
- Sugar (Granulated): $\frac{1}{2}$ cup (100g)
- Flour (All-Purpose): $\frac{2}{3}$ cup (80g), sifted
- Salt: A pinch
- Vanilla Extract: 1 teaspoon
- Finishing Dust: Powdered sugar (confectioners’ sugar) and/or granulated sugar for dusting
Petit conseil pro: Always weigh your flour. Volumetric measurements (cups) can vary wildly, and too much flour is the number one reason homemade ladyfingers turn out dense instead of light and crisp. For the best Homemade Ladyfingers, precision matters!
Step-by-Step Preparation: Whipping the Magic
The structure of these cookies relies on stabilized meringue and perfectly whipped yolks. Follow these steps carefully for success.
- Preheat and Prep: Preheat your oven to $375^\circ\text{F}$ ($190^\circ\text{C}$). Line two large baking sheets with parchment paper. If you’re making them for tiramisu, you might want to trace $3$-inch ovals on the back of the parchment paper as a guide for piping.
- Whip the Yolks: In a medium bowl, beat the 3 egg yolks with the vanilla extract and half of the granulated sugar ($\frac{1}{4}$ cup) until the mixture is very thick, pale yellow, and ribbons when the whisk is lifted. This process takes about 3-4 minutes with a hand mixer.
- Whip the Whites (Meringue): In a separate, grease-free bowl (this is crucial!), beat the egg whites with the pinch of salt until soft peaks form. Gradually add the remaining $\frac{1}{4}$ cup of sugar, continuing to beat until stiff, glossy peaks form. The meringue should hold its shape when the whisk is removed.
- Fold the Yolks: Gently fold the whipped yolk mixture into the meringue. Use a rubber spatula, moving in a sweeping motion from the bottom of the bowl upward and over, being careful not to deflate the air. Stop folding just when the color is uniform.
- Fold the Flour: Sift the $\frac{2}{3}$ cup of flour directly over the egg mixture. Gently fold the flour in, using the same light, sweeping motion. Overmixing is the greatest enemy of light ladyfingers; stop as soon as you see no dry flour streaks.
- Pipe the Cookies: Spoon the batter into a piping bag fitted with a large, plain round tip (or simply snip a $\frac{1}{2}$ inch hole in the corner of a sturdy zip-top bag). Pipe the batter into $3$- to $4$-inch long strips, spaced about 1 inch apart on the prepared baking sheets.
- The Double Dust: Sift a generous layer of powdered sugar over the piped strips. Wait 5 minutes for the sugar to absorb, then sift a second layer of powdered sugar. This double dusting creates the characteristic slightly crispy, crackly surface.
- Bake: Bake for 10–12 minutes, or until the edges are golden and the cookies are firm to the touch and lightly colored. They should feel dry and spring back when touched.
- Cool: Remove the Homemade Ladyfingers from the oven and transfer them immediately to a wire rack to cool completely. They will crisp up as they cool.
💡 Petit conseil pro: Achieving Crispy Edges and Air-Filled Sponges
The difference between a chewy ladyfinger and a perfectly airy one is often found in these small but mighty details. This is where you unlock the true satisfaction of completion.
The Dryness Factor
Ladyfingers must be dry enough to stand up to the moisture of coffee or syrup in a dessert like tiramisu.
- Tip: If you find your Homemade Ladyfingers are still a bit soft after cooling, turn off your oven and place the cookies back inside on the racks for another 15–20 minutes as the oven cools. This will gently dry them out without browning them further. This practical troubleshooting tip is a must-know.
Preventing Deflation: The Art of Folding
The entire structure of these cookies is based on the trapped air in the eggs. Deflating the batter means flat, dense cookies.
- Tip: Always sift your flour. Sifting makes the flour lighter and easier to incorporate quickly, minimizing the amount of folding needed. Use a large bowl for folding—this gives you more room to maneuver your spatula without repeatedly mashing the batter.
Internal Linking Opportunities
If you love the meringue process required for these cookies, you should check out our article on “Mastering the Perfect French Meringue” for more advanced techniques!
🍰 Accompagnements Suggérés: Beyond Tiramisu
While the primary use of a Homemade Ladyfingers Recipe is, of course, the iconic tiramisu, don’t limit your creativity! These light biscuits are versatile and delicious on their own.
- Classic Dipping: Serve them alongside a warm cup of coffee, espresso, or even a glass of sweet wine (like Moscato d’Asti or Vin Santo) for a simple, elegant snack.
- Fruit Trifles: Layer them in a glass bowl with fresh whipped cream and seasonal berries (strawberries, raspberries, blueberries). The ladyfingers soak up the berry juices beautifully.
- Charlotte Cakes: Use them vertically to line a springform pan, creating the classic “fence” for a Charlotte dessert filled with mousse or Bavarian cream. This is a wonderful way to showcase the beauty and texture of your Homemade Ladyfingers.
- Chocolate Sauce: Offer them alongside a rich, homemade dark chocolate dipping sauce for a sophisticated dessert platter.
Why stick to the same store-bought packaging when you can transform simple pantry items into such a versatile, bakery-quality base?
👩🍳 Concluding Thoughts: The Joy of Homemade
There is immense joy in taking simple ingredients—eggs, sugar, and flour—and unlocking the potential to create something as sophisticated and light as these Homemade Ladyfingers. You’ve not only baked a batch of cookies; you’ve mastered a classic French-Italian sponge technique that will elevate every dessert you make from now on.
This journey is all about sustainable lifestyle changes in your kitchen—choosing quality and flavor over convenience. I hope you feel truly empowered by your success!
À vos tabliers! Did you use these to make a tiramisu, or did you dip them straight into your coffee? I’d love to hear about your experience, especially if this was your first time tackling a sponge cookie! Share your photos and stories in the comments below.
Bon appétit!