Salut les gourmands!
Have you ever had a craving for that creamy, comforting taste of cheesecake combined with the salty, decadent punch of peanut butter, but the thought of turning on the oven was just too much? That’s exactly how I felt last summer when I stumbled upon this genius recipe for No-Bake Peanut Butter Cheesecake Balls. I was hosting a last-minute get-together, and I needed a dessert that looked impressive but took zero effort. These little orbs of joy were the perfect solution! They deliver all the tangy, smooth richness of a classic cheesecake, swirled with intense peanut butter flavor, all contained in a perfect, bite-sized truffle. They literally take $15 \text{ minutes}$ of active work before chilling. This recipe is your secret weapon for quick entertaining or just satisfying that intense dessert urge. Get ready to transform your dessert game with this quick, creamy, and guaranteed crowd-pleaser!

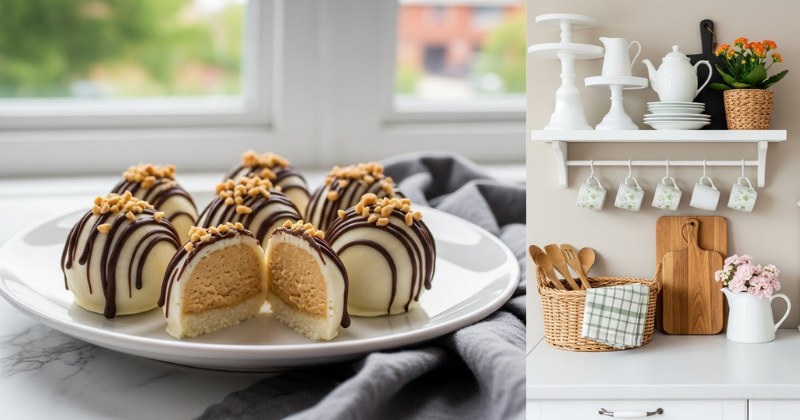
🥜 Presentation of the No-Bake Peanut Butter Cheesecake Balls
These No-Bake Peanut Butter Cheesecake Balls are the ultimate marriage of simplicity and indulgence. They combine a rich, velvety filling (the “cheesecake” component) with a crunchy, sweet coating, requiring no oven time whatsoever. They are perfect for parties, gift-giving, or simply stashing in the freezer for a quick treat.
| Category | Detail |
| Active Prep Time | 15 minutes |
| Chilling Time (Filling) | 1 hour (Minimum) |
| Rolling & Setting Time | 20 minutes |
| Total Time | Approximately 1 hour 35 minutes |
| Servings | 20-25 balls |
| Difficulty | Easy |
| Key Keyword | No-Bake Peanut Butter Cheesecake Balls |
This is an incredibly forgiving and adaptable recipe, making it ideal for beginners who want to achieve a stunning dessert without the stress of baking.
🧀 Essential Ingredients for Creamy Perfection
The quality of your ingredients, especially the peanut butter and cream cheese, will dictate how smooth and flavorful your No-Bake Peanut Butter Cheesecake Balls turn out.
For the Cheesecake Filling
- $8 \text{ ounces}$ cream cheese, softened (Full-fat block cream cheese is best!)
- $1/2 \text{ cup}$ smooth, creamy peanut butter (Natural style works, but stir well!)
- $1/2 \text{ cup}$ powdered sugar, sifted
- $1 \text{ teaspoon}$ vanilla extract
- Pinch of salt (essential to balance the sweetness)
For the Coating
- $12 \text{ ounces}$ semi-sweet or milk chocolate melting wafers (or high-quality chocolate chips)
- $1 \text{ tablespoon}$ shortening or coconut oil (to thin the chocolate for dipping)
- $1/4 \text{ cup}$ finely chopped peanuts (for garnish)
- $1 \text{ teaspoon}$ flaky sea salt (for a dramatic finish)
Related Keywords for SEO:
- Easy no-bake desserts
- Peanut butter cream cheese truffles
- Bite-sized dessert recipe
- Cheesecake fat bombs
🧑🍳 Preparation: The Quick Path to Decadence
You won’t believe how quickly this No-Bake Peanut Butter Cheesecake Balls filling comes together! Make sure your cream cheese is truly soft before starting—this prevents lumps.
Step 1: Making the No-Bake Filling
- Cream the Base: In a large mixing bowl, beat the softened cream cheese using an electric mixer until it is completely smooth and fluffy. Scrape down the sides of the bowl often.
- Add Peanut Butter: Beat in the $1/2 \text{ cup}$ of peanut butter until fully combined. The mixture should already be wonderfully creamy.
- Sweeten and Flavor: Gradually beat in the sifted powdered sugar, vanilla extract, and the pinch of salt until the filling is homogenous and perfectly smooth.
- Initial Chill: Cover the bowl and refrigerate the filling for at least $1 \text{ hour}$. This is a non-negotiable step! The mixture must be firm enough to roll into balls.
Step 2: Rolling the Balls
- Prep Station: Line a baking sheet with parchment paper. Have a small bowl of extra powdered sugar or cocoa powder nearby to dust your hands.
- Scoop: Use a small cookie scoop ($1 \text{ tablespoon}$ size) or a spoon to portion out the chilled peanut butter mixture.
- Roll: Working quickly, roll the scooped portions into smooth, compact balls. Place them back on the parchment-lined baking sheet.
- Freeze (Quick Tip): Place the tray of rolled balls in the freezer for an extra $10 \text{ minutes}$. This makes them extremely cold and easier to dip into the warm chocolate without melting.
Step 3: Dipping and Finishing
- Melt Chocolate: Combine the chocolate wafers and the shortening/coconut oil in a microwave-safe bowl. Microwave in $30 \text{-second}$ intervals, stirring well after each one, until the chocolate is smooth and melted. The shortening/coconut oil makes the chocolate thinner and smoother for dipping.
- Dip: Remove the peanut butter balls from the freezer. Using a fork or a toothpick, dip each ball completely into the melted chocolate. Tap the fork gently against the side of the bowl to allow excess chocolate to drip off.
- Garnish: Immediately place the coated ball back on the parchment. While the chocolate is still wet, sprinkle with chopped peanuts or flaky sea salt.
- Final Set: Return the tray to the refrigerator for $15 \text{ minutes}$ to allow the chocolate coating to fully set.
💡 Petit conseil pro: Achieving the Perfect Coating
Dipping truffles can be tricky, but this technique will transform your process and prevent cracked coatings.
- Temperature Contrast: Petit conseil pro: The key to a thin, even, crack-free coating is temperature contrast. The peanut butter balls must be very cold (frozen for $10 \text{ minutes}$), and the chocolate must be warm and thin. The cold truffle instantly sets the chocolate, locking in the flavor and shape.
- Troubleshoot Thick Chocolate: If your melted chocolate is too thick, simply add $1/2 \text{ teaspoon}$ more shortening or coconut oil and stir until it reaches a thin, pourable consistency. Using a thinned coating is the secret to getting a smooth finish without a bulky layer of chocolate.
- The Two-Fork Method: If you don’t have a dipping tool, use two forks. Drop the ball onto the tines of the first fork, then use the second fork to push it off onto the parchment. This is a great Home Tips & DIY shortcut for smooth dipping.
☕ Accompagnements Suggérés: Serving Your Bites
These No-Bake Peanut Butter Cheesecake Balls are rich enough to stand alone, but they pair beautifully with simple beverages that cut through their intense sweetness.
- Beverage Pairing: Serve them alongside small glasses of cold milk (for a nostalgic pairing!) or a strong, unsweetened black coffee. The bitterness of the coffee creates a wonderful contrast to the peanut butter and chocolate.
- Sweet Dip: For a truly decadent experience, serve them chilled on a platter with a small bowl of warm salted caramel sauce for optional dipping.
- Presentation: Arrange them in mini cupcake liners (the small foil kind are perfect) for easy handling and an elegant, uniform look on a dessert table.
- Personal Connection: I always use a touch of flaky sea salt on the top of about half the batch—the burst of saltiness is highly addictive and truly unlocks the peanut butter flavor! This encouraging language motivates action and customization.
🎁 The Ultimate Easy Edible Gift
The simplicity and shelf-stability of these Peanut Butter Cream Cheese Truffles make them the perfect homemade edible gifts. Because they contain no water, they hold up wonderfully.
- Gifting Strategy: Place them in small, attractive tins or boxes lined with shredded paper. They transport well when kept cool and look incredibly professional.
- Cost-Saving Benefit: Compared to specialty chocolate shops, crafting a batch of $25$ luxury truffles costs a fraction of the price, allowing you to spread holiday cheer or party favors widely.
- Custom Coatings: Use different coatings to denote different flavors—roll some in cocoa powder, others in melted white chocolate, and the rest in dark chocolate.
This ability to create a visually stunning and delicious gift provides huge satisfaction of completion.
💡 Variations and Next-Level Tips
Once you’ve mastered the basic No-Bake Peanut Butter Cheesecake Balls recipe, you can easily encourage experimentation with different flavors.
- Peanut Butter Swirl: After dipping in chocolate, drizzle the top with a tiny bit of melted peanut butter mixed with coconut oil for an elegant, two-toned swirl.
- Crispy Center: Fold $1/4 \text{ cup}$ of finely crushed graham crackers or puffed rice cereal into the chilled peanut butter filling for an added textural crunch.
- Boozy Treat: For an adult version, replace $1 \text{ teaspoon}$ of the vanilla extract with a teaspoon of Bourbon or Irish Cream.
This recipe is a brilliant General Lifestyle/Casual Tip for effortlessly elevating your entertaining skills.
À vos tabliers! Grab that cream cheese and peanut butter, and get ready to create the most creamy, quick, and crowd-pleasing dessert you’ve ever made.
Bon appétit!