
Learn to make your own salve with this muscle soothing salve recipe! Discover how to blend natural oils and beeswax for a potent, DIY recovery balm at home.
Have you ever finished a long day of gardening, a tough workout, or just hours of sitting at a desk and felt that deep, nagging ache in your shoulders or legs? We have all been there, reaching for store-bought creams that often smell like a medicine cabinet and are filled with synthetic ingredients. But what if you could make your own salve that smells like a spa and works with your body’s natural healing processes?
Creating a muscle soothing salve is a transformative experience. Not only will you discover how to unlock the power of botanicals, but you will also gain the satisfaction of knowing exactly what is going onto your skin. This guide is designed to empower you to take your wellness into your own hands. By the time you finish reading, you will have the confidence to craft a professional-grade balm that brings cooling relief and warm comfort to your tired muscles. Let’s embark on this journey toward natural recovery together!
Foundation: Why You Should Make Your Own Salve
Before we jump into the melting pot, it is important to understand what makes a salve truly effective. When you choose to make your own salve, you are essentially creating a concentrated “hug” for your skin and muscles. Unlike lotions, which are water-based and evaporate quickly, salves are oil-based. This allows the active ingredients to sit on the skin longer, penetrating deeper into the tissues where the tension lives.
The Anatomy of a Muscle Soothing Salve
A great muscle soothing salve typically consists of three main parts:
- Infused Carrier Oils: These provide the “slip” and initial nourishment.
- Beeswax (or Candelilla Wax): This acts as the hardening agent and creates a protective barrier.
- Essential Oils: These are the “active” powerhouses that provide the heating or cooling sensations.
Addressing Common DIY Hesitations
If you feel a bit nervous about working with waxes or herbs, don’t be! Many beginners worry about the “perfect” consistency or the safety of essential oils. The beauty of DIY wellness is that it is incredibly forgiving. If your salve is too soft, you can melt it down and add more wax. If it’s too hard, add a splash more oil. This process is all about progress and finding what works best for your body.
Step-by-Step: Crafting Your Muscle Soothing Salve
Ready to get started? This process is as much about the ritual as it is about the result. Follow these clear, actionable steps to ensure your first batch is a success.
Required Tools and Ingredients
- The Base: 1 cup of Olive oil or Coconut oil (Infused with Arnica or Calendula for extra power!).
- The Structure: 1/4 cup of Beeswax pellets.
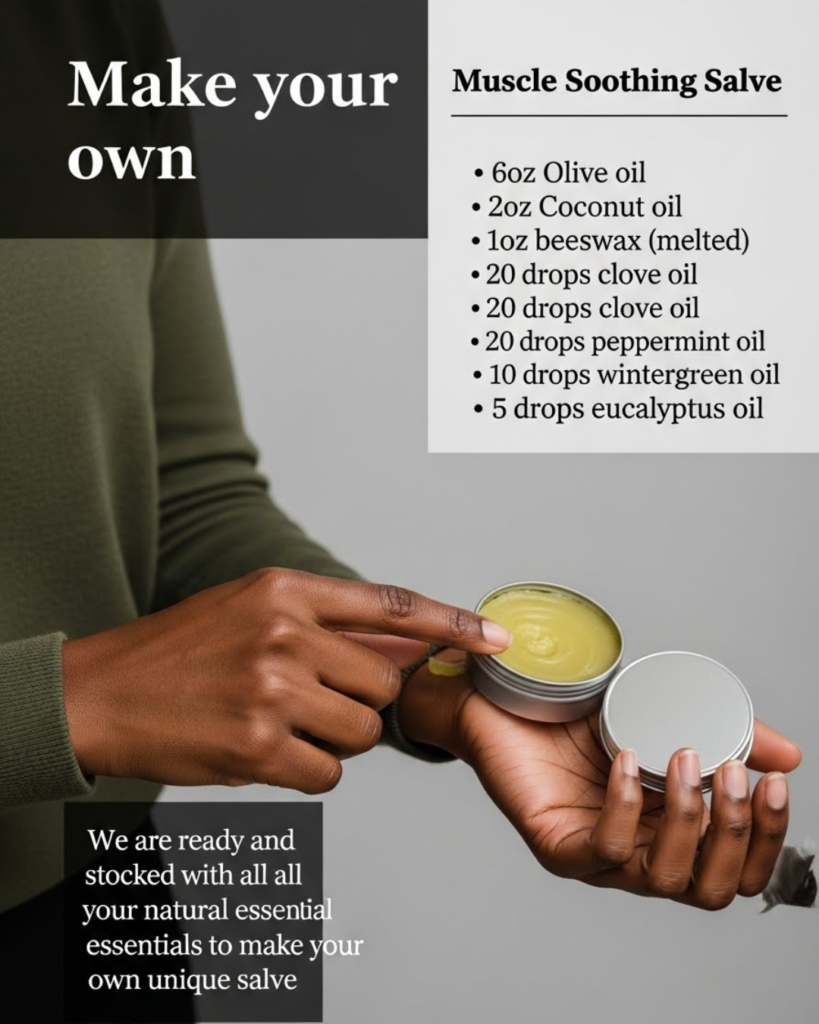
- The Relief: 20 drops of Peppermint essential oil (cooling) and 20 drops of Eucalyptus or Ginger essential oil (warming/circulatory).
- Tools: A double boiler (or a glass bowl over a pot of water), glass jars for storage, and a stir stick.
The Core Method
- Melt the Base: Place your carrier oil and beeswax pellets into the double boiler. Use low heat. High heat can damage the delicate nutrients in the oil, so be patient!
- The Stirring Ritual: Stir gently until the wax is completely liquid and clear. This is a great time to set an intention for your healing balm.
- The Temperature Check: Once melted, remove the mixture from the heat. Let it cool for about 2–3 minutes before adding your essential oils. Adding them while the wax is boiling hot can cause the beneficial compounds to evaporate.
- Add the “Magic”: Stir in your essential oils. You will immediately smell the refreshing aroma of the muscle soothing salve coming to life.
- The Pour: Carefully pour the liquid into your glass jars. Let them sit undisturbed at room temperature for at least two hours to fully set.
Timing and Planning
Total active time is only about 15 minutes, but the cooling phase is crucial. Avoid the temptation to put them in the fridge to speed it up, as this can cause the salve to crack or become grainy.
Advanced Strategies: Expert Customization
Once you have achieved success with the basic recipe, you can begin to share expert-level insights by customizing your balm for specific needs.
Incorporating Herbal Infusions
To take your muscle soothing salve to the next level, try infusing your carrier oil with dried herbs first. Arnica is legendary for bruising, while St. John’s Wort is excellent for nerve-related tension. Simply place the herbs and oil in a slow cooker on “warm” for 4 hours, strain, and then use that oil as your base.
Creating Different Strengths
Not every ache is the same. You can customize the “kick” of your salve:
- The “Ice” Blend: Focus on Peppermint and Wintergreen for a sharp, cooling sensation after a hot workout.
- The “Heat” Blend: Focus on Black Pepper and Ginger essential oils to increase blood flow to cold, stiff joints.
- The “Relax” Blend: Add Lavender to the mix to help soothe the mind along with the body before sleep.
Featured Snippet: How long does homemade muscle salve last?
When stored in a cool, dark place in an airtight glass jar, your DIY muscle soothing salve will stay potent and fresh for 6 to 12 months. To maximize its shelf life, ensure your tools are completely dry during the making process, as moisture is the primary cause of spoilage in oil-based products.
Troubleshooting: Common Challenges and Solutions
Even the most seasoned DIYers hit a snag now and then. If things don’t go perfectly, here is how to handle frequent obstacles with encouragement:
- My salve is too hard: This usually means you used a bit too much beeswax. Simply put the jars back into a warm water bath until they melt, add a tablespoon of carrier oil, and let them reset.
- The scent isn’t strong enough: Every person’s sensitivity is different. You can safely add more essential oils (up to 2% dilution) if you feel you need a stronger therapeutic effect.
- The oil and wax are separating: This happens if the wax was cooled too quickly or not stirred enough. Re-melt the mixture, give it a thorough stir, and let it cool more gradually.
Preventive Measures
Always perform a small “patch test” on your skin before applying the salve to a large area. This ensures your skin loves the ingredients as much as your muscles do!
Maximizing Results: Next Level Recovery Tips
To build upon the success of your muscle soothing salve, consider how it fits into a broader wellness lifestyle.
Complementary Strategies
- Hydration: Muscles need water to flush out lactic acid. Pair your salve application with a large glass of water.
- Internal Link Opportunity: Consider trying DIY Epsom Salt Soaks before applying your salve for a “one-two punch” of magnesium and botanicals.
- Internal Link Opportunity: Learn more about gentle stretching routines to keep your muscles limber.
- Internal Link Opportunity: Explore how to grow your own medicinal herbs like Calendula to use in your next batch.
Maintenance and Long-Term Use
Consistency is key. Instead of waiting until you are in pain, try using a small amount of your muscle soothing salve as a preventative measure on areas where you typically carry tension, such as the neck or lower back.
Conclusion: Empower Your Wellness Journey
You have successfully learned how to make your own salve, and in doing so, you have taken a massive step toward self-sufficiency and natural health. The muscle soothing salve you’ve created is more than just a remedy; it is a testament to your capability to nurture yourself. You’ve moved through the foundation, mastered the steps, and discovered how to troubleshoot like a pro.
The transformation starts with one small jar. As you apply your handmade balm and feel the tension melt away, remember that you achieved this with your own two hands. We encourage you to keep experimenting, keep learning, and most importantly, keep listening to what your body needs.
Would you like me to suggest a specific essential oil blend for chronic joint stiffness? Your path to a more natural, empowered life has just begun!
Important Disclaimer: This article is for informational purposes only and should not replace professional advice. For health-related topics, consult healthcare providers. For safety procedures, verify current best practices and local regulations. Individual results may vary, and personal circumstances should always be considered when implementing any suggestions.
Caption: Your journey to natural relief starts with one handmade jar!