Create a soothing natural sinus chest rub recipe with essential oils and coconut oil. Breathe easier and find comfort with this gentle, DIY congestion relief.
Have you ever spent a restless night tossing and turning because your nose was completely blocked and your chest felt like it was under a heavy weight? We have all been there, and it is a truly draining experience. While store-bought vapor rubs are a staple in many homes, they often contain petroleum-based ingredients or synthetic fragrances that can be irritating to sensitive skin and lungs. What if you could unlock the healing power of plants to create your own professional-grade relief? By mastering this natural sinus chest rub recipe, you can achieve a profound sense of comfort using only clean, wholesome ingredients from your own pantry.
This DIY project is designed to transform your approach to wellness. Instead of relying on harsh chemicals, you will learn to use pure essential oils and nourishing butters to soothe your airways. You are about to discover how simple it is to formulate a powerful, aromatic balm that provides a gentle bridge to easier breathing. Get ready to empower your medicine cabinet and achieve a natural state of relief. You have the capability to nurture your family’s health with this effective, homemade solution!
Foundation: Why Go Natural for Sinus Relief?
Before we dive into the mixing process, let’s build your confidence with the basic concepts of natural congestion support. Understanding the “why” behind your ingredients will help you create a better finished product.
The Power of Plant Volatiles
Essential oils are the concentrated essences of plants, containing volatile compounds that can interact with our respiratory system. When you inhale the aroma of a natural sinus chest rub recipe, the molecules travel through your nasal passages, helping to provide a sensation of openness and cooling. This is the same principle used in high-end spa treatments, but you are bringing it into your home.
Avoiding Petroleum and Parabens
Traditional rubs often use petrolatum (petroleum jelly) as a base. While effective at creating a barrier, it doesn’t allow the skin to “breathe” and offers no nutritional value to your tissues. By using a base of beeswax and coconut oil, you are providing your skin with fatty acids and vitamins while the essential oils do their work.
Reassurance for Beginners
If you are new to working with essential oils, you might feel a bit hesitant. Don’t worry! This recipe uses safe dilution ratios that are gentle yet effective. You are simply combining nature’s best elements to support your body’s natural healing processes. You’ve got this!
Step-by-Step: The Ultimate Natural Sinus Chest Rub Recipe
Ready to create your own batch of “breathe easy” balm? Follow these manageable steps to achieve a smooth, professional consistency every time.
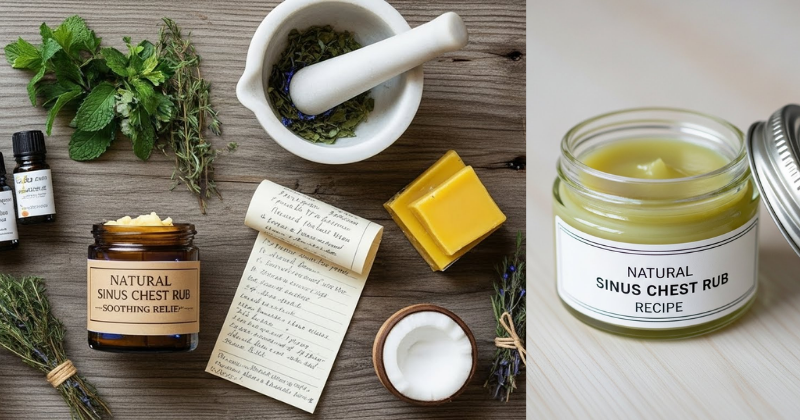
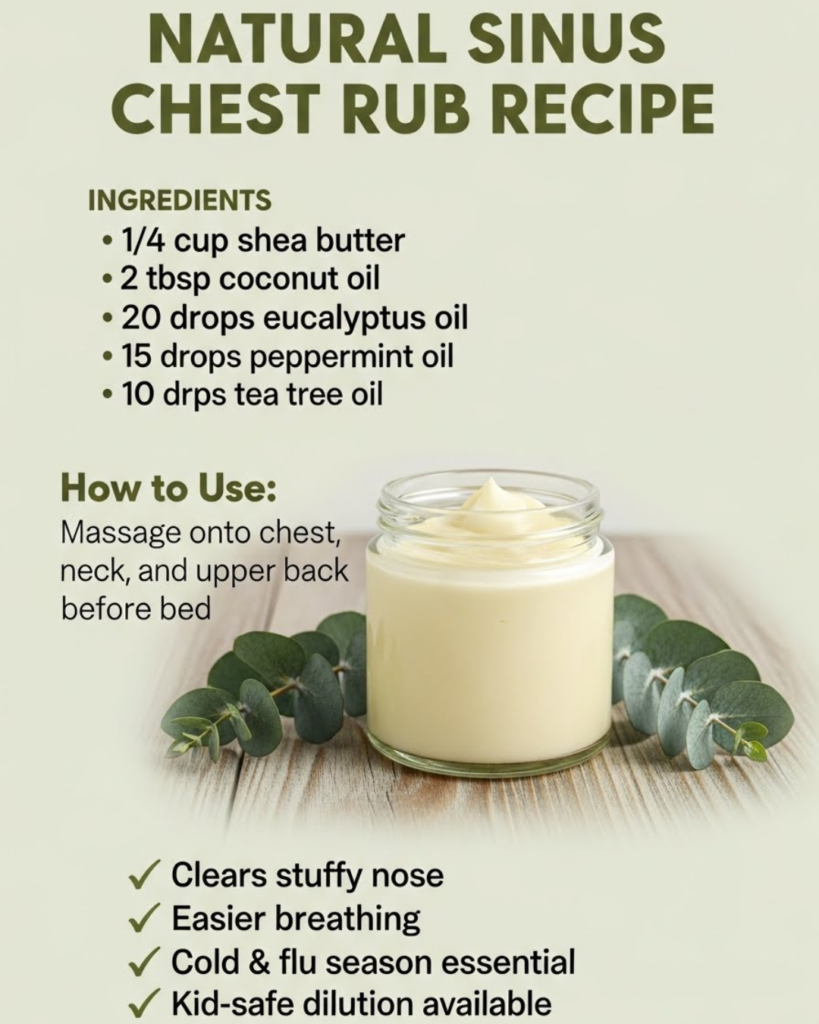
Ingredients and Tools
- 1/2 cup Virgin Coconut Oil: Provides a creamy, skin-loving base.
- 2 tablespoons Shea Butter: Adds a luxurious texture and stays solid at room temperature.
- 2 tablespoons Beeswax Pellets: Ensures the rub doesn’t melt in your hands too quickly.
- Essential Oils: 20 drops Eucalyptus, 15 drops Peppermint, 10 drops Rosemary, and 5 drops Lavender.
- Glass jars: Small 2-ounce tins or jars are perfect for storage.
The Melting Process
- The Double Boiler: Place the coconut oil, shea butter, and beeswax in a heat-safe glass bowl. Set this over a pot of simmering water.
- Combine: Stir gently until all ingredients have melted into a clear, golden liquid.
- The Cooling Gap: This is a vital pro tip! Remove the bowl from the heat and let it sit for 3–5 minutes. You want it to be liquid but not “steaming” hot. If it’s too hot, the therapeutic properties of the essential oils may diminish.
- Add the Oils: Stir in your eucalyptus, peppermint, rosemary, and lavender oils.
- The Pour: Carefully pour the mixture into your jars.
- The Set: Leave the jars undisturbed for about 2 hours until they are firm and opaque.
Timing and Planning
This recipe takes about 10 minutes of active prep and 2 hours to set. It is a great activity for a Sunday afternoon so you are prepared before the next “stuffiness” strike.
Advanced Strategies: Customizing Your Sinus Support
Once you’ve mastered the basic natural sinus chest rub recipe, you can share expert-level insights by tailoring the blend to your specific needs.
Kid-Safe Variations
For children under the age of 10, eucalyptus and peppermint can sometimes be too strong. To customize the approach for little ones, swap the Eucalyptus for Tea Tree oil and the Peppermint for Spearmint. It provides a much gentler cooling sensation while still supporting clear breathing.
The “Foot Rub” Secret
Did you know that applying a sinus rub to the soles of your feet can be just as effective as the chest? The pores on the feet are large, allowing for quick absorption. Apply the rub to the feet and put on warm socks before bed for a “next level” overnight treatment.
Featured Snippet: What is the best essential oil for a sinus chest rub?
The most effective essential oil for a sinus rub is Eucalyptus globulus or Eucalyptus radiata. These oils contain high levels of 1,8-cineole, a compound scientifically recognized for its ability to help clear mucus and provide a cooling, opening sensation in the respiratory tract.
Troubleshooting: Common Challenges and Solutions
Even with the best recipes, sometimes things don’t go perfectly. Here is how to handle frequent obstacles with encouragement:
- “My rub is too hard”: This usually means there was a bit too much beeswax. Solution: Melt it down again and add a tablespoon of liquid carrier oil, like jojoba or sweet almond oil.
- “The scent isn’t strong enough”: Everyone’s sensitivity is different. If you find it too faint, you can add 5 more drops of Peppermint. However, always stay within a 3% dilution for safety!
- “It feels grainy”: This happens if the shea butter cools too slowly. To fix this, melt it again, then put the finished jars directly into the refrigerator to “flash-cool” them.
Preventive Measures
Always test a small “patch” on your inner arm before applying the rub to your chest. This ensures your skin loves the ingredients as much as your sinuses do!
Maximizing Results: Holistic Congestion Relief
Now that you have your rub, you can build upon your success by looking at complementary ways to stay healthy.
Next Level Tips
- Hydration: Drink plenty of water to help thin out mucus while using your rub.
- Internal Link Opportunity: If your congestion is caused by environmental factors, find out why mold keeps coming back in bathrooms to clear up your home’s air.
- Internal Link Opportunity: Support your immune system by learning how to make homemade organic magnesium lotion.
- Internal Link Opportunity: If your skin is feeling dry from the winter air, check out this DIY face cream with rosehip oil for deep hydration.
- Internal Link Opportunity: Create a relaxing atmosphere for recovery by learning to make cozy candles at home.
Maintenance and Long-Term Success
Store your chest rub in a cool, dark place. Because it contains no water or synthetic preservatives, it can stay fresh for up to a year if kept away from direct sunlight. By making this yourself, you are achieving a sustainable, cost-effective way to care for your family’s wellness.
Conclusion: Breathe Deeply and Live Fully
You have now discovered the ultimate natural sinus chest rub recipe. You have moved from being a consumer of synthetic products to an empowered creator of natural wellness. By following this guide, you have achieved a professional-quality balm that provides comfort and relief whenever you need it most.
The transformation to a more natural lifestyle is a journey of many small, rewarding steps. We encourage you to whip up a batch today so you are ready for the next seasonal change. You are more than capable of taking charge of your health!
Would you like me to help you create a “Wellness Kit” checklist with other natural remedies? Your path to natural breathing is just beginning!
Important Disclaimer: This article is for informational purposes only and should not replace professional advice. For health-related topics, consult healthcare providers. For financial or legal matters, seek qualified professional guidance. For safety procedures, verify current best practices and local regulations. Individual results may vary, and personal circumstances should always be considered when implementing any suggestions.
Caption: Breathe easy with the power of nature!