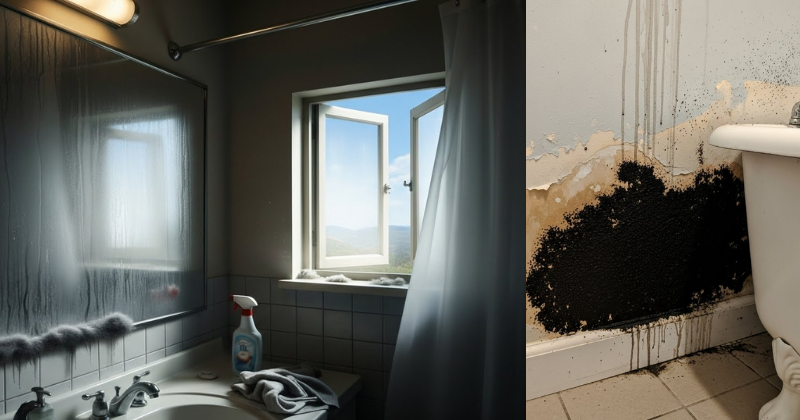
Bathrooms don’t grow mold because of steam—it’s what happens after that determines if your home stays fresh or becomes a breeding ground for spores. Learn the truth here! If you have ever stepped out of a hot, relaxing shower only to see your mirror fogged up and your walls dripping with moisture, you have seen the beginning of a potential problem. But here is the secret: that cloud of steam isn’t the villain of the story. The real issue is the lingering moisture that stays behind long after you have dried off.
In this guide, you will discover why your current cleaning routine might be missing the mark and how a few simple, post-shower habits can transform your bathroom into a sparkling, mold-free sanctuary. We are going to unlock the science of moisture control and give you the tools to achieve a healthier home environment. You don’t need a massive renovation budget to stop mold; you just need to understand what happens when the bathroom door closes.

The Foundation: Why Steam Isn’t the Enemy
It is a common myth that steam itself causes mold. If that were true, every sauna in the world would be covered in fuzzy black spots! The reality is that steam is just water in a gaseous state. It is light, airy, and generally harmless. The problem starts when that steam hits a surface that is cooler than the air—like your tiles, mirror, or ceiling—and turns back into liquid water. This process is called condensation.
The Mold Triangle
To understand how to protect your home, you need to know what mold needs to survive. Think of it as a triangle: mold requires food, warmth, and moisture. Your bathroom provides plenty of food in the form of soap scum, skin cells, and even the paper backing on drywall. It provides warmth because of your heaters and hot water. The only part of the triangle you can truly control is the moisture.
Why Condensation Lingers
When steam cools down and becomes liquid water, it seeks out cracks and crevices. If your bathroom stays “muggy” for hours after a shower, you are essentially providing an all-you-can-eat buffet for mold spores. The goal isn’t to stop the steam—it’s to stop the condensation from sitting still. By focusing on what happens after the shower, you can break the mold triangle and keep your bathroom pristine.
The Post-Shower Checklist: Actionable Steps to Stop Mold
Building a mold-resistant bathroom is about creating a “exit strategy” for moisture. You can achieve amazing results by implementing these simple, step-by-step methods immediately after you turn off the water.
1. The 20-Minute Fan Rule
Most people turn their bathroom fan off as soon as they leave the room. This is a mistake! The fan needs time to exchange the humid air for dry air.
- The Action: Keep your ventilation fan running for at least 20 minutes after your shower ends.
- Pro Tip: If you tend to forget, consider installing a timer switch. This allows you to set it and forget it, ensuring the air is fully cleared without wasting electricity all day.
2. The Squeegee Method
This is perhaps the most effective DIY home tip for preventing mold. By physically removing the water from your shower walls and glass, you are getting rid of 90% of the moisture that would otherwise evaporate into the room.
- The Action: Take 30 seconds to squeegee the walls and the floor of the shower.
- The Benefit: Not only does this stop mold, but it also prevents the buildup of hard water stains and soap scum, making your deep-cleaning days much easier!
3. Manage Your Textiles
Damp towels and bath mats are secret moisture reservoirs. If you leave a bunched-up towel on a hook, the center stays wet for hours, contributing to the overall humidity of the room.
- The Action: Spread towels out flat on a bar so they dry quickly.
- The Action: If your bath mat feels soggy, hang it over the side of the tub or a rail to let air circulate through the fibers.
Advanced Strategies: Expert-Level Moisture Control
Once you have the basics down, you might want to look at “next-level” ways to customize your approach. These strategies involve minor upgrades that pay off in a big way for long-term home maintenance.
Upgrading Your Ventilation
Not all bathroom fans are created equal. If your fan sounds like a jet engine but the mirror is still foggy after 10 minutes, it might not be moving enough air.
- Check the CFM: Fans are rated by Cubic Feet per Minute (CFM). A general rule is that you need 1 CFM for every square foot of bathroom space.
- Humidity Sensors: You can now buy fans with built-in sensors that automatically turn on when they detect a rise in humidity and turn off only when the air is dry. This is a “set-it-and-forget-it” dream for busy homeowners.
Anti-Microbial Materials
If you are planning a small refresh or a DIY project, consider the materials you are using. Some products are specifically designed to resist the “what happens after” moisture phase.
- Mold-Resistant Drywall: Often called “green board” or “purple board,” this drywall is treated to resist moisture absorption.
- Semi-Gloss Paint: Higher-gloss paints have a tighter molecular structure that makes it harder for water to soak in and easier for you to wipe down.
“A bathroom that breathes is a bathroom that stays healthy.”
Troubleshooting Common Bathroom “Hot Spots”
Even with the best habits, some bathrooms have architectural quirks that make moisture control difficult. Let’s look at how to handle these common obstacles.
The Windowless Bathroom
If you don’t have a window or a fan, you might feel like your situation is hopeless. It’s not!
- The Solution: Use a small, portable dehumidifier. Placing a compact unit on the counter and running it for an hour after your shower can pull pints of water out of the air.
- Cross-Ventilation: Open the bathroom door and the nearest window in the hallway or bedroom to create a draft that pulls the steam out.
Peeling Paint and Grout Cracks
Sometimes mold grows behind the surfaces because water has found a way in.
- The Prevention: Check your caulking and grout regularly. If you see a crack, water is getting in there and staying trapped.
- The Fix: Re-caulking is a simple DIY project that can save you thousands in mold remediation costs. Always use 100% silicone caulk designed for kitchen and bath use.
Hidden Leaks
Is your bathroom always humid even when no one has showered? You might have a slow leak behind the toilet or under the sink.
- The Test: Check your water meter before and after a period of non-use. If it moves, you have a leak that is contributing to a constant moisture problem.
Maximizing Results: Sustainable Success
To truly achieve a mold-free home, you need to build upon your initial success. Think of moisture management as a lifestyle change for your house.
- Regular Maintenance: Once a month, wipe down your walls with a mixture of water and vinegar. This is a fantastic natural cleaning solution that kills mold spores before they can take root.
- Air Circulation: Keep the bathroom door open whenever the room is not in use. This allows the home’s HVAC system to help regulate the temperature and humidity in the space.
- Seasonal Adjustments: In the summer, humidity levels are naturally higher. You may need to run your fan longer or use a dehumidifier more frequently than you would in the dry winter months.
By focusing on the “what happens after,” you are taking a proactive stance. You are no longer just reacting to mold—you are preventing it from ever having a chance to grow. This approach saves you money, protects your health, and keeps your home looking beautiful.
Important Disclaimer: This article is for informational purposes only and should not replace professional advice. For health-related topics, consult healthcare providers. For financial or legal matters, seek qualified professional guidance. For safety procedures, verify current best practices and local regulations. Individual results may vary, and personal circumstances should always be considered when implementing any suggestions.
Conclusion
You now have the knowledge to transform your bathroom from a moisture trap into a clean, dry retreat. Remember, the steam from your shower isn’t the problem; it’s the liquid water that stays behind. By using the 20-minute fan rule, mastering the squeegee, and ensuring proper ventilation, you can stop mold before it even starts.
You are fully capable of maintaining a healthy home environment with these simple, achievable habits. The satisfaction of a mold-free bathroom is worth the extra few minutes of effort each day. Start today by timing your fan or wiping down those walls, and watch how much easier your home maintenance becomes!