
Discover how to make a homemade all natural skin balm for dry skin. Learn the best DIY recipe using shea butter and oils to soothe and hydrate your skin naturally.
Do you ever feel like your skin is constantly thirsty, no matter how much lotion you apply? Dry, itchy, or cracked skin isn’t just a cosmetic nuisance; it can be genuinely uncomfortable and even painful during the colder months. Many store-bought moisturizers are filled with water and alcohol, which can actually leave your skin feeling drier in the long run. But imagine a rich, buttery solution that seals in moisture and provides a protective barrier against the elements. Today, you are going to learn how to create a homemade all natural skin balm for dry skin that is pure, potent, and incredibly effective.
By switching to a DIY balm, you are choosing to feed your skin only the highest quality nutrients without any mysterious chemicals or synthetic fragrances. This guide provides achievable, step-by-step guidance to help you craft a luxury-grade product in your own kitchen. You have the capability to transform your skincare routine and unlock a level of softness you haven’t felt in years. Get ready to discover how a few simple ingredients can achieve a total breakthrough for your skin’s health and glow!
Foundation: Why a Natural Balm Beats Commercial Lotions
Before we get to the double boiler, let’s build your confidence with the basic concepts of natural skin care. Understanding the “why” behind the ingredients will help you appreciate the healing power of your homemade all natural skin balm for dry skin.
The Difference Between Lotion and Balm
Most commercial lotions are 60-80% water. While they feel light, the water evaporates quickly, often taking your skin’s natural oils with it. A balm, however, is anhydrous (meaning it contains no water). It is a concentrated blend of fats and waxes that creates an occlusive layer, literally locking moisture into your cells.
Key Components for Deep Hydration
- Shea Butter: Rich in vitamins A and E, it acts as a powerful emollient.
- Beeswax: This provides the “shield,” protecting your skin from wind and cold while letting it breathe.
- Carrier Oils: Ingredients like sweet almond or jojoba oil penetrate deep into the dermis to nourish from within.
Reassurance for Beginners
If you’ve never made your own beauty products, don’t worry! This process is as simple as melting and stirring. You are doing a great job by taking control of what goes on your body. You have everything you need to succeed, and the results will be far more satisfying than anything you can find on a pharmacy shelf.
Step-by-Step: The Perfect Recipe for Silky Skin
Ready to create your “holy grail” moisturizer? Follow these manageable steps to craft a batch of homemade all natural skin balm for dry skin.
1. Gather Your Supplies
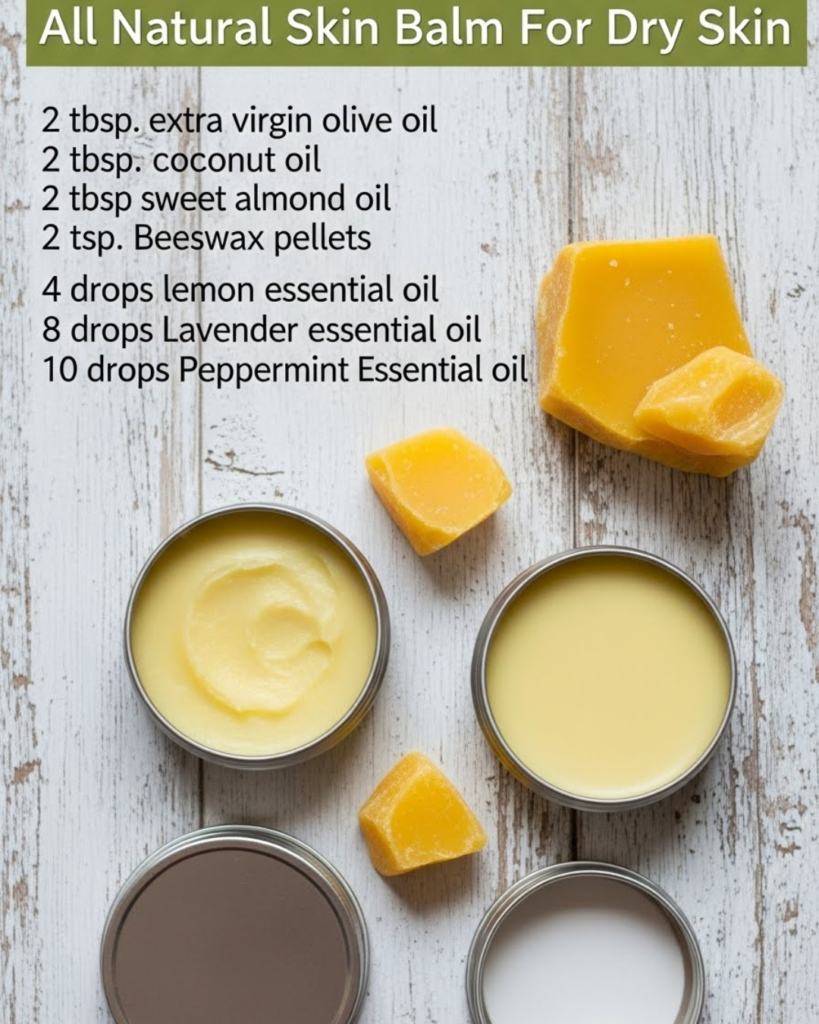
To make a standard 4oz jar of balm, you will need:
- 1/4 cup Shea Butter: The creamy base.
- 2 tablespoons Coconut Oil: For easy spreading and antibacterial properties.
- 1 tablespoon Beeswax Pellets: To provide structure and protection.
- 1 tablespoon Jojoba or Sweet Almond Oil: For deep penetration.
- 10-15 drops Lavender or Frankincense Essential Oil: For soothing and scent.
2. The Melting Process
- Step 1: Create a “double boiler” by placing a glass bowl over a pot of simmering water.
- Step 2: Add the beeswax, shea butter, and coconut oil to the bowl. Stir gently until completely melted and clear.
- Step 3: Remove from heat and stir in your jojoba oil and essential oils.
- Step 4: Pour the liquid immediately into a clean glass tin or jar.
3. Cooling and Storage
Allow the balm to sit undisturbed at room temperature for at least 3 hours until it is solid. Store it in a cool, dry place to maintain its consistency.
- Internal Link: To keep your DIY workspace as clean as your new balm, discover the secret of the Magic Cleaning Paste for an easy kitchen cleanup.
Advanced Strategies: Customizing Your Balm for Specific Needs
Once you have mastered the basic recipe, share expert-level insights with yourself to adapt the balm for different areas of your body.
The “Intensive Heel” Variation
For cracked heels or rough elbows, add an extra tablespoon of beeswax. This creates a thicker, more protective barrier that stays on the skin longer during sleep.
- Internal Link: If you’re focusing on circulation in your legs as well, learn how Garlic and Cloves Naturally Support Better Circulation.
The “Calming Night” Blend
To use your balm as a relaxing nighttime hand treatment, use a combination of Lavender and Cedarwood essential oils.
- Internal Link: Pair your skin ritual with a cup of Dreamy Lavender Sleep Milk to ensure your mind is as relaxed as your skin.
Featured Snippet: What is the best way to apply skin balm for dry skin?
To get the best results from a homemade all natural skin balm for dry skin, apply it to slightly damp skin immediately after a shower or bath. Because the balm is an occlusive, it works by trapping the water already on your skin into the pores. A pea-sized amount is usually enough for both hands—warm it between your palms first to melt it into a silky oil.
Troubleshooting: Common Challenges and Solutions
Even the simplest DIY projects can have a few hiccups. Here is how to handle them with an empowering mindset:
- “My balm feels grainy”: This usually happens if the shea butter cools too slowly.
- Solution: Re-melt the balm and place the jar in the refrigerator immediately after pouring to “flash-cool” it. This keeps the fats from crystallizing.
- “It’s too hard to scoop out”: * Fix: You likely added a bit too much beeswax. Melt it down again and add a teaspoon of jojoba oil to soften the texture.
- “It feels too greasy”:
- Tip: Remember, a little goes a long way! If it still feels heavy, try adding 1/2 teaspoon of arrowroot powder to the mixture while melting; this creates a “dry” finish on the skin.
- Internal Link: If you’re feeling too tired to start a project, check out A Simple Self-Care Ritual That Feels Like a Reset Button to find your spark.
Maximizing Results: The Full Glow Lifestyle
Now that you have your homemade all natural skin balm for dry skin, let’s build upon that success by optimizing your skin health from the inside out.
Hydration and Nutrition
External moisture is only half the battle. To keep your skin plump, ensure you are drinking enough water throughout the day.
- Internal Link: Try the DETOX WATER to DEFLATE THE BELLY recipe, which keeps you hydrated while providing skin-loving antioxidants.
Seasonal Considerations
During winter, use your balm as a “wind shield” on your cheekbones before going for a walk. In the summer, it works beautifully as an after-sun salve to soothe parched skin.
- Internal Link: For those who love gardening, this balm is a must-have for “gardener’s hands.” Learn more in our guide on The #1 Supplement People Use for Joint Pain Relief Right Now to keep your hands moving and healthy.
Conclusion: You Are Capable of Healthy, Radiant Skin
You have now discovered the ultimate guide to creating a homemade all natural skin balm for dry skin and, more importantly, you have the achievable steps to make it a reality. You have moved from feeling frustrated by dry skin to being an empowered creator of your own luxury skincare. By following these methods—layering high-quality fats, using occlusive beeswax, and applying to damp skin—you have achieved a strategy for long-term skin health.
The journey to natural wellness is a rewarding path of self-care. We encourage you to whip up your first batch this weekend! You are more than capable of achieving a high-quality, vibrant life using the simple, healing ingredients nature has provided.