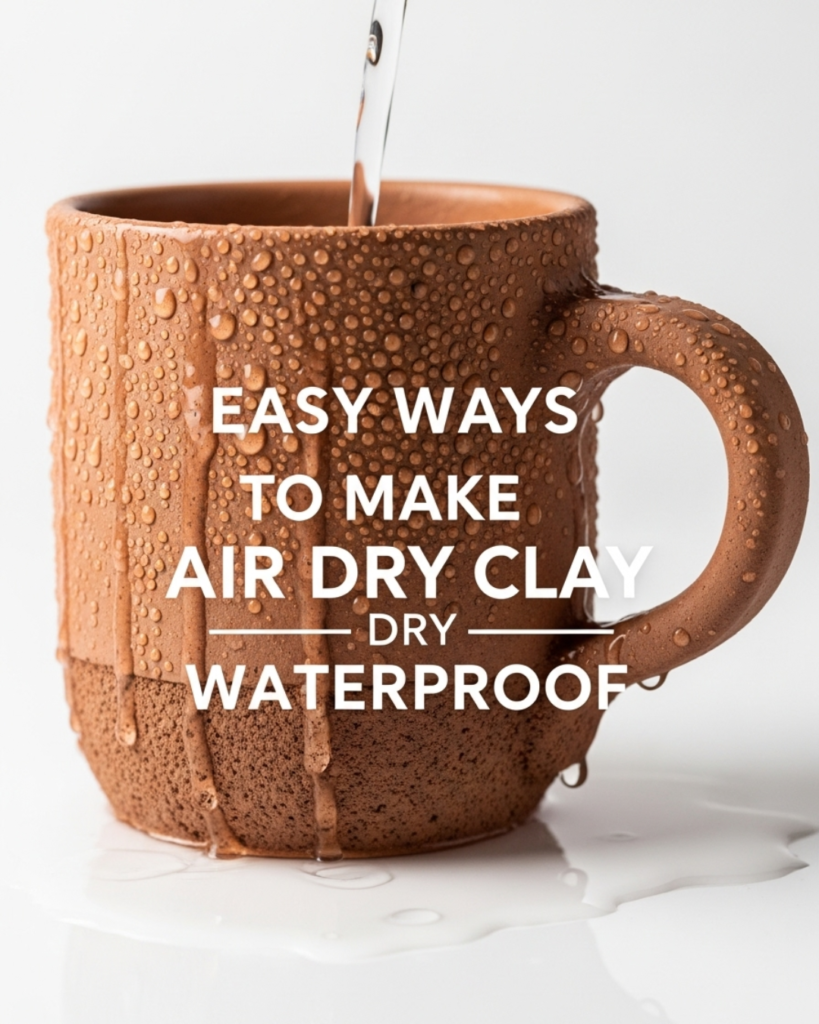
Learn how to make air dry clay waterproof with this comprehensive guide. Discover the best sealants and techniques to protect your DIY clay projects from moisture today.
Have you ever spent hours meticulously sculpting a beautiful vase or a custom jewelry dish, only to watch it soften or crack the moment it touched a bit of water? It is a heartbreaking experience for any crafter. Air dry clay is one of the most accessible and versatile mediums for artists, but its greatest weakness is its porous nature. Because it doesn’t undergo the chemical transformation of kiln-fired ceramic, it remains susceptible to the elements. However, you don’t need a thousand-degree furnace to protect your creations. Understanding how to make air dry clay waterproof is the secret to turning a temporary hobby into a collection of long-lasting, functional art.
In this guide, we are going to unlock the professional techniques used by seasoned crafters to seal and shield clay. You will discover the best types of varnishes, the importance of curing times, and the step-by-step methods to ensure your pieces can withstand dampness. You have the capability to create stunning, durable home decor that looks and feels like high-end pottery. Let’s dive into the world of protective finishes and transform your crafting potential!
Foundation: Understanding the Limits of Air Dry Clay
Before you grab a brush, it is essential to build confidence in what “waterproofing” actually means in the world of DIY crafts. Many beginners hesitate because they aren’t sure if their clay can ever truly hold water.
Waterproof vs. Water-Resistant
It is important to manage expectations: air dry clay is naturally water-soluble. When we talk about how to make air dry clay waterproof, we are usually discussing making it highly water-resistant. While you can seal a piece well enough to wipe it with a damp cloth or protect it from humidity, air dry clay should generally not be used for functional dinnerware or items that hold standing water (like a flower vase) for long periods.
Why Sealing is Non-Negotiable
If left unsealed, air dry clay absorbs moisture from the air, which can lead to mold growth or structural softening. By applying a sealant, you are creating a non-porous barrier. This not only protects the piece but also enhances the colors of your paint and gives the surface a professional “finished” look. If you are interested in [sustainable home decor], sealing your items ensures they last for years rather than weeks.
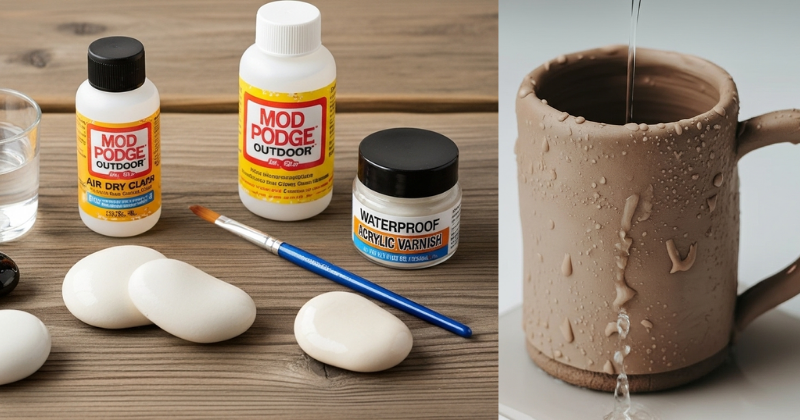
Core Materials You’ll Need
- Fully Cured Clay Project: Never seal damp clay!
- Sealant: Resin, polyurethane, or specialized clay varnishes.
- Brushes: Synthetic soft-bristle brushes to avoid streak marks.
- Sandpaper: High-grit (400+) for a smooth foundation.
Step-by-Step: The Core Methods for a Perfect Seal
Ready to protect your hard work? Follow this clear, actionable process to master how to make air dry clay waterproof using the most reliable home methods.
1. The Preparation Phase
Success starts with a smooth surface.
- The Step: Once your piece is bone-dry (usually 24–48 hours), use fine-grit sandpaper to buff away any bumps or fingerprints.
- The Clean: Use a dry, soft brush or a “tack cloth” to remove every speck of dust. If dust remains, it will be trapped under your sealant forever.
2. Choosing and Applying Your Sealant
There are three main paths you can take depending on the finish you want.
- Polyurethane/Varnish: Great for a classic look. Apply in thin, even coats.
- Epoxy Resin: The “gold standard” for waterproofing. It creates a thick, glass-like plastic coating that is extremely durable.
- Acrylic Sealer: Good for decorative items that won’t be handled much.
3. The Curing Timeline
Patience is your best tool.
- The Action: Apply your first coat and let it dry completely according to the manufacturer’s instructions.
- The Build: For true water resistance, apply 2-3 thin coats rather than one thick one. This prevents drips and ensures total coverage of every microscopic pore.
Advanced Strategies: Pro Tips for Functional Art
Once you have mastered the basics, use these expert-level insights to take your DIY projects to the next level.
The “Dipping” Technique
For small items like beads or charms, brushing can be tedious and leave marks. Instead, thin your varnish slightly and dip the entire piece using a wire hook. This ensures 100% coverage, including the inside of holes where water often sneaks in. This is a brilliant [jewelry-making shortcut] that ensures your pieces don’t soften against the skin’s natural moisture.
Using Liquid Rubber or Glass Inserts
If you absolutely must use an air dry clay pot for a real plant, use a “double-pot” strategy. Share these expert-level insights: place a plastic or glass container inside your clay creation. You can also coat the inside of the clay pot with a thick layer of liquid rubber sealant (like Flex Seal) to prevent soil moisture from reaching the clay walls.
Creative Aesthetic Finishes
Don’t settle for just “shiny.” You can find sealants in matte, satin, and high-gloss finishes. You can even mix a bit of mica powder into your resin to create a shimmering, waterproof galaxy effect on your trays and dishes. Experimentation is the heart of [creative self-care]!
Troubleshooting: Common Challenges and Setbacks
Even the most careful artist can run into trouble. Here is how to handle frequent obstacles with encouragement.
“My sealant is sticky and won’t dry!”
- The Solution: This usually happens due to high humidity or applying a second coat too quickly. Move the piece to a cool, dry room with a fan. If it’s resin, ensure your mixing ratio was exactly 1:1.
- Encouragement: Setbacks are just part of the learning process. If it stays tacky, you can sometimes “save” it by applying a thin layer of clear acrylic spray over the top.
“The clay cracked after I sealed it.”
- The Fix: This means there was still moisture trapped inside the clay when you sealed the outside. The water tried to evaporate and forced a crack.
- Preventive Measure: Use the “cool touch” test. If the clay feels cold to your cheek, it still has water in it. Wait another 24 hours.
“There are bubbles in my finish.”
- Alternative Approach: If using resin, use a heat gun or a lighter to gently pop bubbles while the liquid is still wet. If using varnish, avoid shaking the bottle; instead, stir it gently to prevent incorporating air.
Maximizing Results: Maintenance and Longevity
To build upon your success, you need to know how to care for your sealed pieces over time.
Cleaning Your Waterproofed Clay
Even though you’ve learned how to make air dry clay waterproof, treat your items with care. Never put them in the dishwasher or submerge them in a sink of hot soapy water. A quick wipe with a soft, damp cloth is all you need to keep them looking fresh. This is a key part of [intentional home maintenance].
Long-Term Considerations
Over the years, some varnishes may yellow if exposed to direct sunlight. If you are making items for a sunny windowsill, look for sealants labeled “UV Resistant.” Additionally, if a piece gets a deep scratch, re-seal that area immediately to prevent moisture from seeping into the core.
Featured Snippet: What is the best way to waterproof air dry clay?
The best way to make air dry clay waterproof is to apply 2-3 coats of a high-quality sealant like liquid polyurethane, acrylic varnish, or epoxy resin. Ensure the clay is 100% dry and sanded smooth before application. For the most durable, water-resistant finish, epoxy resin provides a thick, non-porous plastic coating that protects the clay from moisture and humidity.
Conclusion
Mastering how to make air dry clay waterproof is a transformative skill that opens up a world of creative possibilities. You have discovered that you have the capability to succeed in making your art both beautiful and durable. By choosing the right sealants and following a patient application process, you achieve professional results that can stand the test of time.
You’ve got this! Start today by checking if your current project is fully cured and ready for its first coat of protection. Whether you are making gifts for friends or decor for your own home, your waterproofed clay will be a testament to your skill and care.