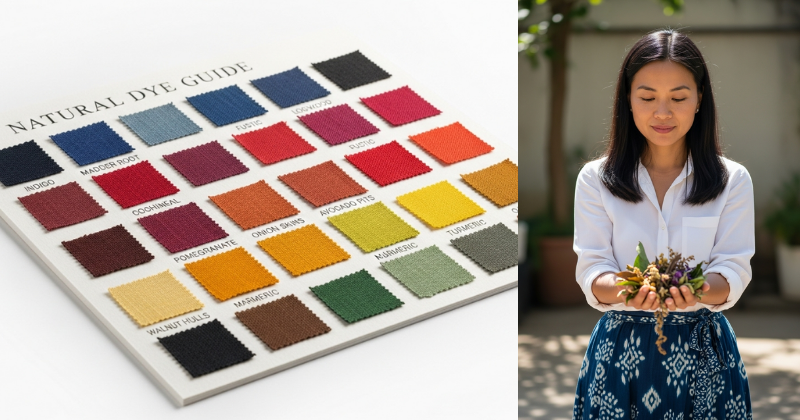
Unlock the vibrant world of eco-friendly color with this Natural Dye Guide. Discover how to transform everyday plants and kitchen scraps into beautiful dyes.
Have you ever looked at a handful of onion skins or a basket of fresh beets and wondered if you could capture those brilliant hues forever? You are not alone in your curiosity! For centuries, humans have looked to the earth to provide a rainbow of colors for textiles, and today, you can bring that ancient craft right into your own kitchen. This Natural Dye Guide is designed to show you that you don’t need harsh chemicals or expensive synthetic kits to create breathtaking, artisanal colors. By using what nature provides, you can transform plain fabrics into unique masterpieces while embracing a more sustainable, slow-fashion lifestyle.
In the following sections, we will explore the alchemy of botanical pigments. You will learn how to prep your materials, choose the right plants for the colors you desire, and ensure your shades remain vibrant wash after wash. Whether you are a seasoned crafter looking to expand your skills or a curious beginner eager to try your first DIY project, this guide provides the roadmap to success. Get ready to discover the magic hidden in your garden and pantry—it’s time to unlock your creative potential and achieve stunning, earth-friendly results!
Foundation: Getting Started with Botanical Pigments
Stepping into the world of natural dyeing feels like rediscovering a lost language. Before you start boiling pots of color, it is important to build a solid foundation. The most beautiful results come from understanding the relationship between the dye source and the material you are coloring.
Choosing Your Fabric
Not all fabrics are created equal in the dye vat. Natural dyes have a deep affinity for natural fibers.
- Protein Fibers: These come from animals, such as wool, silk, and alpaca. They generally take up natural dyes very easily and produce the most vibrant results.
- Cellulose Fibers: These come from plants, such as cotton, linen, hemp, and bamboo. These require a bit more preparation to ensure the color “sticks” and doesn’t wash away.
Understanding the “Mordant”
If there is one secret to successful dyeing, it is the mordant. A mordant is a substance—usually a mineral salt—that acts as a bridge between the fabric and the dye. Without it, your colors might look beautiful at first but will fade quickly. The most common and safe mordant for home use is Alum (potassium aluminum sulfate), which you can often find in the spice aisle of the grocery store.
Safety First in the Craft Room
Even though we are using “natural” ingredients, safety is paramount. Always use dedicated pots and utensils for dyeing that are not used for food preparation. Ensure your workspace is well-ventilated, especially when simmering dyes for long periods. By keeping your “dye kitchen” separate from your “food kitchen,” you can experiment with confidence.
Step-by-Step: The Core Method of Natural Dyeing
Creating color is a rhythmic, rewarding process. Follow these steps to ensure your first batch of natural dye is a success.
1. Scouring the Fabric
Before you can add color, you must remove any oils, waxes, or finishes left over from the manufacturing process. This is called scouring. Simply simmer your fabric in water with a small amount of pH-neutral dish soap for about an hour, then rinse thoroughly.
2. The Mordanting Process
This is where the magic starts. Dissolve your Alum in warm water (usually about 10-15% of the weight of your dry fabric). Add your wet, scoured fabric to the pot and simmer gently for about an hour. Let it cool in the pot, then rinse. Your fabric is now “primed” and ready to receive color!
3. Extracting the Color
Place your plant materials (like onion skins, avocado pits, or marigold petals) in a pot and cover with water.
- The Simmer: Bring the water to a gentle simmer (avoid a rolling boil, which can “muddy” the colors) for about 45-60 minutes.
- The Strain: Once the water is richly colored, strain out the plant matter using a fine mesh sieve or cheesecloth. This liquid is your “dye bath.”
4. The Dyeing Phase
Submerge your pre-mordanted, wet fabric into the dye bath. For the most even color, make sure the fabric has plenty of room to move around. Simmer the fabric in the dye for 45-60 minutes, stirring occasionally. For deeper shades, you can even let the fabric soak in the cooling dye bath overnight.
Advanced Strategies: Pro Tips for Color Mastery
Once you have mastered the basics, this Natural Dye Guide can help you experiment with expert-level techniques to customize your creations.
Modifying with Kitchen Alchemy
You can actually change the color of your dye after it’s been made by shifting the pH balance.
- Iron (The Saddener): Adding a small amount of iron (like water from rusted nails) will “sadden” the color, turning yellows into olives and pinks into purples.
- Acid (The Brightener): Adding vinegar or lemon juice can shift colors toward the warmer side of the spectrum, making oranges more vibrant.
- Base (The Shifter): Adding baking soda can sometimes unlock hidden blues or greens in certain botanical dyes.
Solar Dyeing and Eco-Printing
If you prefer a more “hands-off” approach, try solar dyeing. Place your fabric and dye materials in a glass jar filled with water and leave it in a sunny spot for several weeks. The sun’s heat slowly extracts the color, resulting in soft, ethereal patterns. Alternatively, you can try “Eco-Printing,” where you bundle leaves and flowers directly inside the fabric and steam them to leave permanent botanical “prints” on the cloth.
Featured Snippet: What are the best plants for natural dye?
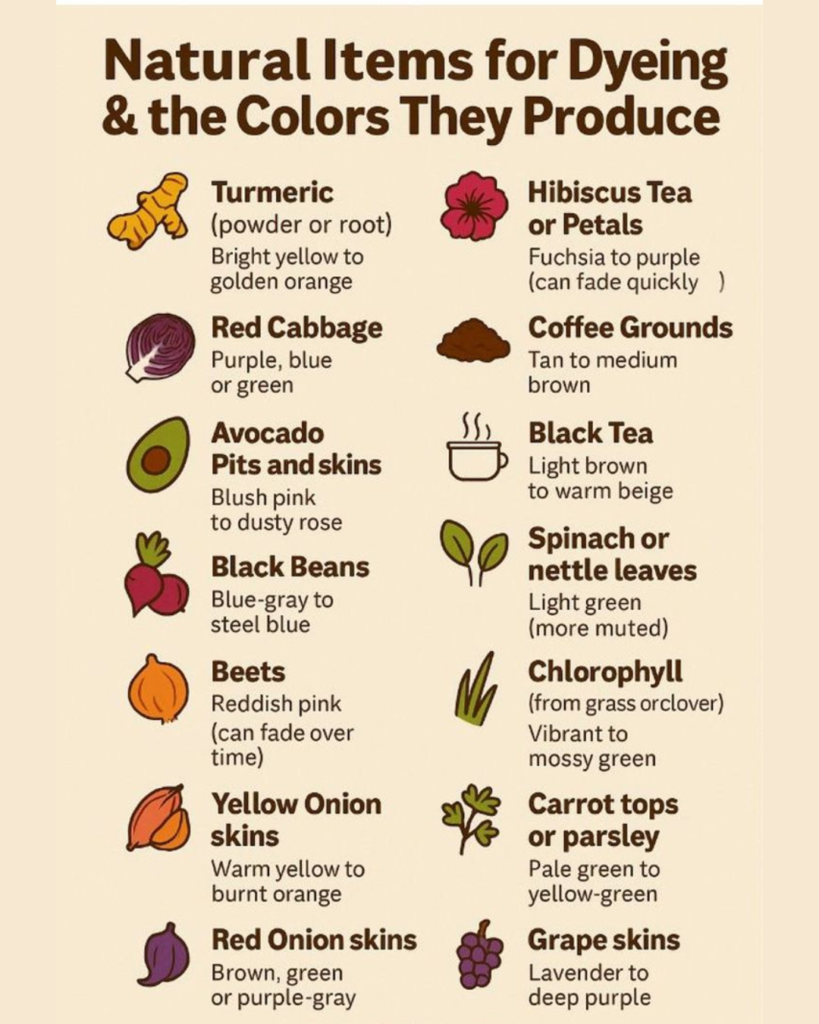
The best plants for beginners in natural dyeing include yellow onion skins (for gold/orange), avocado pits and skins (for soft pink), turmeric (for bright yellow), and black walnut hulls (for deep brown). These materials are high in tannins or pigments that bond easily to fibers, making them reliable choices for those new to botanical color.
Troubleshooting: Common Dyeing Challenges
Don’t be discouraged if your first pot doesn’t turn out exactly as planned! Natural dyeing is part science and part intuition.
“My color washed right out!”
- The Cause: You likely skipped the mordant step or used a fabric with a high synthetic (polyester) content.
- The Fix: Ensure you are using 100% natural fibers and always use a mordant like Alum. If you are dyeing cotton, try a “tannin-mordant” double process for better results.
“The color is blotchy or uneven.”
- The Cause: The fabric was crowded in the pot or wasn’t stirred enough.
- The Fix: Use a larger pot and make sure the fabric can swim freely. Also, ensure the fabric was thoroughly wet before entering the dye bath to prevent “dry spots” from resisting the color.
“The color isn’t as bright as the plant.”
- The Cause: High heat can sometimes “break” the pigment.
- The Prevention: Keep your dye bath at a “shimmer” (just below a simmer). Also, remember that dried fabric always looks several shades lighter than wet fabric!
Maximizing Results: Longevity and Next Steps
To build upon your success, you must think about the long-term care of your naturally dyed items.
Caring for Your Colors
Naturally dyed fabrics are “living” colors. To keep them bright, always wash them by hand in cool water with a pH-neutral soap. Avoid drying them in direct sunlight, as UV rays can cause botanical pigments to fade over time. Think of your dyed items as delicate treasures that deserve a little extra self-care.
Growing Your Own Dye Garden
The ultimate way to level up is to [grow your own dye garden]. Plants like Japanese Indigo, Madder, and Coreopsis are easy to grow and provide a sustainable source of pigment year after year. This deepens your connection with nature and ensures you always have “magic” on hand for your next project. You might even consider [composting your leftover plant matter] to complete the eco-friendly cycle!
Conclusion
Embarking on the path of botanical color is a transformative journey. As this Natural Dye Guide has shown, the ability to create beauty from the earth is an empowering skill that connects you to history and nature. By starting with simple kitchen scraps and moving toward advanced modifiers, you have unlocked a world of sustainable creativity.
Remember, there are no mistakes in natural dyeing—only happy accidents and new shades to discover. Every piece you create is a one-of-a-kind reflection of the season and your unique touch. You are now equipped to achieved brilliant, lasting results. So, grab a pot, gather some petals, and let the colors of the earth inspire you!