Discover how to make a DIY Hydrating Lip Balm Recipe (Non-Sticky & All-Natural) that protects your smile using simple, organic ingredients from your pantry.
Have you ever scanned the back of a store-bought lip balm tube only to find a list of ingredients that sound more like a high school chemistry final than a skincare product? You are not alone. Many commercial balms rely on petroleum-based waxes and synthetic fragrances that can actually leave your lips feeling drier in the long run. If you are tired of that “sticky” residue and want a product that truly sinks in to provide deep moisture, this DIY Hydrating Lip Balm Recipe (Non-Sticky & All-Natural) is the transformation your self-care routine needs.
By taking control of the ingredients, you can unlock a level of hydration that feels luxurious, breathable, and entirely pure. Imagine a balm that glides on smoothly, tastes like a hint of honey or mint, and keeps your lips soft through harsh winter winds or scorching summer sun. In this guide, we will walk you through the empowering process of creating your own signature balm. It is easier than you think, cost-effective, and incredibly satisfying. Let’s dive into the world of botanical butters and oils to achieve the perfect pout!
Foundation: Choosing the Best All-Natural Ingredients
Before you heat up the stove, it is vital to understand why certain ingredients work better than others. The secret to a non-sticky finish lies in the balance between “hard” waxes and “soft” oils. When you master this ratio, you achieve a professional-grade product right at your kitchen counter.
The Power of Beeswax (or Candelilla)
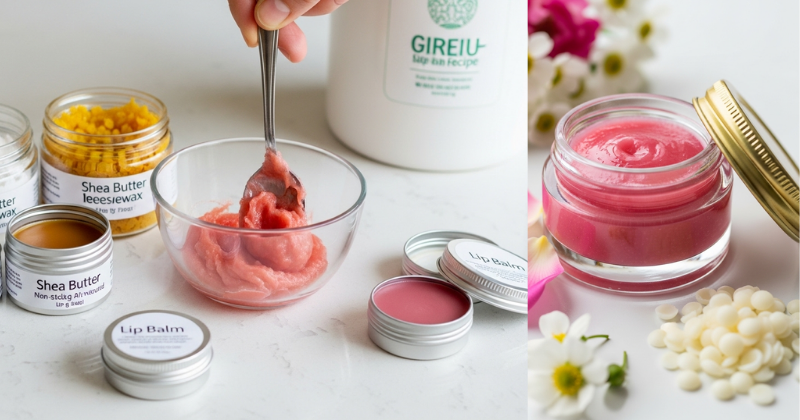
The structural foundation of any good DIY Hydrating Lip Balm Recipe (Non-Sticky & All-Natural) is the wax. Beeswax provides a protective barrier that locks in moisture without feeling heavy. If you prefer a vegan option, Candelilla wax is a fantastic alternative derived from shrubs. These waxes ensure your balm stays solid in your pocket but melts perfectly upon contact with your skin.
Nourishing Butters and Carrier Oils
This is where the true hydration happens.
- Shea Butter: Known for its high concentration of fatty acids and vitamins, it softens the skin and provides a creamy texture.
- Coconut Oil: A classic choice for immediate moisture, though it has a lower melting point.
- Sweet Almond Oil: This is the secret to the “non-sticky” feel. It is a light, hypoallergenic oil that absorbs quickly into the delicate skin of the lips.
Essential Oils for Aroma and Benefit
Beyond just smelling good, essential oils can offer therapeutic benefits. Peppermint oil provides a refreshing tingle and increases circulation, while Lavender oil is deeply soothing for cracked or irritated skin. Because the lips are sensitive, we always recommend a very low dilution—just a few drops go a long way in your natural skincare journey.
Step-by-Step: Crafting Your Perfect Lip Balm
Creating your own balm is a quick and achievable project. It usually takes less than 20 minutes from start to finish. Follow these clear steps to ensure your batch turns out perfectly every time.
1. Prepare Your Workspace
Cleanliness is key when making skincare. Sanitize your tins or tubes and your stirring utensils with a bit of rubbing alcohol. This ensures your all-natural balm stays fresh and shelf-stable for months. You will need a small glass measuring cup or a “double boiler” setup to melt the ingredients gently.
2. The Golden Ratio
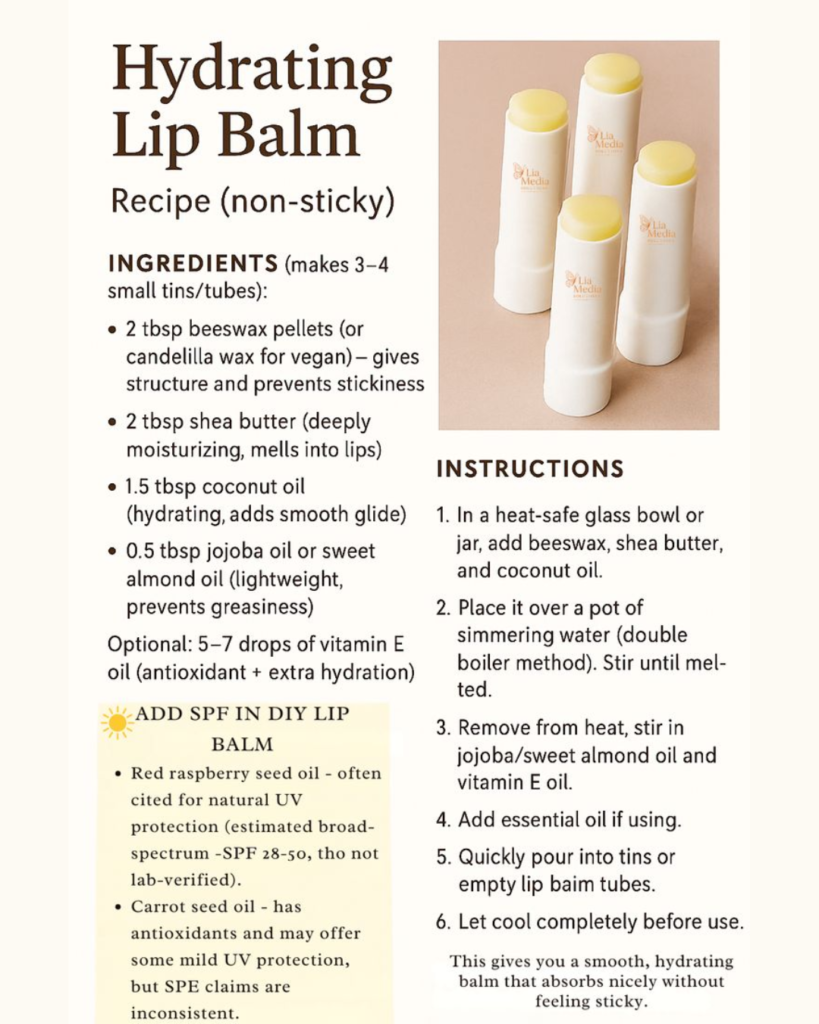
For a standard, firm-yet-creamy balm, use the following measurements:
- 2 Parts Wax (Beeswax pellets)
- 2 Parts Butter (Shea or Cocoa butter)
- 3 Parts Oil (Sweet Almond or Jojoba oil)
3. Melt with Care
Place your wax, butter, and oils into your heat-safe glass container. Set the container inside a pot with an inch or two of simmering water. Pro Tip: Never use direct heat! Melting these ingredients slowly ensures they don’t lose their beneficial nutrients or develop a “burnt” scent. Stir gently until the mixture is a clear, golden liquid.
4. Flavor and Pour
Once melted, remove the mixture from the heat. This is the moment to add 5-10 drops of your favorite essential oils. Stir quickly and pour the liquid into your containers. Let them sit undisturbed for at least 30 minutes. You will see the liquid transform into a beautiful, opaque solid right before your eyes!
Advanced Strategies: Customizing Your Formula
Once you have the basic DIY Hydrating Lip Balm Recipe (Non-Sticky & All-Natural) down, you can start to experiment like a pro. Personal adaptation is where the real fun begins.
Creating a “Sun-Safe” Version
If you spend a lot of time outdoors, you can add a small amount of non-nano Zinc Oxide to your mixture. This provides a physical barrier against UV rays, similar to how you might [protect your plants in a garden] during a heatwave. It adds a slightly white tint, but the protection is worth it for long summer days.
Infusing with Herbs
For a truly artisanal touch, try “infusing” your carrier oil before making the balm. Place dried calendula flowers or rose petals in your almond oil for 2-4 weeks. The oil will soak up the healing properties of the plants. This connects your beauty routine to the [rhythms of nature and gardening], creating a product that is literally grown from the earth.
Tinted Lip Balms
Want a pop of color? You can naturally tint your balm by adding a tiny pinch of beetroot powder or a small slice of an old lipstick to the melting pot. This gives you a “my lips but better” glow while maintaining all the hydrating benefits of the natural oils.
Troubleshooting: Solving Common Balm Blunders
Even simple DIYs can have a few hurdles. Don’t worry if your first batch isn’t “boutique ready”—most issues are easily fixed!
“My balm is too hard to swipe.”
- The Cause: Too much beeswax or a cold environment.
- The Fix: Remelt the balm and add a teaspoon more of your liquid carrier oil (like Sweet Almond oil). This will soften the final texture.
“There are tiny grains in the balm.”
- The Cause: Shea butter can sometimes “crystallize” if it cools too slowly.
- The Solution: This is just a texture issue and doesn’t mean the balm is bad. To prevent it next time, pop your poured balms into the refrigerator immediately so they cool down fast.
“The balm feels greasy, not hydrating.”
- The Cause: Using too much coconut oil without enough “dry” oils.
- The Prevention: Ensure you are using a lighter oil like Jojoba or Grapeseed oil in your ratio. These oils penetrate the skin faster, leaving that coveted non-sticky finish.
Maximizing Results: Maintenance and Gifting
Now that you’ve achieved success, how do you make it last? Proper storage and creative uses can take your DIY game to the next level.
Shelf Life and Storage
Because this recipe contains no water, it is very shelf-stable. Most all-natural balms will last for about a year. Keep them in a cool, dry place. If you added Vitamin E oil to your recipe, it acts as a natural antioxidant, helping the oils stay fresh even longer.
The Ultimate Eco-Friendly Gift
Handmade lip balms make incredible gifts for friends and family. You can [create custom labels] or even use your [homemade paper from junk mail] to wrap the tubes for a zero-waste aesthetic. It’s a thoughtful way to share your new skills and encourage others to move toward a more sustainable lifestyle.
Featured Snippet: How do you make lip balm not sticky?
To make a non-sticky lip balm, use “light” carrier oils like Sweet Almond, Jojoba, or Grapeseed oil instead of heavy oils. Maintaining a ratio of 1 part wax to 2 parts oil/butter ensures the balm provides a protective barrier while absorbing quickly into the skin. Avoid using honey or sugary additives, which can create a tacky residue on the lips.
Conclusion
Mastering a DIY Hydrating Lip Balm Recipe (Non-Sticky & All-Natural) is a small step that leads to a big change in your wellness routine. You’ve moved away from mysterious synthetics and toward the healing power of plants. By following these steps, you’ve created a product that is safer for your body and kinder to the planet.
The empowerment that comes from making your own essentials is addictive. You now have the knowledge to adjust your formula for the seasons, the sun, or even for friends. Your smile deserves the best, and now you can provide it with your own two hands. So, go ahead—swipe on your creation and feel the difference that all-natural hydration makes!