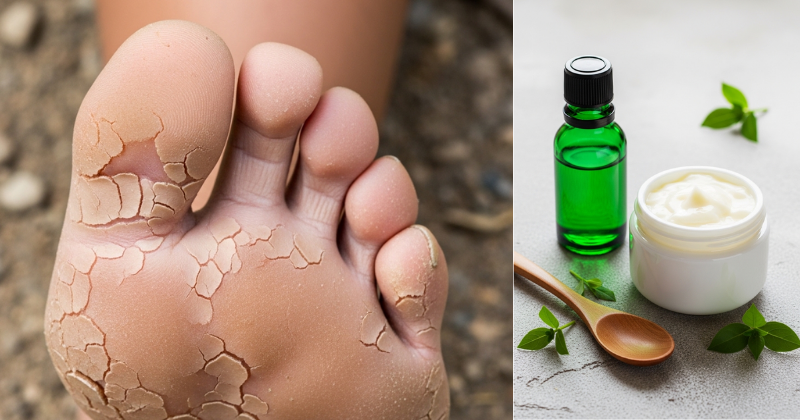
Foot skin — particularly on the heels and soles — experiences mechanical stresses and environmental conditions that no other body region endures, making it uniquely prone to dryness, cracking, and callus formation. The plantar surface (sole) of the foot contains no sebaceous glands, relying entirely on neighboring sweat glands for moisture — a system insufficient to maintain the barrier integrity required under the constant pressure of weight-bearing. This DIY foot cream delivers intensive repair through a carefully constructed emulsion combining urea (a clinical keratolytic and humectant), shea butter (providing fatty acids and triterpene anti-inflammatories), and peppermint essential oil (offering cooling relief and antimicrobial protection). The formulation addresses the specific dermatological challenges of foot skin: excessive hyperkeratosis requiring exfoliation, severe transepidermal water loss demanding occlusion, and fissures requiring both hydration and protection. You’ll create a professional-grade foot treatment that genuinely softens calluses, heals cracks, and restores suppleness — at a fraction of commercial product costs and with complete ingredient transparency.
The Unique Dermatology of Foot Skin
Understanding why feet develop such severe dryness compared to other body areas helps you appreciate why specialized formulations achieve better results than general body moisturizers.
Plantar Hyperkeratosis and Mechanical Stress
The stratum corneum (outermost skin layer) on the soles is approximately 40-50 times thicker than on facial skin — a protective adaptation to mechanical stress from standing, walking, and running. This thickened layer, when healthy, provides cushioning and protection. However, under conditions of friction, pressure, and inadequate moisture, this hyperkeratotic tissue becomes excessively thick, rigid, and prone to fissuring (cracking). The fissures create painful breaks in barrier integrity that expose deeper tissue to bacterial infection and make walking uncomfortable or painful.
The absence of sebaceous glands on plantar surfaces means the foot skin lacks the lipid-rich sebum that naturally moisturizes skin elsewhere. Sweat gland secretions — primarily aqueous with dissolved salts — provide insufficient lipid content for barrier maintenance. This anatomical reality makes topical lipid application not merely beneficial but physiologically necessary for maintaining foot skin health in most individuals.
The Calcaneal (Heel) Fissure Problem
Heel fissures develop through a predictable cascade: inadequate moisture and lipid support leads to rigid, inelastic hyperkeratotic tissue; mechanical stress during walking creates shear forces that this rigid tissue cannot accommodate; the tissue cracks vertically, creating painful fissures that can extend through the full stratum corneum thickness into the viable epidermis where nerve endings and blood vessels reside. Superficial fissures (confined to the stratum corneum) are painless but provide entry points for deeper cracking. Deep fissures produce pain, bleeding, and infection risk.
Effective treatment requires simultaneously addressing the hyperkeratosis (through keratolytic agents that dissolve excess dead skin), providing intensive hydration (through humectants that attract water into the tissue), and creating an occlusive barrier (through lipids that prevent transepidermal water loss). This DIY foot cream provides all three mechanisms.
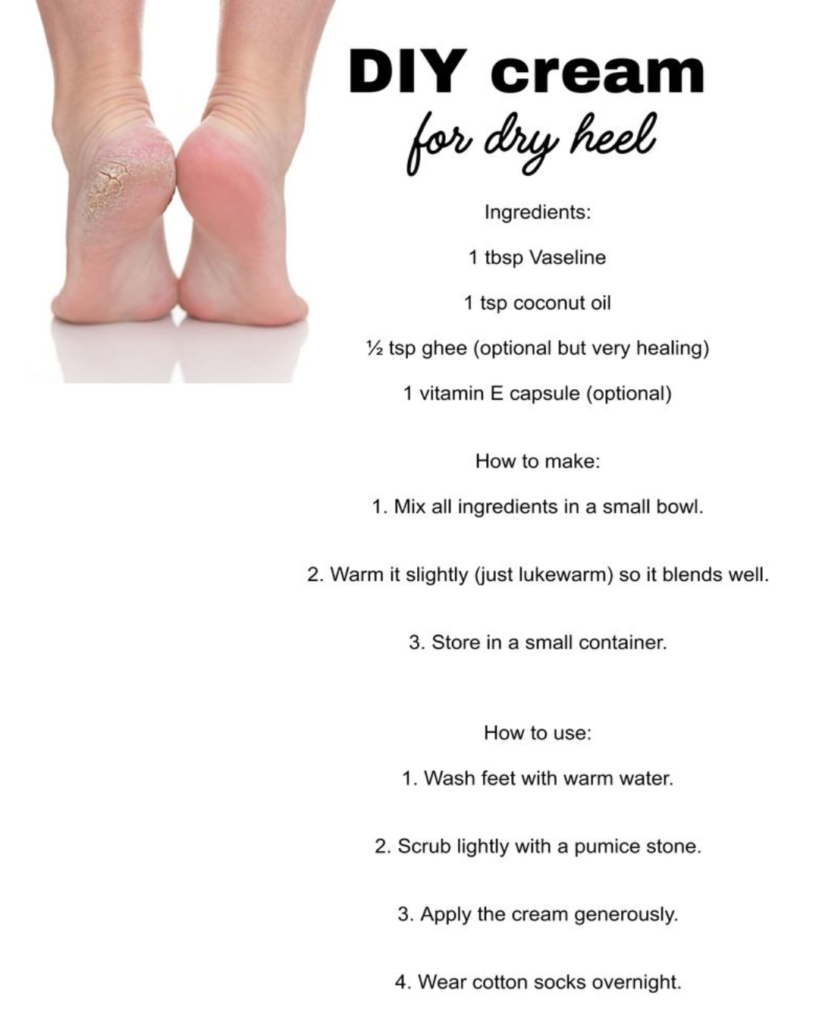
Complete DIY Foot Cream Recipe
This formulation produces approximately 120ml (4 oz) of intensive foot cream — sufficient for 4-6 weeks of daily application to both feet.
Ingredients and Their Dermatological Functions
Base ingredients:
- 60g (approximately 1/4 cup) raw shea butter
- 2 tablespoons (30ml) sweet almond oil or coconut oil
- 1 tablespoon (15g) beeswax pellets
- 2 tablespoons (30ml) distilled water
- 1 tablespoon (approximately 10g) urea powder (10% concentration in finished product — available from cosmetic ingredient suppliers)
- 1/2 teaspoon vegetable glycerin
- 1/2 teaspoon vitamin E oil
- 10-12 drops peppermint essential oil
- Optional: 5 drops tea tree essential oil (additional antimicrobial protection)
Ingredient rationale: Shea butter provides the lipid matrix rich in stearic acid (ceramide precursor), oleic acid (barrier fluidizer), and triterpene compounds (lupeol, amyrins) with documented anti-inflammatory activity that addresses the inflammation accompanying heel fissures. Sweet almond or coconut oil improves spreadability while providing additional emollient fatty acids. Beeswax creates structure (prevents the cream from being excessively soft) while contributing mild occlusive properties. Urea at 10% concentration functions as both a keratolytic (dissolving excess hyperkeratotic tissue through disruption of hydrogen bonds between corneocytes) and a humectant (attracting water from the atmosphere and deeper skin layers into the stratum corneum). Clinical research documents that 10% urea significantly improves skin hydration and reduces roughness in xerotic (dry) skin within 2 weeks of consistent application. Vegetable glycerin provides additional humectant action. Vitamin E (alpha-tocopherol) prevents oxidative rancidity of the unsaturated fatty acids while contributing antioxidant protection to the skin. Peppermint essential oil’s menthol produces cooling sensations through TRPM8 receptor activation (providing immediate relief for sore, tired feet) and exhibits antimicrobial activity against foot odor-causing bacteria.
Step-by-Step Preparation Protocol
Equipment needed: Double boiler or heat-safe bowl over simmering water, whisk or electric hand mixer, small glass jars or tins (total 4 oz capacity), digital thermometer (optional but recommended for precision).
Step 1: Melt the lipid phase. In the double boiler, combine shea butter, sweet almond or coconut oil, and beeswax. Heat gently over simmering water, stirring occasionally, until completely melted and uniform — approximately 8-12 minutes. No solid pieces should remain visible.
Step 2: Prepare the water phase with urea. In a separate small container, warm the distilled water to approximately 60-65°C (warm to touch but not hot). Add the urea powder and stir vigorously until completely dissolved. Urea dissolves readily in warm water but resists dissolution in cold water — the warming step is essential. Add the vegetable glycerin and stir to incorporate.
Step 3: Combine phases (critical emulsification step). Remove the lipid phase from heat and allow to cool for 2-3 minutes to approximately 65-70°C (still fluid but not hot). The lipid phase and water phase should be approximately the same temperature before combining — temperature matching is critical for stable emulsion formation. Slowly pour the urea-water mixture into the lipid mixture in a thin, steady stream while whisking constantly. Continue whisking vigorously for 2-3 minutes as the mixture cools — you’ll observe it transforming from a separated mixture into a uniform, creamy emulsion. As it reaches approximately 45-50°C, the emulsion will begin to thicken noticeably.
Step 4: Add heat-sensitive ingredients. Once the mixture has cooled to approximately 40°C (warm but comfortable to touch), add the vitamin E oil and peppermint essential oil (plus optional tea tree oil). Whisk thoroughly to distribute evenly. These compounds are added at lower temperature to prevent volatilization of aromatics and degradation of vitamin E.
Step 5: Final whipping and jarring. For a lighter, more easily spreadable texture, use an electric hand mixer to whip the cooling emulsion for 2-3 minutes as it approaches room temperature. This incorporates air and creates a fluffy, whipped texture. Transfer to your clean jars or tins, cap tightly, and label with ingredients and date.
Storage and shelf life: Store at room temperature away from direct heat and sunlight. The combination of vitamin E antioxidant, peppermint antimicrobial properties, and the preservative effect of urea provides 3-4 months shelf life. Discard if you notice off odors, color changes, or separation that doesn’t resolve with stirring.
Application Technique for Maximum Healing
The effectiveness of intensive foot cream depends substantially on application method and timing — factors that determine whether active ingredients reach the deeply hyperkeratotic tissue requiring treatment.
The Evening Intensive Treatment Protocol
The optimal application window is immediately before bed after thorough foot washing. Soak feet in warm water for 10-15 minutes to hydrate the stratum corneum and soften hyperkeratotic tissue — this pre-hydration dramatically improves subsequent cream penetration. Pat feet until barely damp (not completely dry — residual moisture aids cream spreading and provides additional hydration). Apply the DIY foot cream generously to all foot surfaces, with particular attention to heels, balls of the feet, and any areas showing calluses or cracking. Use firm circular massage motions for 2-3 minutes per foot — this mechanical stimulation improves blood flow and enhances product penetration.
The Sock Occlusion Technique
For severely dry, cracked heels, the “sock occlusion” method amplifies results substantially. After applying cream, don cotton socks (not synthetic — cotton breathes while providing occlusion) and leave on overnight. The occlusion from socks enhances both cream penetration and water retention, producing measurably greater barrier improvement than open application. Users consistently report that a single night of sock occlusion produces more visible softening than several days of open application — reflecting the profound importance of occlusion in delivering active ingredients through the thick plantar stratum corneum.
Treatment Frequency and Maintenance
For active healing of cracked heels and severe dryness, apply nightly with sock occlusion for the first 2 weeks. Most users observe dramatic improvements in softness, flexibility, and fissure healing within this initial intensive period. Transition to maintenance application (nightly without socks or every other night) once acute symptoms resolve. Consistent maintenance prevents the recurrence of severe dryness and cracking that made the initial intensive treatment necessary.
Advanced Formulation Variations
The Maximum Strength Crack Healing Formula
For deep, painful heel fissures, enhancing the base formula with additional keratolytic and wound-healing compounds provides accelerated repair. Increase urea concentration to 20% (double the base recipe amount) — 20% urea produces more aggressive keratolysis appropriate for severe hyperkeratosis. Add 1 teaspoon of raw honey to the water phase before combining with the lipid phase — honey provides antibacterial protection (important for preventing infection in open fissures) and wound-healing properties through its hydrogen peroxide content and osmotic effects. Add 1/4 teaspoon of calendula extract (Calendula officinalis) — calendula’s triterpene alcohols support wound healing and provide anti-inflammatory activity that addresses the pain and redness accompanying deep fissures.
The Antifungal Protection Formula
For individuals prone to athlete’s foot or nail fungus, adding targeted antifungal essential oils creates a preventative treatment alongside moisturizing benefits. Add 10 drops of tea tree oil (documented antifungal activity against Trichophyton species causing athlete’s foot), 5 drops of oregano oil (carvacrol and thymol provide broad-spectrum antifungal activity), and 5 drops of clove oil (eugenol exhibits antifungal mechanisms). This enhanced formula provides both therapeutic moisturization and prophylactic antimicrobial protection — particularly valuable for individuals who frequent gyms, pools, or communal changing facilities.
The Cooling Relief Formula for Tired, Achy Feet
For feet experiencing muscular fatigue, inflammation, or general discomfort from prolonged standing or walking, enhancing the cooling and anti-inflammatory components provides both moisturization and symptomatic relief. Increase peppermint oil to 20 drops (doubling the menthol-mediated cooling sensation), add 10 drops of eucalyptus oil (eucalyptol provides additional cooling and mild analgesic effects), and add 1/2 teaspoon of arnica oil (Arnica montana — contains sesquiterpene lactones with documented anti-inflammatory activity and traditional use for muscle soreness). This formulation is particularly popular among runners, nurses, retail workers, and anyone spending long hours on their feet.
Troubleshooting Common DIY Foot Cream Challenges
Emulsion Separation or Instability
The most technically challenging aspect of this formulation is creating a stable emulsion between the oil-based lipid phase and the water-based urea solution. Separation — visible as water pooling separately from the cream or oil droplets appearing — indicates emulsion failure. Prevention requires temperature matching (both phases at 65-70°C before combining), vigorous whisking during and after combination, and gradual cooling while stirring. If separation occurs in a finished batch, remelt the entire mixture in a double boiler, ensure both phases reach 70°C, and re-emulsify while whisking continuously through the cooling phase. Adding 1/4 teaspoon of emulsifying wax (available from cosmetic suppliers) to the lipid phase before initial melting provides insurance against separation for those finding emulsion stability challenging.
Grainy Texture From Urea Crystallization
If the finished cream develops a gritty, sandy texture, undissolved urea crystals are the cause. This occurs when urea is added to insufficiently warm water or when the water phase cools before complete dissolution. Prevention requires warming the water to at least 60°C before adding urea and stirring thoroughly until no visible particles remain. If graininess develops in a finished batch, scoop the cream back into a double boiler, warm gently to 50-60°C while stirring, and allow the urea to fully redissolve before cooling and re-jarring.
Cream Too Soft or Too Hard
Texture depends on the wax-to-oil ratio and storage temperature. If cream is too soft (runny, doesn’t hold shape), increase beeswax to 2 tablespoons in the next batch. If too hard (difficult to scoop, doesn’t spread easily), reduce beeswax to 1/2 tablespoon or add an additional tablespoon of liquid oil. The “spoon test” mentioned in previous formulations helps calibrate texture before committing to jarring the full batch.
Building a Complete Foot Care System
Complementary Exfoliation for Enhanced Results
The DIY foot cream delivers maximum benefit when paired with regular mechanical exfoliation that removes superficial hyperkeratotic tissue, allowing deeper cream penetration. Use a pumice stone or foot file on damp (not dry) feet 2-3 times weekly, gently filing callused areas with unidirectional strokes. Over-aggressive filing damages skin — gentle, consistent removal is more effective than occasional intensive sessions. Apply the foot cream immediately after exfoliation while the skin remains slightly damp from the filing session.
Footwear and Lifestyle Factors
Topical treatment achieves limited results if footwear continually contributes to the problem. Shoes that fit properly (neither too tight creating pressure points nor too loose allowing excessive friction) prevent callus formation. Moisture-wicking socks made from natural fibers or technical fabrics keep feet drier, reducing the maceration that contributes to fissures. Going barefoot on rough surfaces accelerates hyperkeratosis — wearing supportive sandals or house shoes indoors reduces mechanical stress. These behavioral modifications work synergistically with topical treatment to achieve results neither produces independently.
Conclusion
This DIY foot cream delivers intensive repair through the same dermatological principles employed in clinical podiatric formulations — keratolytic urea dissolves excess hyperkeratotic tissue, humectants attract water into the stratum corneum, lipid-rich emollients restore barrier integrity, and occlusive overnight application maximizes active ingredient penetration. Prepare the formulation through careful emulsification following the temperature guidelines, apply nightly with the sock occlusion technique during the initial 2-week intensive phase, and transition to maintenance application once acute symptoms resolve. The transformation in foot softness, healing of cracks, and resolution of calluses that this evidence-based formulation produces is genuinely achievable — providing professional-grade foot care through ingredients you understand and control completely.