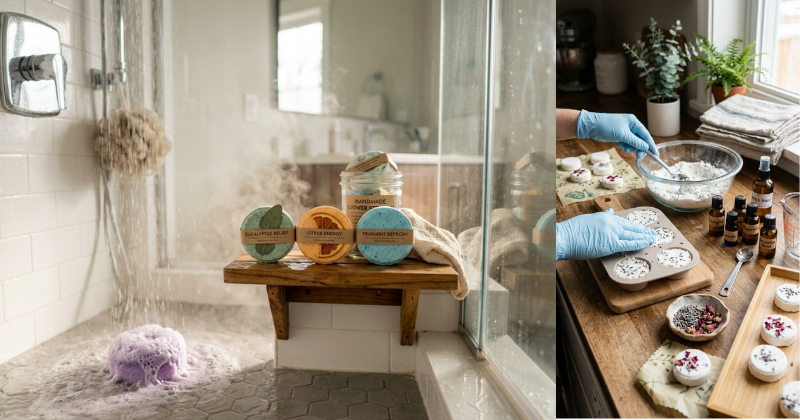
Elevate your daily routine with DIY shower steamers! Learn to create these fizzy, aromatic delights to unlock a spa-like experience in your own bathroom today.
Imagine stepping into your shower after a long, exhausting day and being greeted by a refreshing cloud of eucalyptus or the calming scent of lavender. You don’t need an expensive spa membership to enjoy the benefits of aromatherapy. With diy shower steamers, you can turn every rinse into a therapeutic escape. These small but mighty pucks are the shower-world equivalent of bath bombs, designed to fizz away and release essential oils into the steam, clearing your head and soothing your soul.
In this guide, you will discover how to craft professional-quality steamers using simple household ingredients. We will explore the best essential oil blends for different moods, from morning wake-up calls to evening wind-downs. By making them yourself, you avoid the synthetic fragrances and high price tags of boutique brands. Get ready to transform your bathroom into a sanctuary of wellness. Let’s dive into the rewarding world of handmade shower aromatherapy!

Foundation: Understanding the Basics of Shower Steamers
If you’ve never used a shower steamer before, you are in for a treat! Unlike bath bombs, which are designed to be submerged in water to moisturize the skin, diy shower steamers are built for the air. They contain a higher concentration of essential oils because they are meant to be inhaled, not touched by the skin.
The Science of the Fizz
The “magic” behind a shower steamer is a simple chemical reaction between baking soda and citric acid. When water hits the steamer, these two ingredients react to release carbon dioxide gas, which carries the essential oil molecules upward into the steam. This process is what creates that wonderful aromatic “cloud” around you.
Why Choose DIY?
Making your own steamers gives you total control. You can ensure that only 100% pure essential oils are used, rather than “fragrance oils” which are often full of phthalates. Additionally, the cost-saving benefits are significant; you can make dozens of steamers for the price of one or two store-bought versions.
Essential Components for Success
To get started, you will need a few key components:
- Baking Soda: The base that provides bulk.
- Citric Acid: The “fizz” factor.
- Essential Oils: The aromatic powerhouse.
- Witch Hazel: The perfect “glue” to hold it all together without starting the reaction too early.
Step-by-Step Process: How to Make Perfect Steamers
Creating your own diy shower steamers is a straightforward process, but the secret lies in the texture. You want it to feel like “wet sand” that holds its shape when squeezed.
1. Mix the Dry Ingredients
In a large glass bowl, combine 2 cups of baking soda and 1 cup of citric acid. Use a whisk to break up any clumps. This ensures a smooth, even fizz when you finally use them in the shower.
2. Add Your Aromatherapy
Add about 60–80 drops of your chosen essential oils. This might seem like a lot, but remember that the scent needs to compete with the smell of your soap and shampoo. Stir well to distribute the oils throughout the powder.
3. The Spritzing Stage
This is the most delicate part! Using a spray bottle filled with witch hazel, lightly spritz the mixture.
- Actionable Tip: Spritz, stir, and squeeze. If the mixture crumbles, add another spritz. If it holds together like a snowball, you are ready!
- Warning: Do not pour liquid in, or the mixture will start fizzing in the bowl and “grow” right out of your container!
4. Mold and Dry
Pack the mixture tightly into silicone molds. Press down firmly with the back of a spoon to remove any air pockets. Let them dry for at least 24 to 48 hours in a cool, dry place. Once they are rock-hard, pop them out of the molds and they are ready to use!
Advanced Strategies: Expert Blending and Customization
Now that you have the basic method down, you can start to experiment like a pro. Customizing your diy shower steamers allows you to target specific wellness goals.
The “Sinus Soother” Blend
If you are feeling under the weather, a combination of Eucalyptus, Peppermint, and Tea Tree oils is unbeatable. The menthol in the peppermint helps “unlock” your airways, while the eucalyptus provides a cooling sensation that feels amazing during a hot shower.
The “Mood Booster” Blend
For those mornings when you just can’t seem to wake up, try a “Citrus Burst.” Blend Grapefruit, Sweet Orange, and a hint of Bergamot. Citrus oils are known for their ability to improve focus and energy, making them the perfect start to a busy day.
Adding Visual Flair
Want your steamers to look as good as they smell?
- Natural Colorants: Use a tiny pinch of mica powder or a few drops of natural food coloring to distinguish your scents.
- Botanicals: Place a few dried rose petals or lavender buds at the bottom of the mold before packing in the powder. It creates a stunning, high-end look that is perfect for gifting.
Troubleshooting: Common Challenges and Solutions
Sometimes, even with the best planning, a batch doesn’t go quite right. Here is how to fix the most frequent issues with diy shower steamers.
- My steamers are “growing” or puffing up: This means you added too much liquid too fast, or your environment is too humid. Try making them on a dry day, and use a lighter hand with the witch hazel.
- They crumble when I take them out of the mold: This usually means they weren’t packed tightly enough or they didn’t have enough moisture to bind. You can actually crumble them back into a bowl, add a few more spritzes of witch hazel, and re-mold them!
- The scent doesn’t last: Essential oils are “volatile,” meaning they evaporate. If you leave your steamers out in the open, the scent will vanish. Always store them in an airtight glass jar to keep the aroma locked in.
- They dissolve too fast in the shower: Make sure you aren’t placing them directly under the stream of water. They should be at the far end of the shower floor where they only get splashed occasionally.
Maximizing Results: Usage and Long-Term Storage
To get the absolute most out of your hard work, you need to know the “pro” way to use and store your aromatherapy pucks.
Where to Place Your Steamer
For the best featured snippet-worthy results: Where do you put a shower steamer? Place the steamer on the floor of your shower, away from the direct stream of water but close enough to get splashed. This allows it to fizz slowly throughout your entire shower rather than washing down the drain in seconds.
Ensuring Freshness
Since you are using pure essential oils, oxygen is the enemy. Keep your diy shower steamers in a sealed mason jar or a zip-top bag. If you find the scent has faded after a few months, you can actually “revive” a steamer by adding two drops of fresh oil to it right before you step into the shower.
Safety First
While these are amazing for adults, be cautious using high concentrations of peppermint or eucalyptus around very young children or pets, as their respiratory systems are more sensitive. Always ensure your bathroom is well-ventilated so the steam doesn’t become overwhelming.
Conclusion
Mastering diy shower steamers is a simple way to practice self-care every single day. You have learned how to create a perfect fizz, blend oils for any mood, and troubleshoot like an expert. By taking this small step into DIY wellness, you are reclaiming your time and creating a personal sanctuary that fits into your busy schedule.
The transformation from a standard shower to a spa-like retreat is just a few ingredients away. You have the capability to create something beautiful, functional, and deeply relaxing. So, grab your baking soda and your favorite oils, and start crafting! Your future, more relaxed self will thank you.
Would you like me to create a printable “Scent Recipe Guide” with 10 different essential oil combinations for your steamers?
Important Disclaimer: This article is for informational purposes only and should not replace professional advice. For health-related topics, consult healthcare providers. For safety procedures, verify current best practices and local regulations. Individual results may vary, and personal circumstances should always be considered when implementing any suggestions.