Craft your own sustainable art with this Eco-Friendly DIY Coffee Clay Recipe. Learn how to transform old coffee grounds into beautiful, stone-like sculptures easily.
Have you ever looked at the damp mound of coffee grounds left in your morning filter and wondered if they could be something more? Most of us simply toss them away, but you are about to discover a hidden treasure in your kitchen waste. Imagine creating rustic, stone-like ornaments, jewelry, or small sculptures using nothing but kitchen staples. It is time to turn your morning caffeine habit into a creative outlet that is as kind to the planet as it is to your soul.
In this guide, you will master a comprehensive Eco-Friendly DIY Coffee Clay Recipe that transforms simple ingredients into a versatile modeling medium. We will walk through the science of why this works, provide a foolproof step-by-step process, and share expert tips for finishing your masterpieces. By the end of this article, you will have the power to reduce your household waste while unlocking a brand-new hobby. Let’s roll up our sleeves and start crafting with a purpose!
Foundation: Why Coffee Clay is the Ultimate DIY Medium
Before we dive into the mixing bowl, let’s talk about why this specific Eco-Friendly DIY Coffee Clay Recipe is a game-changer for crafters. Unlike store-bought polymer clays, this version is entirely biodegradable and non-toxic.
The Power of Upcycling
Every year, millions of tons of coffee grounds end up in landfills, where they release methane—a greenhouse gas. By repurposing them, you are participating in a [circular economy at home]. The grounds provide a unique, organic texture and a natural “earthy” scent that synthetic materials just can’t replicate. It’s a wonderful way to connect with the concept of [sustainable living] through art.
Simple, Pantry-Safe Ingredients
One of the best parts about this recipe is that you probably already own everything you need. This removes the barrier to entry for beginners and makes it a cost-effective project for families.
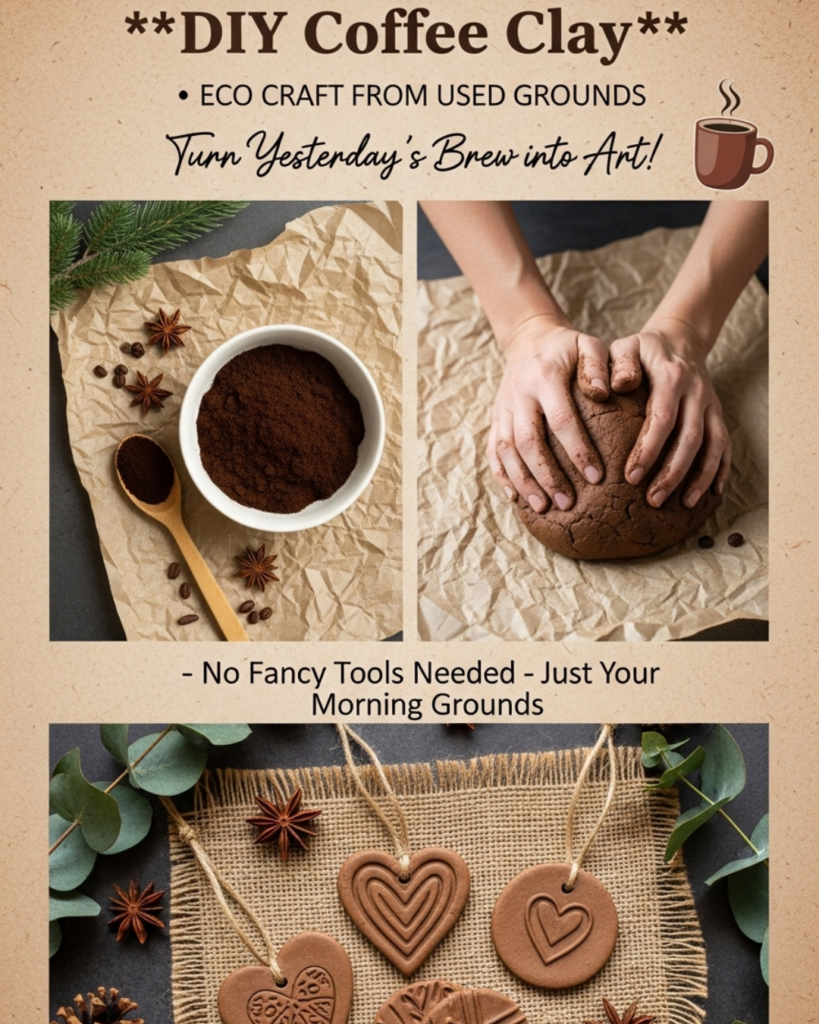
- Coffee Grounds: Provides bulk and texture.
- Flour: Acts as the primary binding agent.
- Salt: Works as a natural preservative and hardener.
- Water: Hydrates the mixture to make it pliable.
Reassurance for Beginners
If you have never worked with clay before, don’t worry! This recipe is incredibly forgiving. If it’s too sticky, you add a little flour. If it’s too dry, you add a drop of water. It is a tactile, sensory experience that encourages experimentation rather than perfection. You are not just making “stuff”; you are nurturing your creative spirit.
Step-by-Step: Crafting Your Coffee Clay
Ready to get started? This process is straightforward and yields a generous amount of clay for multiple projects.
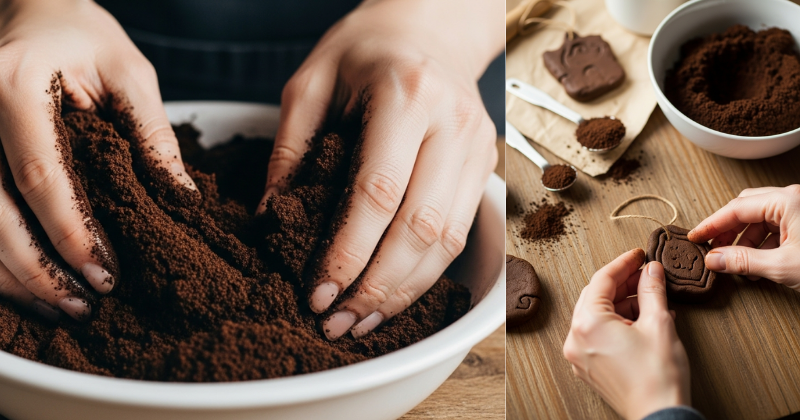
1. Prepare Your Grounds
For the best results, your coffee grounds should be dried or only slightly damp.
- The Action: If you have fresh grounds, spread them on a baking sheet and let them air dry for a few hours or pop them in a low oven (around 170°F) for 10 minutes.
- Pro Tip: Finely ground coffee creates a smoother clay, while coarse grounds give a rugged, stone-like appearance.
2. The Mixing Process
Follow these measurements for a perfect consistency:
- Combine: 1 cup of dried coffee grounds, 2 cups of all-purpose flour, and 1/2 cup of salt in a large bowl.
- Integrate: Slowly add 3/4 cup of warm water.
- Knead: Use your hands to mix until a dough forms. Knead it on a floured surface for about 2-3 minutes until it feels smooth and elastic.
3. Shaping and Drying
Now for the fun part! You can roll the clay out to 1/4 inch thickness and use cookie cutters, or hand-sculpt 3D figures.
- Drying Time: This clay air-dries, which means no oven is required (though you can use one to speed things up).
- The Timeline: Air drying usually takes 24 to 48 hours depending on the thickness. Flip your pieces halfway through to ensure even drying.
Advanced Strategies: Pro Tips for Professional Results
Once you’ve mastered the basic Eco-Friendly DIY Coffee Clay Recipe, you can start customizing your work to look like high-end boutique decor.
Adding Natural Pigments
While the coffee provides a lovely tan or brown hue, you can experiment with other kitchen items. Adding a teaspoon of cinnamon enhances the scent and darkens the color. A pinch of turmeric can add a golden glow. This is a great way to explore [natural dyes] without using synthetic chemicals.
Texture and Detailing
Because this clay has a “toothy” texture from the grounds, it takes impressions beautifully.
- Nature Prints: Press dried leaves, twigs, or acorns into the wet clay to create botanical fossils.
- Mixed Media: Embed small pebbles or sea glass into the clay before it dries for a mosaic effect.
Featured Snippet: How do I make DIY coffee clay last longer?
To ensure your coffee clay creations last, you must allow them to dry completely to prevent mold. Once fully hardened, seal the pieces with a non-toxic clear coat or a simple mixture of 50/50 water and white glue. For long-term storage of unused wet clay, wrap it tightly in plastic wrap, place it in an airtight container, and keep it in the refrigerator for up to one week.
Troubleshooting: Solving Common Clay Challenges
Art is a process, and sometimes the clay doesn’t behave. Here is how to fix the most frequent issues.
“My clay is cracking as it dries.”
- The Cause: This usually happens if the clay dries too quickly or is too thin in certain spots.
- The Solution: If you see a crack forming, dampen your finger and gently rub a tiny bit of fresh clay into the gap.
- Prevention: Dry your pieces away from direct sunlight or heater vents. A slow, natural dry is always best.
“The clay feels too sticky to work with.”
- The Cause: High humidity or a little too much water during the mixing phase.
- The Fix: Dust your hands and your work surface with a little extra flour. Work it in gradually until the stickiness vanishes.
“My finished pieces feel slightly soft.”
- The Strategy: If air-drying isn’t doing the trick, you can “low-bake” them.
- The Advice: Place your pieces on a parchment-lined tray and bake at 200°F (90°C) for 30-60 minutes. Keep a close eye on them to ensure they don’t scorch!
Maximizing Results: Finishing and Display
Your journey doesn’t end when the clay is dry. Finishing touches can transform a “craft project” into a “work of art.”
Sanding and Polishing
Once completely dry, you can use fine-grit sandpaper to smooth out any rough edges. This is particularly effective for jewelry pieces like beads or pendants. The sanding process reveals the beautiful speckles of the coffee grounds, giving it a polished granite look.
Eco-Friendly Sealing
To protect your items from moisture, it is important to seal them. Instead of plastic-based varnishes, consider using beeswax or a [natural soy-based sealer]. Rubbing a small amount of beeswax onto the surface with a cloth gives it a soft, professional sheen and deepens the coffee color.
Gifting and Sharing
These creations make incredible, personalized gifts. Attach a small tag explaining that the item was made from upcycled coffee grounds. It’s a powerful conversation starter about [zero-waste gift ideas] and shows that you put thought, time, and environmental care into your present.
Conclusion
Mastering this Eco-Friendly DIY Coffee Clay Recipe is more than just a fun afternoon project; it is a step toward a more mindful and creative lifestyle. You have learned how to take something as mundane as old coffee grounds and transform them into lasting art. By using simple pantry staples, you have unlocked a way to create that is safe for your family and the earth.
Remember, the goal isn’t perfection—it’s the joy of making. Whether you are making holiday ornaments or simple beads, you are proving that beauty can be found in the most unexpected places. Now, go grab those grounds from this morning and see what you can create!