
Natural soaps made with plant-based ingredients are increasingly popular among people looking for simple, customizable skincare options. Ingredients like hibiscus and oatmeal are often used in handmade soaps because they provide gentle exfoliation and skin-soothing properties while adding natural color and texture.
Hibiscus flowers contain plant compounds such as antioxidants and mild natural acids, which may help support smoother-looking skin. Oatmeal, on the other hand, is widely known for its calming and moisturizing effects, especially for dry or sensitive skin.
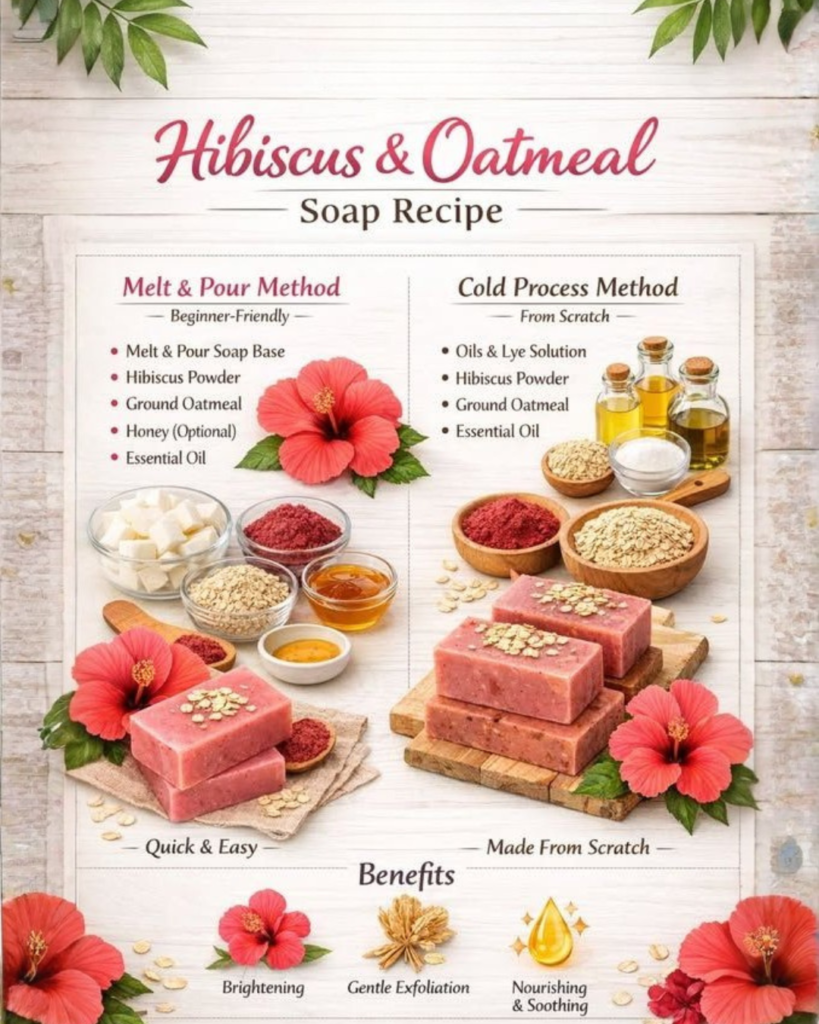
In this guide, you’ll learn two simple ways to make hibiscus and oatmeal bathing soap at home:
- Melt & Pour Method – beginner-friendly and fast
- Cold Process Method – a traditional soap-making technique from scratch
Both options allow you to create a natural soap bar with minimal ingredients while controlling what goes into your skincare products.
Why Use Hibiscus and Oatmeal in Soap?
These ingredients are commonly used in natural skincare because they offer gentle benefits without harsh chemicals.
Hibiscus Benefits
Hibiscus petals are rich in plant compounds that may support skin appearance.
Potential benefits include:
- Natural antioxidants
- Mild plant acids that help gently exfoliate
- Natural pink or reddish tint
- Floral herbal scent
Ground hibiscus can also add visual appeal to soap bars.
Oatmeal Benefits
Oatmeal has long been used in skincare because of its soothing properties.
Common benefits include:
- Gentle exfoliation
- Skin-soothing compounds
- Moisture support
- Suitable for dry or sensitive skin
Finely ground oatmeal works best in soap because it blends smoothly into the mixture.
Method 1: Melt & Pour Hibiscus Oatmeal Soap (Beginner-Friendly)
The melt & pour method is ideal for beginners because it does not involve handling lye.
Instead, you use a pre-made soap base that is melted and customized with additional ingredients.
Ingredients
- 500 g melt & pour soap base (glycerin, goat milk, or shea butter base)
- 1 tablespoon finely ground dried hibiscus
- 1 tablespoon finely ground oatmeal
- 1 teaspoon sweet almond oil or olive oil
- Optional: a few drops of lavender or rose essential oil
Tools
- Heat-safe bowl or double boiler
- Silicone soap molds
- Mixing spoon
- Knife for cutting the soap base
- Spray bottle with rubbing alcohol (optional for bubbles)
Step-by-Step Instructions
1. Cut the Soap Base
Cut the melt & pour soap base into small cubes so it melts evenly.
2. Melt the Base
Place the cubes in a heat-safe bowl and melt them using:
- a microwave in short intervals, or
- a double boiler on the stove
Stir occasionally until fully melted.
3. Add the Ingredients
Once melted, stir in:
- ground hibiscus
- ground oatmeal
- carrier oil
- optional essential oils
Mix gently until evenly combined.
4. Pour Into Molds
Carefully pour the soap mixture into silicone molds.
If bubbles appear on the surface, lightly spray with rubbing alcohol.
5. Let It Set
Allow the soap to cool and harden for 2–3 hours.
Once solid, remove from the molds and the soap is ready to use.
Method 2: Cold Process Hibiscus Oatmeal Soap (From Scratch)
Cold process soap making allows complete control over ingredients but requires handling sodium hydroxide (lye). Proper safety precautions such as gloves and goggles are important.
Ingredients
- 300 g olive oil
- 200 g coconut oil
- 150 g shea butter
- 120 g sodium hydroxide (lye)
- 300 g distilled water
- 1 tablespoon finely ground hibiscus
- 1 tablespoon finely ground oatmeal
- Optional essential oils
Tools
- Digital scale
- Heat-safe containers
- Immersion blender
- Silicone soap mold
- Safety gloves and goggles
Step-by-Step Instructions
1. Prepare the Lye Solution
Slowly add sodium hydroxide to distilled water (never the reverse) while stirring.
The mixture will heat up quickly. Allow it to cool to around 38–43°C (100–110°F).
2. Melt the Oils
In a separate container, melt coconut oil and shea butter. Then mix with olive oil.
Let the oil mixture cool to a similar temperature as the lye solution.
3. Combine Lye and Oils
Slowly pour the lye solution into the oils while blending with an immersion blender.
Blend until the mixture reaches light trace (a pudding-like consistency).
4. Add Hibiscus and Oatmeal
Stir in the ground hibiscus and oatmeal evenly.
Add essential oils if desired.
5. Pour Into Mold
Pour the soap mixture into molds and gently tap to release air bubbles.
Cover the mold with a towel and allow it to rest for 24–48 hours.
6. Cure the Soap
After removing from the mold, cut the soap into bars and allow them to cure for 4–6 weeks. This process helps the soap harden and become milder on the skin.
Tips for Better Soap Results
Use Finely Ground Ingredients
Large plant pieces can feel rough on the skin. Grinding hibiscus and oatmeal into a fine powder improves texture.
Avoid Too Much Exfoliant
Adding too much oatmeal or hibiscus may make the soap crumbly. Small amounts are usually enough.
Test Essential Oils First
Some essential oils are strong and may irritate sensitive skin. Use small amounts and choose skin-safe oils.
Store Soap Properly
Keep soap bars in a dry, ventilated area between uses to help them last longer.
Conclusion
Making hibiscus and oatmeal bathing soap at home can be a fun and customizable DIY project. Whether you choose the simple melt & pour method or the traditional cold process method, both allow you to create natural soap bars using gentle plant ingredients.
Hibiscus adds natural color and botanical compounds, while oatmeal provides soothing and mild exfoliating qualities. Together, they create a soap that feels nourishing and pleasant to use.
By following safe preparation methods and using quality ingredients, homemade soaps can become a practical addition to a natural skincare routine.