Learn how to do facial at home in simple way with this comprehensive DIY guide. Discover easy steps for glowing skin using basic ingredients and professional tips!
Important Disclaimer: This article is for informational purposes only and should not replace professional advice. For health-related topics, consult healthcare providers. For safety procedures, verify current best practices and local regulations. Individual results may vary, and personal circumstances should always be considered when implementing any suggestions.

Have you ever looked in the mirror after a long week and felt like your skin lost its natural spark? We’ve all been there—the dullness, the clogged pores, and that tired look that no amount of concealer seems to fix. You might think a professional spa visit is the only solution, but what if I told you that you could achieve that radiant, “just-walked-out-of-the-salon” glow right in your own bathroom?
Learning how to do facial at home in simple way is not just about saving money; it’s about reclaiming your self-care time and understanding exactly what goes onto your skin. This guide will transform your skincare routine, helping you unlock a clearer, brighter complexion without any complicated machinery or expensive price tags. Get ready to discover the ultimate DIY glow-up that fits perfectly into your busy lifestyle. Your journey to beautiful, refreshed skin starts right here!
Foundation: Understanding the Basics of a DIY Facial
Before we dive into the “how-to,” let’s build your confidence. Many people hesitate to try a home facial because they fear it’s too complex or that they might irritate their skin. However, at its core, a facial is simply a systematic way of deep cleaning and nourishing your face.
The goal is to move through a logical sequence that prepares, treats, and protects your skin cells. You don’t need professional-grade steaming machines or medical extractors. In fact, using your own hands and simple kitchen or drugstore staples can often be more beneficial because you can customize the intensity.
H3: Why a Home Facial Works
A home facial works by increasing blood circulation and encouraging lymphatic drainage. When you massage your face during the various steps, you are helping your skin shed dead cells and absorb nutrients more effectively. This is a sustainable lifestyle choice that supports long-term skin health rather than just a quick, chemical-heavy fix.
H3: Gathering Your Simple Toolkit
To keep things easy, you only need a few basics:
- A gentle cleanser
- An exfoliant (store-bought or a DIY sugar scrub)
- A bowl of hot water and a towel for steaming
- A face mask suited to your skin type
- Your favorite moisturizer or facial oil
Step-by-Step Process: How to Do Facial at Home in Simple Way
Breaking down the process into manageable steps makes the experience relaxing rather than overwhelming. Follow this core method for the best results.
Step 1: Double Cleanse
Start by removing any surface-level dirt or makeup. Use a cleansing oil or micellar water first, then follow up with your regular water-based face wash. This ensures you are working on a truly clean canvas.
Step 2: Gentle Exfoliation
Exfoliation removes the “wall” of dead skin cells that prevents products from sinking in. Massage your exfoliant in circular motions, focusing on areas like the nose and chin where pores tend to clog. Be gentle—you want to polish, not scrub!
Step 3: The Steam Session
This is where the transformation happens. Fill a bowl with hot (not boiling) water. Lean over it with a towel draped over your head to trap the steam for 5 to 8 minutes. This softens the sebum in your pores, making the rest of the facial much more effective.
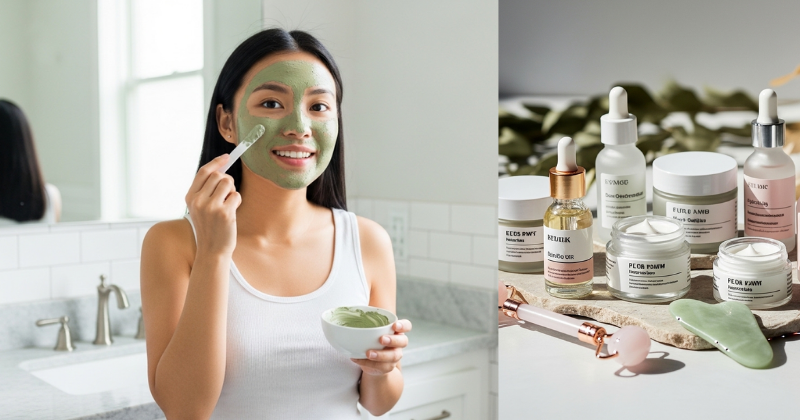
Step 4: Mask and Relax
Apply a mask that addresses your current skin concerns. Use a clay mask if you’re oily, or a honey-based mask for hydration. Leave it on for 10-15 minutes. This is the perfect time to practice the Legs-Up-the-Wall pose to lower your cortisol while your skin absorbs the goodness.
Step 5: Tone and Moisturize
Rinse the mask off with lukewarm water. Use a toner to balance your skin’s pH, then lock everything in with a generous layer of moisturizer. Your skin will feel soft, plump, and incredibly hydrated.
Advanced Strategies: Pro Tips for a Spa-Quality Experience
Once you’ve mastered the basic steps of how to do facial at home in simple way, you can add some expert-level variations to boost your results.
H3: Targeted Ingredients for Different Skin Types
Customization is the secret to a professional-grade result.
- For Brightening: Look for Vitamin C or use a few drops of fresh lemon juice in a yogurt mask.
- For Acne-Prone Skin: Incorporate tea tree oil or a dash of turmeric in your mask to kill bacteria.
- For Aging Skin: Focus on facial massage techniques that lift the jawline and cheekbones.
H3: Temperature Play
Experts often use temperature to shock the skin into a state of renewal. After your steam session, try splashing your face with ice-cold water or using a “chilled” spoon to massage under your eyes. This helps close the pores and reduces puffiness instantly.
H4: Timing and Frequency
For the best results, perform this full routine once every two weeks. Over-exfoliating can damage your skin barrier, so give your face time to recover and glow.
Troubleshooting: Common Challenges and Easy Solutions
Even with a simple process, you might run into a few hiccups. Don’t worry—setbacks are just part of the learning curve!
- Problem: My skin looks red or irritated after the facial.
- Solution: You may have scrubbed too hard or used water that was too hot. Apply a thin layer of aloe vera gel or a cold compress to soothe the area immediately.
- Problem: I don’t have a face mask at home.
- Solution: You can easily make a DIY mask. For oily skin, use oatmeal and water; for dry skin, use mashed avocado or honey.
- Problem: I feel a breakout coming on the next day.
- Solution: This is often “purging,” where the steam and cleansing bring deep impurities to the surface. Keep the area clean and avoid touching it; it should clear up quickly, leaving better skin behind.
Preventive Measures
Always do a patch test if you are trying a new DIY ingredient. Just like the Hibiscus Hair Growth Secret requires checking for allergies, your face is sensitive. Test a small amount on your jawline before applying it everywhere.
Maximizing Results: Maintenance and Long-Term Care
Achieving success with one facial is great, but building upon that success is how you transform your skin forever. Maintenance is just as important as the treatment itself.
Complementary Strategies
- Hydration from Within: Drink plenty of water throughout the day. No topical moisturizer can replace the glow that comes from being well-hydrated.
- Clean Pillowcases: Make sure you sleep on a clean silk or cotton pillowcase to prevent bacteria from transferring back to your freshly cleaned pores.
- Sun Protection: Your skin is more sensitive after a facial, especially after exfoliation. Always apply SPF 30 or higher the next morning.
Inspiring Continued Growth
As you become more comfortable with these steps, you might explore other natural beauty hacks, like using lemon slices and water for natural cleaning or discovering new botanical oils. The more you learn, the more empowered you will feel to take control of your beauty and wellness.
Conclusion: You Are Your Own Beauty Expert
You’ve now unlocked the secret of how to do facial at home in simple way! By following these achievable steps, you’ve not only saved time and money but also given your skin the personalized attention it deserves. The transformation from tired and dull to radiant and refreshed is a powerful reminder of how small, consistent acts of self-care can make a massive difference.
Remember, you have the capability to achieve professional results with just a little bit of knowledge and a lot of love for yourself. So, take a deep breath, look in that mirror, and enjoy your stunning new glow. You’ve earned it!