Learn how to freeze lemon zest with our easy, step-by-step guide. Discover the best methods to preserve citrus flavor and save money in the kitchen today.
Have you ever followed a recipe that called for only the juice of a lemon, leaving you with a naked, zesty yellow rind that ends up in the trash? Or perhaps you’ve found a great sale on citrus but knew you couldn’t use it all before it shriveled away? It is a common kitchen dilemma that leads to unnecessary waste. But what if you could capture that bright, aromatic sunshine and keep it in your freezer for months? Learning how to freeze lemon zest is a transformative kitchen hack that ensures you always have a burst of citrus flavor ready for baking, cooking, or garnishing.
In this comprehensive guide, we are going to unlock the secrets to preserving citrus peel like a pro. You will discover how to prep your fruit, the best tools for the job, and three different storage methods that suit any cooking style. You have the capability to reduce food waste and elevate your meals with zero extra cost. Let’s dive into the world of flavor preservation and achieve a more efficient, zest-filled kitchen!
Foundation: Why You Should Preserve Your Citrus Peel
Before we get into the “how,” it is essential to build confidence in why this small habit makes a massive difference. Most of a lemon’s essential oils—the stuff that provides that incredible fragrance—live in the zest, not the juice.
The Benefits of Freezing Zest
Freezing is the gold standard for preserving the volatile oils in citrus. Unlike drying, which can sometimes result in a muted or “woody” flavor, freezing keeps the zest tasting exactly like it was just grated. This is a huge win for [sustainable home living] and budget-conscious cooks. By saving the zest every time you use a lemon for juice, you are essentially getting a gourmet ingredient for free.
Addressing Common Concerns
A frequent hesitation for beginners is the fear of “freezer burn” or the zest clumping into a solid brick. We will address these by using airtight storage and specific flash-freezing techniques. Another concern is safety; since we are using the outer skin, cleanliness is paramount. If you are used to [organic gardening practices], you know that the surface of the fruit is just as important as the inside!
Key Tools for Success
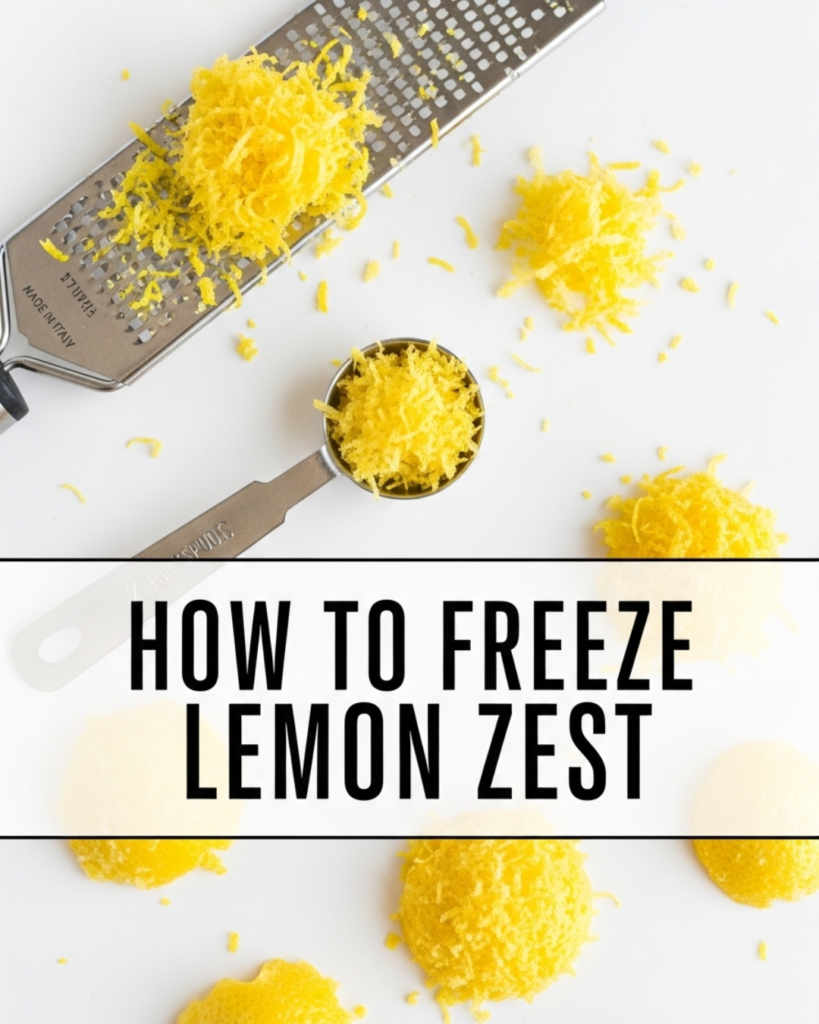
- Microplane or Zester: For fine, fluffy zest.
- Vegetable Peeler: For large strips used in cocktails or stews.
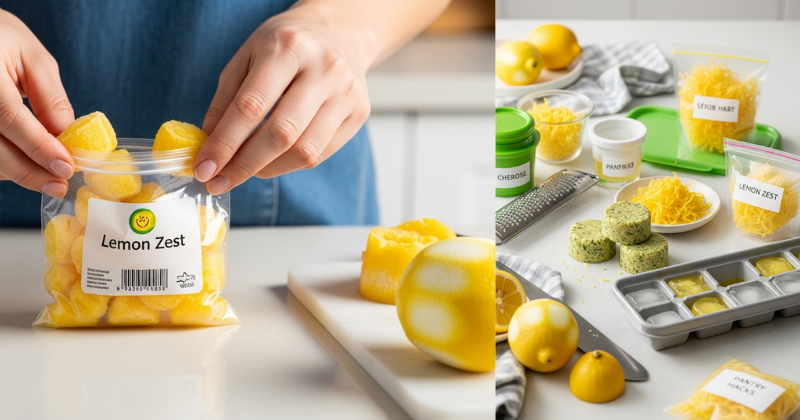
- Airtight Containers: Small jars or freezer-safe zip bags.
- Parchment Paper: Essential for the flash-freeze method.
Step-by-Step: The Core Methods for Freezing Lemon Zest
Ready to start? Follow these manageable steps to ensure your zest stays fresh and potent for up to six months.
1. Preparing the Fruit
Cleanliness is your first step to a high-quality product.
- The Wash: Scrub the lemons under warm water with a vegetable brush. This removes dirt and, more importantly, the food-grade wax often found on grocery store citrus.
- The Dry: Pat the fruit completely dry. Any surface moisture will turn into ice crystals, which leads to clumping.
2. The Flash-Freeze Method (Best for Baking)
This is the most effective way to ensure your zest stays loose and easy to measure.
- The Step: Grate your lemon zest directly onto a baking sheet lined with parchment paper. Spread it out so the pieces aren’t touching.
- The Freeze: Place the tray in the freezer for 30–60 minutes.
- The Storage: Once frozen solid, scrape the zest into a small freezer bag. Squeeze out all the air before sealing.
3. The Ice Cube Tray Method (Best for Sauces)
If you often add zest to pastas or pan sauces, this shortcut is a lifesaver.
- The Step: Place a teaspoon of zest into each well of a clean ice cube tray.
- The Seal: Add just enough water or lemon juice to cover the zest and freeze.
- The Result: You now have pre-portioned “flavor bombs” ready to drop into a hot pan!
Advanced Strategies: Expert Tips for Maximum Flavor
Now that you have the basics down, let’s explore ways to customize your approach and unlock even better results.
Preserved Zest in Oil
For a gourmet twist, try freezing your zest in olive oil instead of water. The oil absorbs the citrus essence, creating a fragrant base for salad dressings or roasted vegetables. Simply follow the ice cube tray method but swap water for a high-quality oil. This is a fantastic [meal prep strategy] for busy weeknights.
Using Different Zest Textures
Don’t limit yourself to fine gratings. Use a vegetable peeler to create wide strips of zest (avoiding the white pith). Freeze these strips flat. They are perfect for dropping into a pot of steamy rice, infusing simple syrups, or garnishing a cold drink. Experimenting with texture is a great way to [achieve professional-level plating] at home.
Pro-Tip: The “Double Bag” Rule
Citrus oils are powerful, but they can also absorb odors from the freezer. To keep your zest from tasting like frozen onions, always double-bag your zest or place the small bags inside a glass jar. This extra layer of protection keeps the flavor pure and the aroma intense.
Troubleshooting: Common Challenges and Solutions
Even the simplest DIY projects can have hiccups. Here is how to address frequent obstacles with solutions.
“My zest turned brown or lost its smell.”
- The Solution: This usually means the zest was exposed to air. Oxygen is the enemy of flavor.
- The Fix: Ensure you are using “Freezer” grade bags (which are thicker) and always press out every bit of air. If you have a vacuum sealer, now is the time to use it!
“I accidentally grated the white part (the pith).”
- The Advice: The pith is bitter and doesn’t freeze well. If you get too much white in your zest, it’s better to compost that batch and try again.
- Preventive Measure: Use a light touch. You only want to remove the very top yellow layer where the color and oils are concentrated.
“The zest is stuck in a big clump.”
- The Alternative Approach: If you forgot to flash-freeze, don’t worry. You can use a fork to “rake” the clump and break off what you need. To prevent this next time, make sure the zest is bone-dry before it hits the freezer.
Maximizing Results: Next-Level Citrus Preservation
To build upon your success, think about how you can integrate this into a zero-waste kitchen lifestyle.
The “Full Lemon” Strategy
Never zest a lemon without juicing it, and never juice a lemon without zesting it first! It is much easier to zest a firm, whole lemon than a squeezed, hollow one. Once zested, you can [learn how to freeze lemon juice] in trays as well, giving you a completely preserved fruit for future use.
Complementary Strategies
Frozen lemon zest pairs beautifully with frozen herbs. Consider making “Citrus-Herb pucks” by freezing zest with chopped parsley or thyme. This is a key part of [efficient kitchen management]. You’ll save time during prep and ensure your dishes always have that “fresh-picked” taste regardless of the season.
Featured Snippet: Can you freeze lemon zest?
Yes, you can freeze lemon zest, and it is the best way to preserve its flavor and aroma. For the best results, flash-freeze the grated zest on a parchment-lined tray for one hour before transferring it to an airtight freezer bag. This prevents clumping and allows you to measure out exactly what you need for recipes later. Frozen lemon zest stays fresh and potent for up to six months.
Conclusion
Understanding how to freeze lemon zest is a simple yet empowering skill that elevates your cooking and reduces household waste. You have discovered that you have the capability to succeed in preserving these vibrant flavors with very little effort. By implementing these methods, you achieve a more organized kitchen and a pantry (or freezer) full of gourmet potential.
You’ve got this! Start today by zesting that last lemon in your fruit bowl before it goes to waste. You’ll be thanked by your future self the next time you’re baking a cake or whisking a dressing.