Learn how to make a DIY water filter using simple materials like sand, charcoal, and gravel. Discover effective emergency water purification methods today.
Imagine you are out on a weekend camping trip, or perhaps you are facing an unexpected emergency at home, and your clean water supply runs low. The realization that you are surrounded by water you cannot drink is a stressful experience. However, nature and your recycling bin provide almost everything you need to solve this problem. Today, you are going to discover exactly how to make a DIY water filter that can turn murky pond water into clear, usable liquid. This isn’t just a survival skill; it is a fascinating science project that empowers you to understand the world around you.
By mastering this process, you will gain the confidence to handle outdoor adventures and emergency preparedness with ease. This guide offers achievable, step-by-step guidance to help you build a functional filtration system using basic mechanical principles. You have the capability to protect your family and unlock a deeper connection to self-reliance. Get ready to discover how simple materials like sand and charcoal can achieve a total breakthrough for your peace of mind!
Foundation: Understanding Natural Filtration
Before we start building, let’s build your confidence with the basic concepts of how water is cleaned in the wild. Understanding the “why” will help you appreciate why knowing how to make a DIY water filter is so essential.
How Nature Filters Water
In the natural world, rainwater is filtered as it seeps through layers of the earth to reach underground aquifers. Our DIY system mimics this “slow sand filtration” process. Each layer we add serves a specific purpose, from catching large sticks to neutralizing microscopic toxins.
Key Components of a Filter
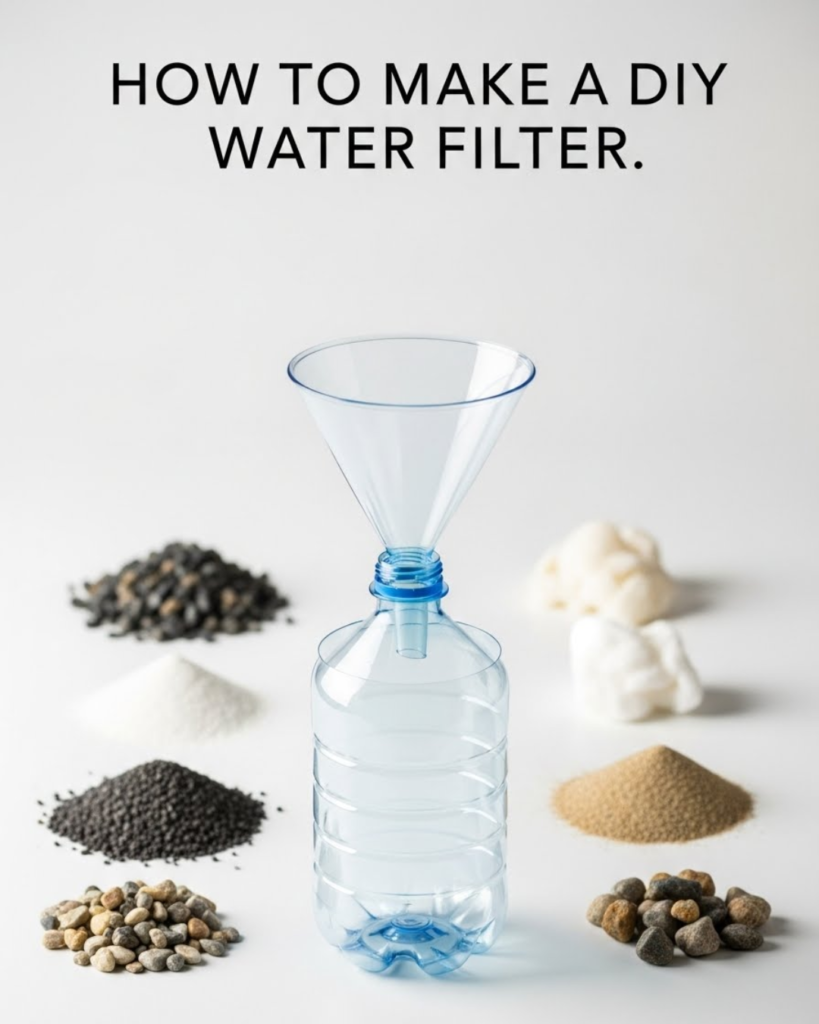
To achieve the best results, we use a tiered approach:
- The Container: Usually a recycled plastic bottle, acting as the housing.
- The Mechanical Layers: Gravel and sand trap large particles like dirt, leaves, and insects.
- The Chemical Layer: Activated charcoal (or crushed charcoal from a campfire) is the secret weapon. It uses a process called adsorption to pull chemicals and odors out of the water.
- The Barrier: A piece of cloth or a coffee filter prevents your filtering materials from falling into your clean water.
Reassurance for Beginners
If you have never built anything like this before, don’t worry! You are doing a great job by learning these skills now. You don’t need a lab or expensive equipment to succeed. With a little patience, you have everything you need to create a working system.
Step-by-Step: Building Your Filtration System
Ready to get started? Follow these manageable steps to assemble your filter. This is the core method for how to make a DIY water filter that works in almost any environment.
1. Prepare the Container
Take a 2-liter plastic bottle and cut off the bottom (the wide end). Turn it upside down so it looks like a funnel. Punch a small hole in the cap or tie a piece of clean cloth tightly over the neck with a rubber band.
2. Layering the Materials
The order of layers is crucial. You want the water to hit the coarsest material first and the finest material last.
- Bottom Layer (Near the neck): Pack in cotton balls, a coffee filter, or a piece of cloth.
- Second Layer: Add 2-3 inches of crushed charcoal.
- Third Layer: Add 2-3 inches of fine sand.
- Fourth Layer: Add 2-3 inches of coarse sand or small pebbles.
- Top Layer: Add 2-3 inches of large gravel or stones.
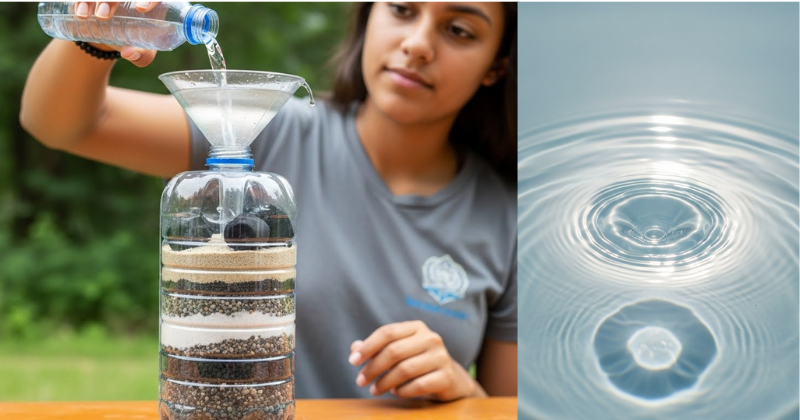
3. The Filtration Process
Slowly pour your “dirty” water into the top. It will take some time to trickle through the layers. This patience is what ensures a high-quality result.
- Internal Link: While you wait for your water to filter, you can work on other home skills like learning How to Make a DIY Anti-Mold Spray for a healthier living environment.
Advanced Strategies: Pro Tips for Pure Water
Once you have mastered the basic construction, use these expert-level insights to take your filtration to the next level.
The Charcoal Secret
If you are in the woods, you can make your own charcoal by crushing the charred remains of a cold campfire. However, for a “pro” version, you can create “activated” charcoal by treating it with lemon juice or calcium chloride, which increases its surface area and ability to trap toxins.
Enhancing Flow and Clarity
If the water is coming out too slowly, you may have packed the sand too tightly. If it is coming out murky, you might need to “pre-rinse” your filter by running clear water through it first to wash away the dust from the charcoal and sand.
- Internal Link: If you are filtering water for a garden, consider how this clean water can help you when you Discover the Best Herbal Tea Recipe for Lung Detox using your own home-grown herbs.
Featured Snippet: Does a DIY water filter make water safe to drink?
While a DIY filter is excellent at removing sediment, odors, and some chemicals, it does not reliably remove all bacteria, viruses, or parasites. To make water truly safe for consumption, you must always boil the filtered water for at least one minute (three minutes at high altitudes) or use chemical purification tablets after the filtration process.
Troubleshooting: Common Challenges and Solutions
Even with a perfect plan, you might face some obstacles. Here is how to handle them with an empowering mindset:
- “The water is still yellow or brown”: This often happens if the charcoal layer is too thin.
- Solution: Increase the amount of crushed charcoal and ensure your sand is as fine as possible.
- “The filter is leaking from the sides”:
- Fix: Ensure your layers are level and firmly packed. If you cut the bottle unevenly, try taping the edges to provide a better seal.
- “I can’t find sand”:
- Alternative: You can use crushed eggshells or even dried grass as a substitute for the coarse layers, though sand is always preferred for its surface area.
- Internal Link: If the stress of an emergency is getting to you, try a DIY Magnesium Cream Recipe to help with relaxation and muscle relief.
Maximizing Results: Maintenance and Long-Term Use
Now that you know how to make a DIY water filter, let’s look at how to keep it working effectively over time.
When to Replace the Layers
A DIY filter is not permanent. Over time, the sand becomes clogged with silt and the charcoal becomes “full” of toxins. If you notice the flow rate significantly decreasing or the water losing its clarity, it is time to dump the materials and start fresh.
Complementary Strategies
- Solar Disinfection (SODIS): After filtering, place your water in a clear plastic bottle and leave it in direct sunlight for 6 hours. The UV rays help kill remaining pathogens.
- Rainwater Catchment: Use your filter in conjunction with a rainwater harvesting system to provide a sustainable source of non-potable water for cleaning or gardening.
- Internal Link: To keep your water containers clean without chemicals, check out our 3-Ingredient Natural Bleach Alternative guide.
Conclusion: Empower Your Self-Reliance
You have now discovered the essential steps of how to make a DIY water filter and, more importantly, you have the achievable knowledge to put it into practice. You have moved from being uncertain about water safety to being an empowered individual who can utilize the resources around them. By following these methods—layering stones, sand, and charcoal—you have achieved a strategy for basic water purification that can save the day.
The journey to self-sufficiency is a rewarding path. We encourage you to try building a “test” filter today so you are ready when it truly matters. You are more than capable of achieving a high-quality, prepared lifestyle using simple, natural tools!
Important Disclaimer: This article is for informational purposes only and should not replace professional advice. For health-related topics, consult healthcare providers. For financial or legal matters, seek qualified professional guidance. For safety procedures, verify current best practices and local regulations. Individual results may vary, and personal circumstances should always be considered when implementing any suggestions.