Discover how to make beautiful DIY aroma stones at home with this simple guide. Learn to create custom, long-lasting natural air fresheners using safe, non-toxic ingredients.
Have you ever walked into a room and felt instantly relaxed by a subtle, heavenly scent, only to realize later that the source was a plug-in filled with synthetic chemicals? Many of us crave a fragrant home but worry about the artificial fragrances and phthalates found in commercial air fresheners. If you are looking for a stylish, sustainable way to scent your space, it is time to discover the magic of scent stones. Learning how to make beautiful DIY aroma stones at home is a creative and rewarding project that transforms simple minerals into elegant, functional decor. These stones act as passive diffusers, slowly releasing the aroma of your favorite essential oils without the need for heat or electricity.
In this comprehensive guide, you will learn the step-by-step process of crafting these “stone” diffusers using accessible ingredients like plaster or clay. We will explore how to customize their shape, color, and scent to match your unique style. By the end of this article, you will feel empowered to replace plastic fresheners with artisanal creations that are as beautiful as they are effective. Get ready to unlock a fresher, more natural home environment—one stone at a time!

Foundation: The Basics of Passive Diffusion
Building your confidence with DIY home projects begins with understanding the simple science behind the craft. Aroma stones, also known as plaster diffusers, work through the principle of porosity.
Why Choose Aroma Stones Over Candles?
Unlike candles or electric diffusers, aroma stones require no flame and no water. This makes them perfect for small spaces like closets, drawers, or office desks where you want a constant, subtle scent. When you learn how to make beautiful DIY aroma stones at home, you are opting for a [sustainable lifestyle change] that reduces energy consumption and eliminates the risk of open flames. They are the ultimate “set it and forget it” natural fragrance solution.
Key Materials and Their Roles
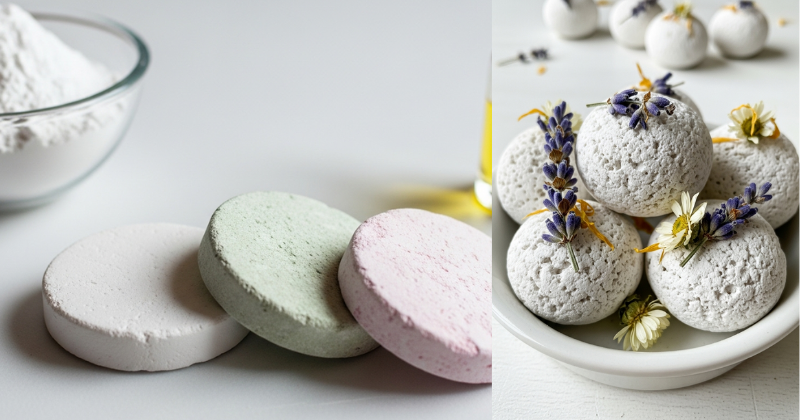
- Plaster of Paris: This is the most popular base. It is highly porous, meaning it “drinks” the essential oils and releases them slowly over several days.
- Alternative Bases: You can also use air-dry clay or a salt-and-flour dough, though plaster provides the most professional, stone-like finish.
- Essential Oils: These provide the therapeutic aroma. Using high-quality oils ensures your stones don’t just smell good but also offer wellness benefits.
Reassurance for Beginners
If you have never worked with plaster before, don’t be intimidated! It is a very forgiving medium that sets quickly. You don’t need a professional studio—just a few silicone molds and a mixing bowl. You are about to discover how satisfying it is to create something that looks like it came from a high-end boutique for a fraction of the cost.
Step-by-Step: Crafting Your First Aroma Stone
Ready to start? Follow these manageable steps to create a batch of stunning, functional scent stones in less than an hour of active time.
1. Prepare Your Workspace
Plaster can be a bit messy, so cover your surface with newspaper or a silicone mat. Gather your silicone molds—flower, heart, or geometric shapes work beautifully for this project.
2. The Golden Ratio
The secret to a strong stone is the ratio of water to plaster. Usually, a 1:2 ratio (one part water to two parts plaster) works best.
- Step A: Pour the water into a disposable mixing bowl.
- Step B: Slowly sift the plaster into the water. Let it sit for a minute to “wet,” then stir gently to avoid creating air bubbles.
Actionable Tip: To achieve a “marble” look, add a single drop of acrylic paint or mineral pigment to the mix and swirl it once with a toothpick before pouring.
3. Pouring and Setting
Carefully pour the mixture into your silicone molds. Gently tap the sides of the molds to help air bubbles rise to the surface and disappear.
- Timing: The stones will feel warm as the chemical reaction happens. Let them sit undisturbed for at least 30 to 60 minutes.
- Curing: Even if they feel hard, they need to “cure” for 24 hours to fully dry before you add any essential oils.
Advanced Strategies: Customizing and Pro Tips
Once you’ve mastered the basic how to make beautiful DIY aroma stones at home technique, you can share expert-level insights by experimenting with textures and scents.
Artistic Variations
- Botanical Impressions: Before the plaster sets, press dried lavender sprigs or rose petals into the back of the stone. This creates a stunning connection to nature.
- Natural Pigments: Instead of paint, try using mica powders or even a pinch of beetroot powder (from your [natural cream blush recipe] supplies) to create soft, earthy hues.
- Embedded Magnets: Glue a small magnet to the back of a finished stone. Now you have a functional, scented fridge magnet that keeps your kitchen smelling like citrus!
Scenting Strategies
To use your stones, simply place 3–5 drops of essential oil onto the center of the stone. The plaster will absorb the oil instantly.
- For the Bedroom: Use a blend of Lavender and Cedarwood to promote deep sleep.
- For the Bathroom: Try Eucalyptus and Lemon for a spa-like freshness.
- Long-Term Maintenance: When the scent fades (usually after 3–5 days), simply “recharge” the stone with a few more drops.
Troubleshooting: Common Challenges and Solutions
Even the best DIYers encounter obstacles. Here is how to handle them with ease.
“My stones are crumbling or dusty.”
- The Solution: This usually happens if there was too much water in the mix. Ensure you are measuring accurately. You can also lightly sand the edges of a cured stone with fine-grit sandpaper to remove any “dusty” burrs.
“The essential oil is leaving a yellow stain.”
- Alternative Approach: Some oils, like Patchouli or Sweet Orange, have a natural tint. If you want to keep your stones pristine white, apply the oil to the back of the stone. The porous plaster will still diffuse the scent effectively from the front.
“There are tiny holes on the surface.”
- Preventive Measures: These are trapped air bubbles. Next time, be more vigorous about tapping the mold on the table after pouring. You can also use a spray bottle of rubbing alcohol to mist the surface right after pouring to pop surface bubbles.
Maximizing Results: Creating a Scented Sanctuary
To build upon your success, integrate your aroma stones into a broader [non-toxic home] strategy.
Complementary Home Tips
Aroma stones work best in clean environments. Use a [DIY non-toxic cleaning recipe that actually works] to wipe down your shelves before placing your stones. If you are placing them in a closet, ensure you have followed the steps on [how to freshen a musty closet naturally] first; the stones are great at adding scent, but they shouldn’t be used to mask underlying moisture issues.
The Gift of Fragrance
These stones make incredible [handmade Mason jar spa gifts]. Place 3 or 4 geometric stones in a jar with a small vial of “recharge” oil. It is a thoughtful, sustainable gift that shows you care about the recipient’s wellness and home aesthetic.
Featured Snippet: How do you use aroma stones?
To use aroma stones, simply place 3 to 5 drops of pure essential oil directly onto the surface of the dry plaster stone. The porous material will absorb the oil and slowly release the fragrance into the air through passive diffusion. Once the scent begins to fade after a few days, you can “recharge” the stone by adding more drops of the same oil or a new blend.
Conclusion
Mastering how to make beautiful DIY aroma stones at home is an empowering way to reclaim your home’s atmosphere. You have discovered that you have the capability to succeed in creating professional-quality decor that supports your wellness and protects your family from synthetic toxins. By choosing your own scents and shapes, you achieve a level of customization that commercial products simply can’t match.
You’ve got this! Start by picking up a small bag of plaster and a silicone mold this weekend. You will be amazed at how a few simple stones can transform the “vibe” of your favorite room.