Learn how to seal air dry clay with this step-by-step beginner’s guide. Achieve long-lasting, waterproof projects and discover the best varnishes for your DIY crafts.
Have you ever spent hours meticulously sculpting a beautiful piece of art, only to have it crack, go soft, or succumb to moisture just a few weeks later? It is a heartbreaking experience that many crafters face when they first start working with earthy, versatile modeling materials. But don’t let those past frustrations hold you back! You are about to discover the essential techniques on how to seal air dry clay to ensure your creations stand the test of time. By the end of this guide, you will unlock the secrets to achieving a professional, durable finish that protects your hard work from dust, yellowing, and water damage.
Transforming a fragile clay sculpture into a sturdy, “gift-ready” treasure is an incredibly satisfying process. This guide provides achievable, step-by-step guidance that removes the guesswork from choosing the right sealants and application methods. You have the capability to create stunning home decor, jewelry, and personalized gifts that last for years. Get ready to discover how simple it is to achieve a high-end look and empower your creative journey!
Foundation: Why Sealing is Non-Negotiable
Before we get our brushes ready, let’s build your confidence by understanding the “why” behind this critical step. Knowing how to seal air dry clay starts with understanding the material’s unique properties.
The Nature of Air Dry Clay
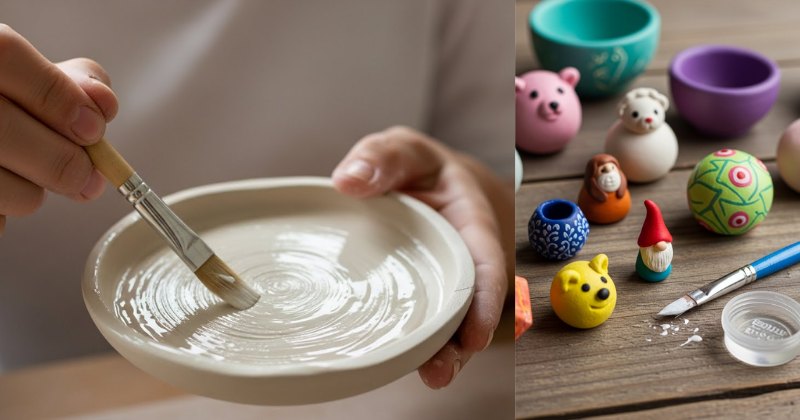
Unlike traditional ceramic clay that is fired in a kiln at high temperatures to vitrify (turn into a glass-like state), air dry clay remains “open” and porous. This means it acts like a sponge, constantly absorbing moisture from the air. If left unsealed, your project can grow mold, become brittle, or even dissolve if it accidentally gets wet.
Common Sealing Concerns
Many beginners hesitate because they fear a sealant will ruin their paint job or make the clay look “plastic.” However, modern sealants come in various finishes—from ultra-matte to high-gloss—allowing you to maintain the exact aesthetic you desire. You aren’t just adding a layer of plastic; you are adding a protective shield that preserves your artistic intent.
Types of Sealers to Consider
- Varnish: Available in matte, satin, and gloss. Perfect for a classic look.
- Acrylic Sealer: A fast-drying, beginner-friendly option often found in spray cans.
- Resin: For those who want a thick, glass-like, completely waterproof finish.
- Mod Podge: A popular, cost-effective choice, though less water-resistant than professional varnishes.
Step-by-Step: The Core Sealing Process
Ready to protect your masterpiece? Follow these clear, actionable steps to master the art of sealing.
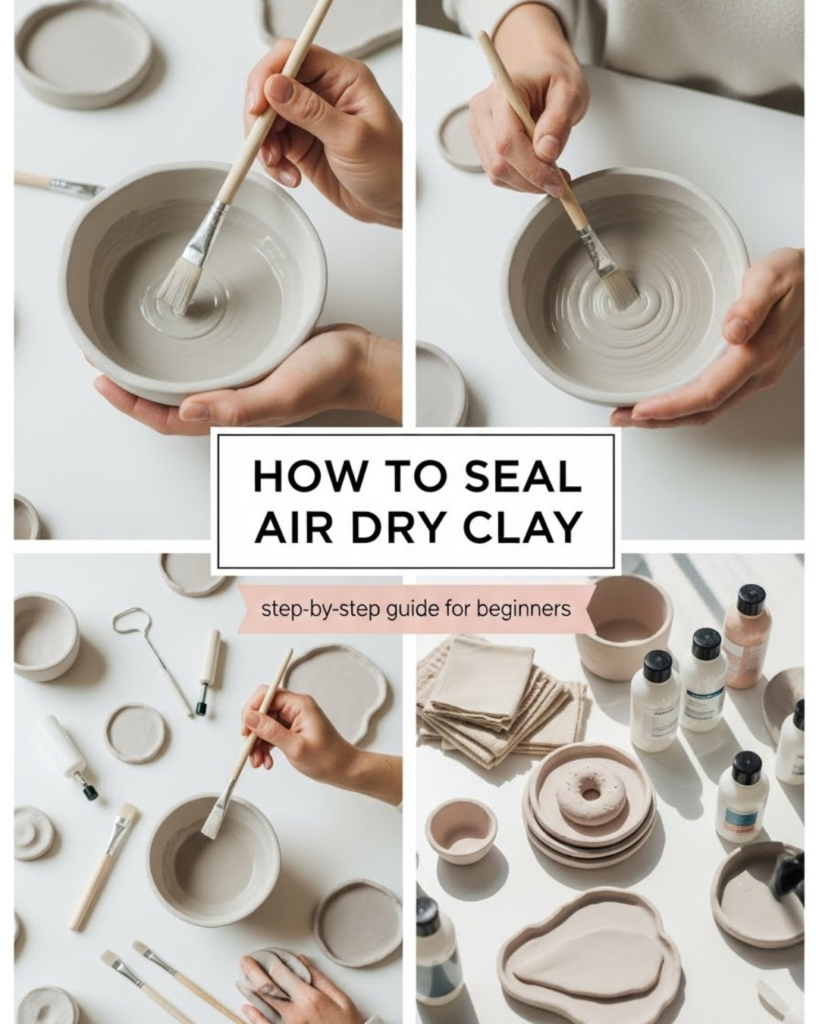
1. Ensure the Project is 100% Dry
This is the most important rule. If you seal clay while it still contains internal moisture, that water will get trapped and cause the clay to rot or the sealant to peel. Wait at least 24 to 48 hours depending on the thickness of your piece. It should feel “room temperature” to the touch, not cool or damp.
2. Sand and Clean
Use a fine-grit sandpaper to smooth out any bumps or fingerprints. Once finished, use a soft, dry cloth to wipe away every speck of dust. Any debris left on the surface will be permanently trapped under your sealer!
3. Apply Thin, Even Coats
Whether you are using a brush-on varnish or a spray, thin layers are the key to a professional finish.
- Brush-on: Use a soft synthetic brush to avoid visible brushstrokes. Work in one direction.
- Spray-on: Hold the can about 8–10 inches away and move in a steady, sweeping motion.
4. Respect the Dry Time
Allow the first coat to dry completely (usually 30 minutes to an hour) before applying the second. Most projects require 2–3 thin coats to achieve a truly waterproof barrier.
5. The Final Cure
While the project may feel dry to the touch quickly, it usually takes 24 hours for the sealant to “cure” or reach its maximum hardness. Place it in a dust-free area and resist the urge to handle it!
Advanced Strategies: Pro Tips for Waterproofing
Once you’ve mastered the basics of how to seal air dry clay, you can share expert-level insights by experimenting with more advanced finishes.
Achieving a Ceramic Look
If you want your air dry clay to look like real, kiln-fired pottery, use a high-gloss liquid varnish or a UV resin. These products provide a depth and shine that mimic a traditional glaze.
Featured Snippet: Is air dry clay food safe after sealing?
No, air dry clay is not food safe, even after sealing with a waterproof varnish. While many sealants are “non-toxic,” they are not rated for direct contact with food or liquids that you intend to consume. Additionally, the clay itself is porous and can harbor bacteria if the sealant develops even a microscopic crack. Always use your air dry clay projects for decorative purposes only, such as jewelry dishes, planters (with a plastic liner), or wall art.
Weatherproofing for Outdoors
If you plan to use your project in a damp area, like a bathroom or a covered porch, look for an “Outdoor” or “Marine Grade” sealer. These are specifically formulated to resist UV rays and higher humidity levels.
Troubleshooting: Common Challenges and Solutions
DIY projects often come with small hurdles, but don’t let them discourage you! Here is how to handle common sealing mishaps:
- “My sealant is sticky”: This usually happens if the coat was too thick or the environment is too humid. Try moving the piece to a cooler, drier room. If it remains tacky after 48 hours, you may need to wipe it down with a bit of rubbing alcohol and try a different brand of sealer.
- “The varnish is bubbling”: Bubbles are often caused by shaking the bottle too vigorously. Always stir your varnish gently rather than shaking it. If bubbles appear on the clay, use the tip of your brush to pop them while they are still wet.
- “The paint is smearing”: If you used low-quality markers or paints, the sealant might reactivate them. To prevent this, use a light mist of a spray sealer first to “lock” the color in place before moving to a brush-on product.
Preventive Measures
Always test your sealant on a small scrap piece of clay first. Different brands of clay and paint react differently to various chemicals. A five-minute test can save a ten-hour project!
Maximizing Results: Beyond the Sealant
Now that your project is protected, you can build upon your success by exploring complementary strategies to enhance your crafting space.
Internal Linking Opportunities
- Natural Decor: If you made a clay vase, learn to make simple fragrant rose potpourri for beginners to fill it with a lasting scent.
- Aromatic Home: Place your sealed clay trinket dishes near DIY clay diffuser stones to create a focused wellness corner.
- Healthy Environment: Keep your crafting room pristine by discovering why mold keeps coming back in bathrooms (and how to prevent it in your studio!).
- Clean Surfaces: Ensure your display shelves are as beautiful as your art by knowing how to clean walls fast and efficiently.
- Self-Care: After a long day of working with your hands, soothe your skin with a DIY face cream with rosehip oil.
Long-Term Maintenance
To keep your sealed clay looking new, avoid submerging it in water. A quick wipe with a damp (not dripping) cloth is all you need to remove dust. If the shine begins to dull over the years, you can simply add a fresh “refresh” coat of varnish to bring it back to life.
Conclusion: Achieve Mastery in Every Project
You have now discovered the comprehensive process of how to seal air dry clay. You have moved from worrying about the fragile nature of your art to being an empowered creator who knows how to achieve long-lasting, waterproof results. By following these steps, you have ensured that your creativity can be enjoyed for a lifetime.
The transformation of a simple hobby into a durable craft is a rewarding journey. We encourage you to pick up your favorite sealer this weekend and finish those projects waiting on your shelf. You are more than capable of achieving professional-grade results!