Salut les gourmands!
I still remember the afternoon my neighbor Sophia emerged from her kitchen carrying a plate of what looked like small, snow-dusted clouds—lemon crinkle cookies still warm from the oven, their cracked surfaces revealing glimpses of golden interior like sunlight breaking through winter frost. That first bite taught me something profound about the relationship between appearance and essence: what seemed delicate and ethereal delivered an explosion of bright, intense lemon flavor so vibrant it made my eyes close involuntarily, transported to some Mediterranean citrus grove where the air itself tastes of sunshine and possibility.
She smiled knowingly as I stood there speechless, understanding without words that she had just initiated me into one of baking’s most beautiful paradoxes—cookies that appear soft and delicate yet possess structure sophisticated enough to support that characteristic crackled surface, flavors bold enough to justify their dramatic presentation, and a texture that somehow balances tender chewiness with satisfying bite. These weren’t merely lemon cookies; they were edible poetry, each one a small meditation on contrast and harmony.
This recipe represents years of refinement, countless batches testing the precise ratio of lemon zest to juice that creates brightness without bitterness, the exact moment when dough firmness allows proper shaping without requiring excessive flour that would compromise tenderness, the temperature calibrations that produce those coveted surface cracks while maintaining moist interiors. You’ll discover why powdered sugar creates different effects than granulated, how cornstarch influences both texture and appearance, the chemistry behind that dramatic transformation from smooth dough ball to crinkled wonder, and the patient chilling periods that aren’t mere suggestions but essential architecture for success.
Whether you’re seeking to master the distinctive crinkle cookie technique, wanting a dessert that balances impressive presentation with approachable execution, or simply craving that perfect marriage of sweet and tart that only lemon can deliver, this recipe reveals that extraordinary results emerge not from complex procedures but from understanding the intimate relationships between ingredients, temperature, and time.
Présentation de la recette
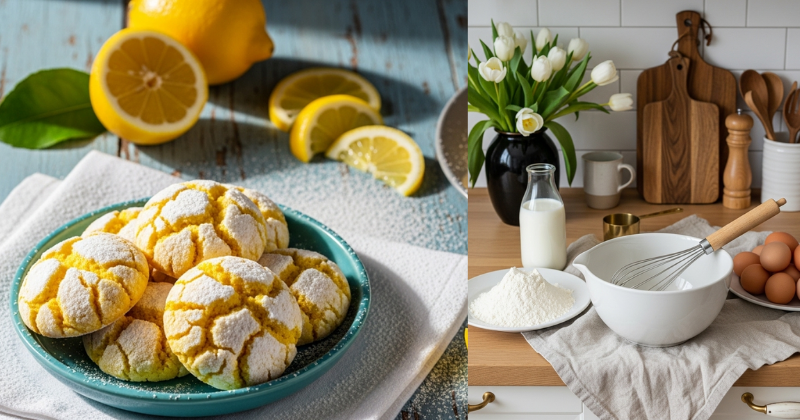
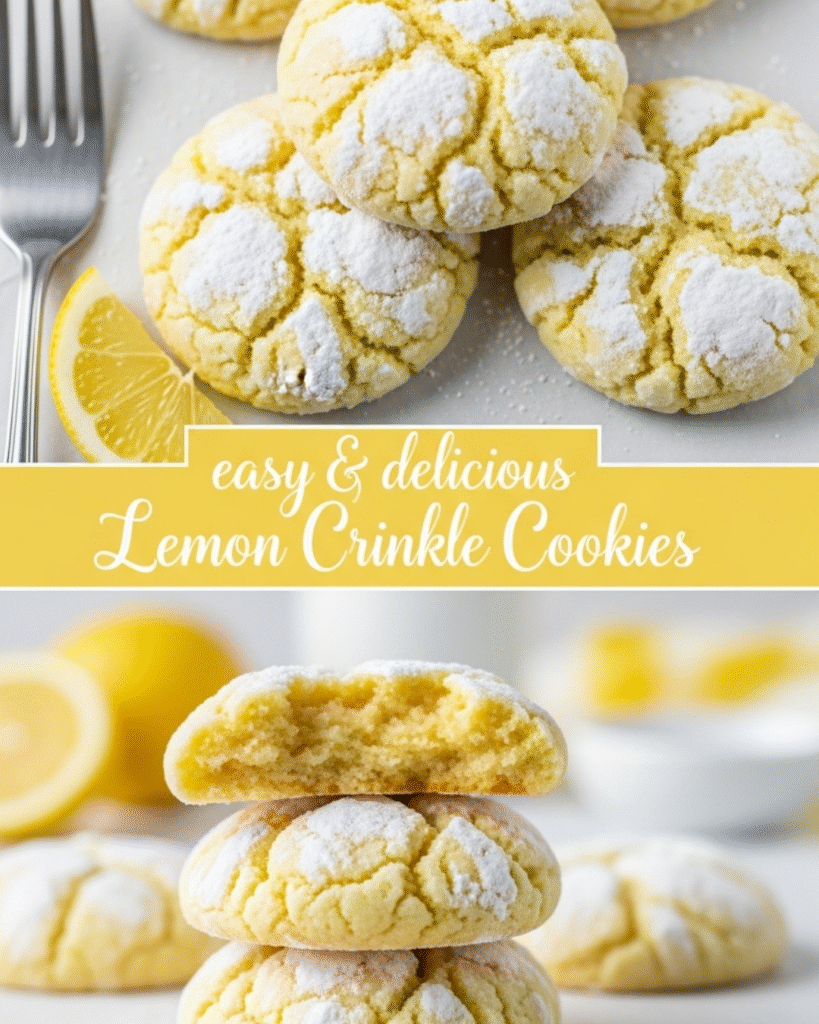
Lemon crinkle cookies occupy that rare culinary space where visual drama meets flavor intensity, where a single bite delivers the full spectrum of citrus brightness from the gentle floral notes in the zest to the sharp, clean acidity of fresh juice. These cookies belong to the crinkle family—characterized by their distinctive cracked, powdered sugar-dusted surfaces that emerge during baking as interior expansion fractures the outer coating.
The preparation timeline proves remarkably manageable considering the sophisticated results. Active hands-on work spans approximately 25 minutes—time devoted to zesting lemons, creaming butter, mixing dough, and shaping balls. However, the dough requires mandatory chilling for at least 2 hours (ideally 4 hours or overnight) to firm sufficiently for proper shaping and to allow flavors to meld and mature. The baking itself proceeds quickly at just 10-12 minutes per batch, with cookies emerging from the oven looking deceptively underdone—a calculated appearance signaling perfect texture.
Time breakdown:
- Dough preparation: 25 minutes
- Chilling time: 2-4 hours (or overnight)
- Shaping and coating: 15 minutes
- Baking: 10-12 minutes per batch
- Cooling: 10 minutes on baking sheet
- Total active time: 40 minutes
- Total elapsed time: 3-5 hours (including chilling)
This recipe yields approximately 24 generously-sized cookies, each one a 2-3 inch sphere of citrus perfection. The difficulty level registers at beginner-intermediate—the techniques themselves prove straightforward, but success hinges on respecting the chilling period and resisting the temptation to overbake cookies that appear underdone when optimal.
The crinkle cookie lineage:
Crinkle cookies emerged from the American baking tradition, with chocolate versions appearing in mid-20th century cookbooks. The technique—coating shaped dough in powdered sugar before baking—creates that signature crackled appearance as expanding dough breaks through the sugar coating. Lemon versions represent more recent innovations, adapting the classic chocolate formula to showcase citrus rather than cocoa. The result transcends simple fruit-flavored cookies, creating something that tastes simultaneously nostalgic and revelatory, familiar yet surprising with every bite.
Ingrédients pour des lemon crinkle cookies lumineux
The ingredient list appears deceptively simple—butter, sugar, eggs, flour, lemon. Yet the quality and precise proportions of each component, along with the careful balance between lemon’s various flavor compounds, determine whether you’ll achieve bright, sophisticated cookies or one-dimensional, overly sweet imitations.
For the cookie dough:
- 1½ cups (190g) all-purpose flour, spooned and leveled
- ½ cup (65g) cornstarch
- 2 teaspoons baking powder
- ½ teaspoon fine sea salt
- ½ cup (113g) unsalted butter, softened to room temperature
- 1 cup (200g) granulated sugar
- 2 large eggs, room temperature
- Zest from 2 large lemons (approximately 2 tablespoons)
- 3 tablespoons fresh lemon juice
- 1 teaspoon pure vanilla extract
- Optional: ¼ teaspoon lemon extract for intensified citrus flavor
For coating:
- ½ cup (60g) powdered sugar (confectioners’ sugar)
- Optional: Additional powdered sugar for secondary coating
The flour-cornstarch combination creates the distinctive tender-yet-structured texture that defines excellent lemon crinkle cookies. All-purpose flour provides gluten for structure, while cornstarch—a pure starch containing no protein—dilutes gluten concentration, creating more tender results. This technique, borrowed from shortbread and other delicate cookies, proves particularly valuable here where we want structure sufficient to support the crackled surface without creating chewy, cake-like texture.
The flour must be measured precisely—weight proves most reliable, though the spoon-and-level method (spooning flour into measuring cups, then leveling with a straight edge) provides acceptable consistency. Scooping directly from the bag compacts flour, potentially adding 20-30% excess that would produce dry, tough cookies.
The butter quality and temperature profoundly influence both flavor and texture. European-style butter, with its higher butterfat content (82-84% versus standard 80%), creates richer flavor and more tender crumb. The butter must reach true room temperature—approximately 65-68°F—soft enough that a finger pressed into it leaves a clear indentation without sinking through. Cold butter won’t cream properly with sugar, while overly warm butter (approaching melting) loses its ability to trap air during creaming, both resulting in compromised texture.
Lemon selection represents your most consequential decision. The cookies require both zest and juice, drawing on different flavor compounds residing in different parts of the fruit. The zest contains essential oils—primarily limonene and citral—that provide intense lemon aroma and flavor without acidity. The juice contributes the bright, tart citric acid that balances sweetness while adding moisture.
Choose lemons that feel heavy for their size, indicating juice abundance, with thin, smooth skins that yield slightly when pressed—signs of ripeness and oil-rich zest. Organic lemons prove preferable when using zest, as conventional lemons often carry pesticide residues concentrated in the peel. Before zesting, wash lemons thoroughly under warm water, scrubbing with a vegetable brush to remove any wax coating.
I’ve discovered through experimentation that the ideal lemon flavor balance involves roughly equal parts zest and juice by volume—2 tablespoons zest to 3 tablespoons juice. This ratio provides brightness from juice, depth from zest, and a complexity that single-source lemon flavor can’t achieve. The optional lemon extract amplifies these natural compounds, creating intensity that fresh lemon alone sometimes struggles to deliver, particularly in baked applications where heat can drive off volatile aromatics.
Baking powder serves as the sole leavening agent, creating the rise that generates surface cracks. The cookies don’t spread extensively—the chilled dough and cornstarch both inhibit spreading—so the expansion occurs primarily upward and outward from within, creating pressure that fractures the powdered sugar coating into those characteristic fissures.
The powdered sugar coating isn’t merely decorative—it’s architectural. When dough balls roll through powdered sugar, they acquire a thick coating that partially dissolves and adheres during baking’s initial minutes. As the cookie expands, this semi-set sugar coating cracks, creating the crinkle pattern. The sugar also contributes sweetness and creates visual drama—those white fissures against golden cookie interior produce the striking appearance that makes these cookies so photogenic.
Préparation détaillée – L’alchimie du citron et du sucre
The transformation of these ingredients into lemon crinkle cookies unfolds through carefully orchestrated phases, each demanding specific attention to technique, temperature, and the subtle signals that distinguish adequately mixed dough from optimally developed dough, sufficient chilling from ideal firmness.
1. Zesting and the release of essential oils (5 minutes)
Begin this ritual with reverence—the act of zesting releases volatile compounds that have been concentrating in the lemon’s skin throughout its ripening, waiting for this moment of liberation. Use a microplane or fine grater, holding it at a slight angle against the lemon’s surface. Apply gentle pressure, moving in long strokes that remove only the colored outer layer—the zest—while leaving behind the white pith that carries bitterness.
Watch as tiny droplets of oil appear on the grater’s surface, watch how the zest clumps slightly from those same oils. The aroma that fills your kitchen isn’t mere scent—it’s limonene molecules diffusing through air, each one carrying the essence of Mediterranean sunshine, of citrus groves where these lemons began as tiny white flowers promising sweetness.
Zest directly into the sugar you’ll use for creaming—this technique allows the sugar crystals to absorb essential oils immediately, preventing their evaporation while the abrasive sugar helps extract even more oils from the zest. Let this mixture sit for 5-10 minutes, occasionally rubbing it between your fingers to encourage oil release. The sugar will transform from white to pale yellow, becoming fragrant with concentrated lemon essence.
2. The creaming method and air incorporation (5-7 minutes)
In the bowl of a stand mixer fitted with the paddle attachment (or using a hand mixer with beater attachments), combine the softened butter with the lemon-scented sugar. Begin mixing on low speed, gradually increasing to medium-high over 30 seconds—this prevents sugar from flying out of the bowl while allowing butter to begin incorporating sugar crystals.
Continue beating for 5-7 minutes. This extended creaming creates millions of tiny air pockets as sugar crystals cut into butter, creating the light, tender structure these cookies require. The mixture transforms before your eyes: initially grainy and yellow, gradually becoming fluffy, nearly white, dramatically increased in volume. The texture should appear light and billowy, similar to thick whipped cream, with the mixture pulling away from the bowl sides in soft peaks.
Listen to the sound—properly creamed butter makes a distinct swooshing against the bowl, different from the slapping of under-mixed butter. Scrape down the bowl sides midway through creaming, ensuring all butter incorporates evenly.
3. Egg and liquid integration (3 minutes)
Add eggs one at a time, beating each for 30-45 seconds before adding the next. This sequential incorporation allows each egg to emulsify fully into the butter-sugar mixture, creating stable structure that won’t separate during subsequent additions. Add the lemon juice, lemon extract (if using), and vanilla with the second egg.
The mixture may appear slightly curdled after adding eggs and juice—tiny clumps of butter separating from liquid. Don’t panic; this temporary appearance results from temperature differences and liquid addition. It will resolve once you add flour, though severe curdling (large, obvious separation) suggests your ingredients weren’t at proper room temperature.
4. Dry ingredient incorporation and the gentle folding (2-3 minutes)
In a separate bowl, whisk together flour, cornstarch, baking powder, and salt. This whisking distributes leavening uniformly throughout flour, preventing pockets of concentrated baking powder that would create uneven rising.
Add the dry ingredients to the wet ingredients all at once. Mix on the lowest speed just until flour disappears into the batter—visible flour streaks should vanish, but avoid extended mixing that would develop gluten structure, creating tough rather than tender cookies. This process should take 15-30 seconds of gentle mixing, scraping the bowl once midway to ensure thorough incorporation.
The finished dough will appear thick, almost sticky, with that characteristic pale yellow color from lemon zest and the slight sheen from butter. This softness makes immediate shaping impossible—hence the mandatory chilling period.
5. The chilling metamorphosis (2-4 hours minimum)
Transfer dough to a clean bowl, cover with plastic wrap pressed directly onto the surface to prevent skin formation, and refrigerate for at least 2 hours. During this time, butter solidifies, making dough firm enough for shaping. More importantly, flour hydrates fully, gluten strands relax, and flavors meld and mature—the lemon oils distributing throughout the dough, the vanilla and butter notes mingling with citrus, creating complexity that freshly mixed dough simply cannot achieve.
I prefer overnight chilling when possible. The extended cold period allows even greater flavor development while the firmer dough shapes more easily the next day. The dough keeps refrigerated for up to 3 days or can be frozen for up to 3 months—flexibility that makes these cookies ideal for advance preparation or spontaneous baking inspiration.
6. Shaping and the powdered sugar ritual (10-15 minutes)
Preheat your oven to 350°F (175°C), positioning racks in the upper-middle and lower-middle positions. Line two baking sheets with parchment paper or silicone baking mats.
Pour powdered sugar into a shallow bowl. Using a cookie scoop (1½ tablespoon capacity) or spoon, portion dough into balls approximately 1 inch in diameter. Roll each ball between your palms briefly—just enough to create a sphere, not so much that body heat softens the dough excessively.
Drop each dough ball into powdered sugar, rolling to coat completely. The coating should appear thick and opaque, completely covering the dough’s surface. For more dramatic crinkle effect, some bakers perform a double coating: roll in powdered sugar, then roll in granulated sugar, then return to powdered sugar for a final coat. This creates extra surface tension that cracks more dramatically during baking.
Place coated balls on prepared baking sheets, spacing them 2 inches apart—they spread modestly during baking but need room for air circulation.
7. Baking and the cracking revelation (10-12 minutes)
Place one sheet on each oven rack. Bake for 10-12 minutes, rotating pans halfway through (moving top pan to bottom position and vice versa, while also rotating each pan 180 degrees). This rotation compensates for oven hot spots and rack-position temperature differences, ensuring even baking.
Here’s where courage matters: these cookies are done when they appear dramatically underdone. The tops should remain pale (not golden brown), with just the faintest color around edges. The centers will look soft, almost wet through the cracks. The cookies will jiggle slightly when the pan is gently shaken. An instant-read thermometer inserted into a cookie’s center should register 190-195°F.
This appearance terrifies first-time bakers who instinctively think “These need more time!” Resist completely. The cookies continue cooking through carryover heat after removal from the oven. What looks underdone at 12 minutes becomes perfect at 15 minutes of cooling. What looks “just right” in the oven becomes overbaked, dry, and cake-like after cooling.
8. The cooling discipline and texture setting (10 minutes on pan)
Remove pans from the oven and place on wire cooling racks. Do not attempt to move the cookies for 10 full minutes—they’re too delicate in their hot state and will break apart. During this cooling phase on the pan, the cookies’ structure sets as temperatures decline and residual heat completes the baking process.
After 10 minutes, use a thin metal spatula to transfer cookies to wire racks for complete cooling. They’ll firm further as they cool but maintain that perfect balance—slightly crisp exterior giving way to tender, almost chewy interior with intense lemon flavor that seems to bloom and intensify as the cookies reach room temperature.
Petit conseil pro: Les secrets de la surface craquelée parfaite
Through countless batches—some producing those coveted dramatic cracks, others emerging smooth and disappointingly uncrinkled—I’ve identified the precise factors that determine surface appearance and developed strategies for consistent success.
The dough consistency proves absolutely critical. Too soft (insufficiently chilled) and cookies spread excessively before the surface can crack; too firm (over-chilled or with too much flour) and they can’t expand enough to generate cracking pressure. The ideal consistency resembles firm cookie dough—scoopable but holding shape, cool to touch but not rock-hard. If your dough has been refrigerated overnight and feels too firm to scoop, let it sit at room temperature for 10-15 minutes before shaping.
The powdered sugar coating thickness directly affects cracking pattern. A thin, barely-there coating won’t provide enough structural contrast to create dramatic cracks—the sugar simply dissolves into the expanding cookie. A thick, generous coating creates the surface tension that fractures beautifully as the interior expands. I aim for coating so thick that the dough ball appears completely white, with no dough color visible through the sugar.
Oven temperature accuracy cannot be assumed. Many home ovens run 25-50°F hotter or cooler than the dial indicates. An oven thermometer provides insurance. If your cookies consistently brown too quickly or remain pale and spread excessively, temperature variation likely explains the discrepancy. For optimal cracking, you want relatively gentle heat that allows interior expansion before the surface sets—too hot and the exterior hardens before expansion generates cracks.
The baking sheet material influences heat transfer and spreading. Dark metal sheets absorb more heat, causing faster browning and potentially preventing proper cracking as cookies set too quickly. Light-colored aluminum sheets provide more even, gentle heat. Insulated baking sheets slow heat transfer too much, producing cookies that spread before setting. Standard light-colored aluminum sheets yield the most consistent results.
The underbaking confidence represents the single most challenging aspect for home bakers accustomed to golden-brown cookies signaling doneness. I tell students to bake until they think “These need 2 more minutes”—then immediately remove them. Set a timer and stop when it sounds, even if instincts scream otherwise. After experiencing the perfect texture that results from this apparent underbaking, you’ll understand and embrace it.
Humidity affects both dough handling and cookie texture. On very humid days, flour absorbs atmospheric moisture, making dough stickier and requiring slightly longer chilling or a tablespoon of additional flour. The powdered sugar coating also behaves differently in humidity—it may clump or dissolve more readily. Store these cookies in airtight containers to prevent them from absorbing moisture and losing their delicate texture contrast.
Accompagnements et variations – L’univers des possibilités citronnées
Lemon crinkle cookies, while magnificent in their pure form, welcome creative elaborations that showcase different facets of citrus character while maintaining the essential crinkle structure and tender texture.
Lime variation – Tropical twist:
Replace lemon zest and juice with lime equivalents. Lime provides different aromatic compounds—more floral, slightly more complex—creating cookies with tropical rather than Mediterranean character. The lime version pairs beautifully with coconut milk or tropical fruit sorbets.
Meyer lemon refinement – Delicate sophistication:
Meyer lemons—a mandarin-lemon hybrid—offer less acidic, more floral flavor than standard lemons. Using Meyer lemon zest and juice creates gentler, more nuanced cookies particularly appealing to those who find traditional lemon cookies too tart. However, Meyer lemons’ lower acidity means you might need an extra tablespoon of juice to achieve similar brightness.
Lemon-lavender elegance – Provençal inspiration:
Add 1 teaspoon dried culinary lavender (finely ground) to the dry ingredients. The lavender’s floral notes enhance lemon’s aromatic complexity, creating sophisticated cookies reminiscent of French gardens. Use sparingly—too much lavender tastes soapy rather than floral.
White chocolate chips – Creamy contrast:
Fold ½ cup white chocolate chips into the finished dough before chilling. The chocolate adds creamy sweetness that balances lemon’s brightness while creating pleasant textural variation—pockets of melted chocolate against tender cookie.
Lemon-poppy seed classic – Textural interest:
Add 2 tablespoons poppy seeds to the dry ingredients. The tiny seeds provide subtle crunch and visual appeal while their mild, nutty flavor complements lemon without competing. This combination honors the classic lemon-poppy seed pairing beloved in muffins and cakes.
Serving contexts and pairings:
These cookies shine alongside afternoon tea—their brightness cuts through rich tea while the sweetness complements tea’s gentle bitterness. For dessert service, arrange cookies on a platter with fresh berries and whipped cream, creating an elegant yet effortless finale. The cookies also pair beautifully with lemon curd, creating a lemon-on-lemon intensity that citrus lovers find irresistible.
For gift-giving, layer cookies in clear glass jars or tins lined with parchment, separating layers with additional parchment to prevent sticking. Their dramatic appearance makes them particularly impressive as edible gifts—beautiful enough to convey thoughtfulness, delicious enough to justify the gesture.
La science et la philosophie derrière les lemon crinkle cookies
Understanding the chemistry and cultural significance underlying lemon crinkle cookies deepens appreciation while informing technique refinements. These cookies embody sophisticated food science wrapped in accessible, friendly form.
The cracking mechanism involves precise physical and chemical processes. When sugar-coated dough enters the hot oven, several things happen simultaneously: the exterior sugar coating partially dissolves and sets into a thin crust; baking powder releases carbon dioxide, causing interior expansion; and butter melts, creating steam that further drives expansion. The rigid sugar crust can’t expand at the same rate as the soft interior, creating stress that relieves through crack formation—similar to how dried earth cracks when moisture withdraws. The pattern of cracks reflects the specific stress distribution in each cookie, making every one slightly unique.
The Maillard reaction and lemon’s role create interesting flavor dynamics. Maillard reactions—interactions between amino acids and reducing sugars under heat—generate hundreds of flavor compounds. However, acidic conditions (like those from lemon juice) slightly inhibit Maillard reactions, explaining why these cookies remain pale rather than developing the golden-brown color typical of many cookies. This paleness isn’t failure—it’s intentional, allowing lemon flavor to dominate while maintaining the tender texture that excessive browning would compromise.
Lemon’s complex phytochemistry contributes multiple flavor dimensions. The zest contains over 200 volatile compounds, with limonene comprising 70-90% of the essential oil content. This compound provides the characteristic “lemon” aroma we recognize instantly. The juice contributes citric acid (creating tartness), ascorbic acid (vitamin C), and numerous other organic acids that together create lemon’s distinctive flavor profile. When heated, some volatile compounds evaporate while others transform chemically, explaining why baked lemon desserts taste different from fresh lemon despite using the same fruit.
The cultural dimension – Brightness as comfort:
Lemon occupies a unique position in Western dessert traditions—simultaneously familiar and special, everyday yet celebratory. Unlike chocolate (indulgent) or vanilla (safe), lemon feels bright, clean, almost virtuous despite residing in undeniably sweet contexts. This perception reflects both sensory and cultural factors: lemon’s acidity creates freshness that cuts perceived heaviness, while its associations with cleanliness and health create psychological permission for indulgence.
The crinkle cookie format amplifies lemon’s appeal through visual drama. The cracked, snow-dusted appearance suggests something precious, handcrafted, special—elevating simple cookies into occasions worth marking. This transformation from everyday to extraordinary through presentation and flavor intensity embodies a broader baking philosophy: ordinary ingredients treated with understanding and care can create experiences that transcend their humble origins.
À vos tabliers!
The journey from butter and sugar to these lemon crinkle cookies—each one a sphere of tender sweetness wrapped in dramatic crackled coating, each bite releasing waves of bright citrus essence—teaches lessons that extend far beyond cookie-making technique. It demonstrates how understanding the relationships between ingredients transforms baking from mechanical recipe-following into creative expression, how patience (in chilling, in proper mixing, in resisting overbaking) creates results impossible to rush, how visual drama emerges from scientific principles properly applied.
These cookies embody what I love most about serious home baking: they demand attention and technique yet reward effort with results that inspire requests for the recipe and create lasting food memories. Each batch offers opportunities for refinement—noticing how different lemon varieties affect flavor, calibrating chilling times to your refrigerator’s temperature, learning your oven’s personality and your own evolving sensory awareness.
I encourage you to make this recipe your own foundation. Master the creaming technique and the confident underbaking, then experiment. Perhaps you’ll discover you prefer more or less lemon intensity, or a particular citrus variation becomes your signature, or one of the flavor additions transforms these into your household’s favorite cookie. Maybe you’ll develop serving rituals—afternoon tea cookies that make ordinary days feel special, or holiday traditions that create annual anticipation.
Share your lemon crinkle cookie experiences in the comments below. Did the dramatic cracking live up to its promise? What citrus combinations created your favorite flavor profiles? Did you discover a variation that became your signature? Your insights enrich our collective baking wisdom, creating a community of knowledge more valuable than any single recipe.
If this recipe brought joy to your kitchen—if it taught you about the science of cracking surfaces, became your impressive-but-achievable dessert for gatherings, or simply made you smile as you tasted that perfect balance of sweet and bright—please share it with others seeking baking adventures that look as spectacular as they taste. In our fast-paced world, the ritual of creating something beautiful with your own hands reminds us that transformation requires time, that understanding deepens pleasure, and that the most memorable foods are those we craft with intention, patience, and love.
Bon appétit!