Discover the magic of lotion dots DIY! Create portable, mess-free solid moisturizer bites that hydrate your skin on the go. Transform your skincare routine today!
Have you ever reached into your bag for a bottle of lotion, only to find it leaked all over your favorite notebook? Or perhaps you’ve tried to fly with your favorite liquid moisturizer and had to toss it at the security gate? We have all been there, and it is frustrating! But what if you could take your hydration with you in a solid, bite-sized, and totally adorable form? Enter the world of the lotion dots DIY—a game-changing project that turns liquid skincare into convenient, solid gems.
In this comprehensive guide, you will learn how to craft these clever little moisturizers using simple, natural ingredients. Not only are they perfect for travel, but they also make incredible gifts and a fun weekend activity. We are going to break down the science of solid skincare and provide a foolproof method for achieving perfect results every time. By the time you finish reading, you’ll be ready to unlock a more sustainable, portable way to glow. Let’s dive into this DIY journey and achieve the soft skin you deserve!
Foundation: What Exactly Are Lotion Dots?
If you are new to the concept of solid skincare, don’t worry! A lotion dots DIY project is essentially a miniaturized version of a lotion bar. Instead of a large puck, you are creating small, button-sized drops that melt instantly upon contact with your skin’s warmth. They are designed to be “single-use” or “area-specific” treats for your hands, elbows, or any dry patches.
Why Go Solid?
The beauty of solid lotion lies in its stability. Because they don’t contain water, they don’t require the heavy synthetic preservatives found in liquid lotions. They are also incredibly cost-effective. You can buy ingredients in bulk and make enough dots to last an entire year for a fraction of the cost of high-end boutique brands.
The Power of Natural Butters and Waxes
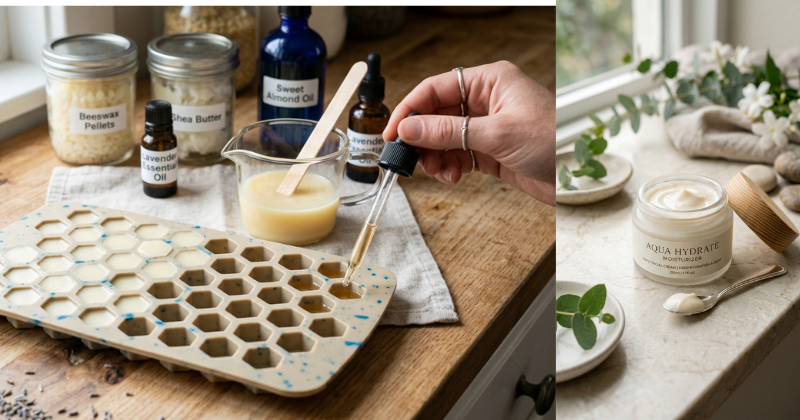
The “magic” that makes these dots work is the combination of hard waxes and soft plant butters. Beeswax or candelilla wax provides the structure, while cocoa or shea butter provides the deep hydration. When you mix these with a liquid carrier oil, you create a product that is solid at room temperature but transforms into a luxurious oil when rubbed against your skin.
Essential Tool Kit
Before you begin, gather these basic tools:
- A double boiler (or a glass bowl over a small pot of water).
- A silicone mold with small, round cavities (often sold as “chocolate drops” or “pet treat” molds).
- A glass measuring cup with a spout for easy pouring.
- A spatula for stirring.
Step-by-Step Process: Crafting Your Lotion Dots
Creating your own lotion dots DIY is an achievable and satisfying process. Follow these clear steps to ensure your dots set perfectly and smell divine.
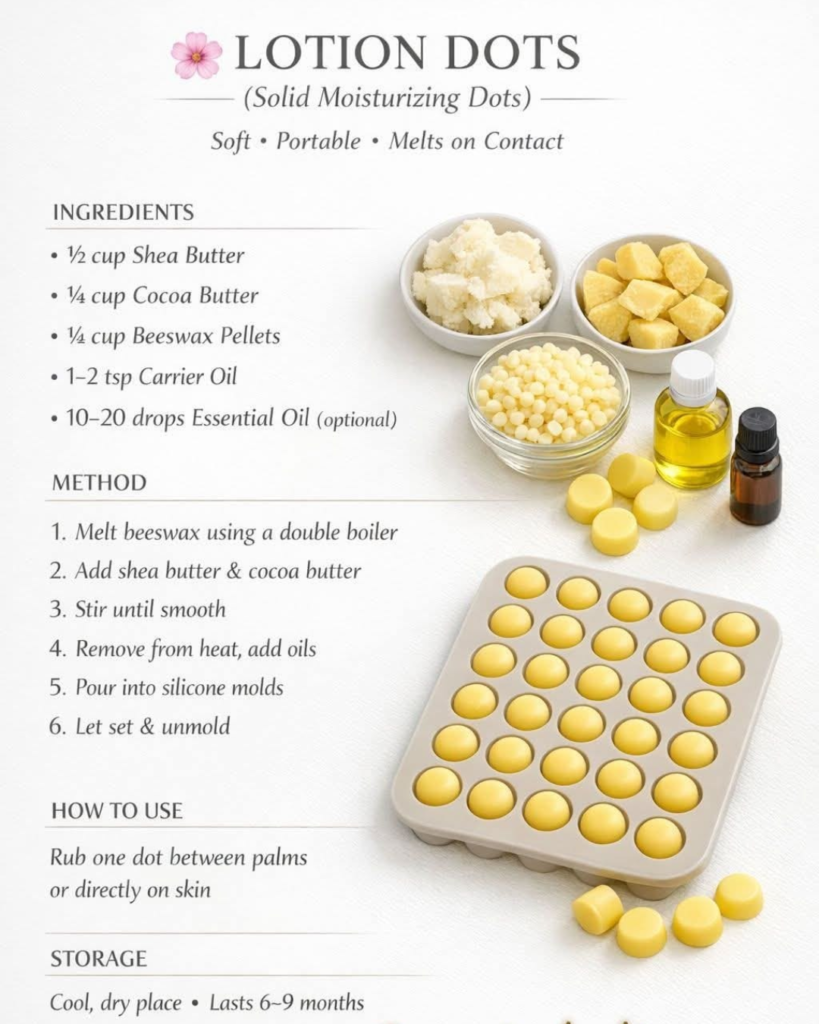
1. The Golden Ratio
The secret to a perfect texture is the 1:1:1 ratio. You will want equal parts by weight of:
- Beeswax pellets (for firmness).
- Shea or Cocoa butter (for creamy moisture).
- Carrier oil (like sweet almond oil, jojoba oil, or fractionated coconut oil).
2. Melting with Care
Place your beeswax, butter, and oil into your double boiler. Heat on low-medium. You want to melt them slowly to preserve the nutrients in the butters. Stir occasionally until the mixture is a clear, golden liquid.
- Pro Tip: Always melt the beeswax first if you aren’t using pellets, as it has the highest melting point.
3. Adding the “Magic” (Scent and Vitamins)
Once the mixture is fully melted, remove it from the heat. Wait about two minutes for it to cool slightly, then add your extras.
- Essential Oils: Add 10–15 drops of your favorite skin-safe oil (like lavender or frankincense).
- Vitamin E: A few drops of Vitamin E oil act as a natural antioxidant for your skin and help keep the oils fresh.
4. The Pouring Technique
Carefully pour the liquid into your silicone mold. Because these are “dots,” the cavities are small, so a steady hand is helpful. If you make a mess, don’t worry! You can scrape up the excess once it hardens and re-melt it.
5. Cooling and Setting
Let the dots sit at room temperature for at least two hours. If you are in a hurry, you can pop the mold into the refrigerator for 30 minutes. Once they feel firm and “clicky” to the touch, gently pop them out of the mold.
Advanced Strategies: Customizing Your Skincare
Once you’ve mastered the basic lotion dots DIY, it’s time to get creative. You can customize your dots to solve specific skin issues or match the seasons.
The “Summer Glow” Variation
In warmer months, you might find your dots melting too easily. To fix this, increase the beeswax portion by 10%. You can also add a tiny pinch of mica powder to the mix to give your skin a subtle, sun-kissed shimmer when you apply the lotion.
Intensive Winter Repair
For cracked winter skin, swap half of your carrier oil for lanolin or infused calendula oil. This creates a much “heavier” barrier that protects your skin from harsh winds. These are particularly great for gardeners or anyone who works with their hands.
Infusing with Herbs
For a truly professional touch, try infusing your carrier oil with dried botanicals like rose petals or chamomile before making the dots. Simply heat the oil and herbs on low for an hour, strain through cheesecloth, and then proceed with the recipe. This adds natural therapeutic benefits without the need for heavy fragrances.
Troubleshooting: Common Challenges
Even the simplest DIY can have a few hiccups. Here is how to handle common obstacles with your lotion dots DIY.
- My dots are too soft/sticky: This usually happens if there is too much liquid oil. Re-melt the batch and add a tablespoon more of beeswax.
- The dots feel grainy: This is common when using shea butter. If shea butter cools too slowly, the fats separate into grains. To prevent this, flash-cool your dots in the freezer immediately after pouring.
- They won’t come out of the mold: Ensure the dots are completely cold. If they are still stuck, put the mold in the freezer for 10 minutes; they should snap right out.
- The scent is too weak: Remember that scents fade as the wax sets. You can use a slightly higher concentration of essential oils next time, but always stay within safe usage rates for skin application.
Maximizing Results: Storage and Gifting
Now that you have a mountain of beautiful lotion dots, you need to keep them fresh and ready for action.
Proper Storage
Store your dots in an airtight container, such as a small tin or a glass jar. Keep them away from direct sunlight or heat sources (like a hot car!). If kept in a cool, dry place, your lotion dots DIY creations will stay fresh for 6–12 months.
The Perfect Gift
Lotion dots make amazing gifts. Place them in a small reusable tin, add a piece of parchment paper between layers to prevent sticking, and tie it with a piece of twine. They are perfect for:
- Party favors or bridesmaids’ gifts.
- Stocking stuffers.
- A “thank you” for teachers or coworkers.
Complementary Strategies
To build upon your success, consider making a matching lip balm or a sugar scrub. Using the same scent profile across your DIY products creates a “signature scent” that feels like a high-end spa experience right in your own home.
Conclusion
Mastering the lotion dots DIY is a simple yet powerful way to take charge of your skincare. You have learned how to balance waxes and butters to create a portable, potent moisturizer that fits your lifestyle. By choosing your own ingredients, you are avoiding unnecessary chemicals and reducing plastic waste—all while keeping your skin incredibly soft.
Remember, the best part of DIY is experimentation. Don’t be afraid to try new oils or scents until you find your perfect match. You have the capability to create something beautiful and functional. So, grab your molds and get melting—your skin will thank you!
Would you like me to create a printable recipe card with these exact ratios for your DIY binder?
Important Disclaimer: This article is for informational purposes only and should not replace professional advice. For health-related topics, consult healthcare providers. For safety procedures, verify current best practices and local regulations. Individual results may vary, and personal circumstances should always be considered when implementing any suggestions.