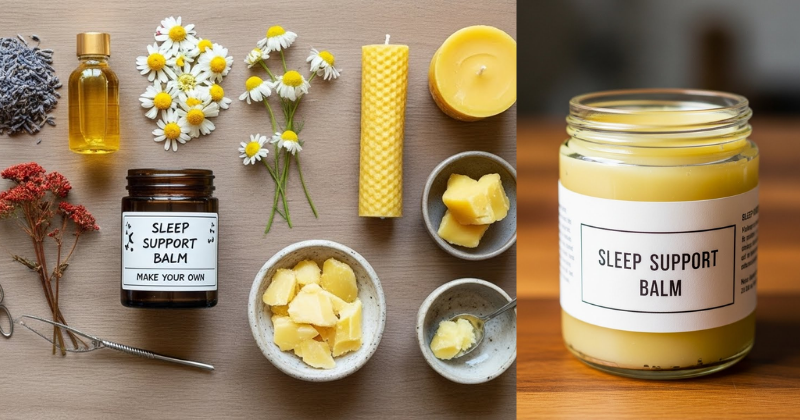
Learn how to make your own sleep support balm with this easy DIY guide. Discover natural ingredients and essential oils to transform your nightly rest.
Have you ever spent hours staring at the ceiling, your mind racing through tomorrow’s to-do list while your body feels completely exhausted? We have all been there, feeling the frustration of a restless night. Sleep is the foundation of our well-being, yet it often feels like the hardest thing to achieve. But what if you could “unlock” a state of deep relaxation using a simple, natural remedy you created yourself?
When you make your own sleep support balm, you are doing more than just mixing oils and wax; you are crafting a powerful ritual that tells your brain it is time to let go. By using the soothing properties of botanicals, you can achieve a more peaceful transition into slumber without relying on synthetic chemicals. This guide is designed to empower you with the knowledge to create a professional-quality balm right in your own kitchen. Get ready to discover the satisfaction of a handmade wellness solution and finally get the rest you deserve!
Foundation: Why a Homemade Sleep Support Balm Works
Before we get our hands messy, let’s build your confidence with the basic concepts of aromatherapy and topical wellness. A sleep support balm works through two primary pathways: your sense of smell and your skin.
The Science of Scent
When you inhale the calming vapors of a DIY sleep balm, the aromatic molecules travel directly to the limbic system of your brain. This area controls emotions and the nervous system. Ingredients like Lavender have been shown in various studies to reduce cortisol levels and encourage the parasympathetic nervous system to take over. This is the “rest and digest” mode that is essential for falling asleep.
The Benefit of a Balm Format
Why a balm instead of just a spray? A balm uses a base of fats—like coconut oil and beeswax—which stay on the skin longer. This allows for a slow, steady release of essential oils throughout the night. Additionally, the act of massaging a homemade sleep support balm into your pulse points provides a sensory grounding experience that helps quiet a racing mind.
Encouraging Reassurance for Beginners
If you are new to DIY wellness, don’t let the idea of “making a salve” intimidate you. It is much like following a simple recipe for cookies—only you can’t eat these! You don’t need a lab or expensive equipment. With just a few staple ingredients, you can achieve amazing results that rival high-end boutique brands. You are more than capable of mastering this craft.
Step-by-Step: How to Make Your Own Sleep Support Balm
Ready to start? This process is straightforward and incredibly rewarding. By following these manageable steps, you will create a batch of balm that can last you for months.
Tool and Ingredient Requirements
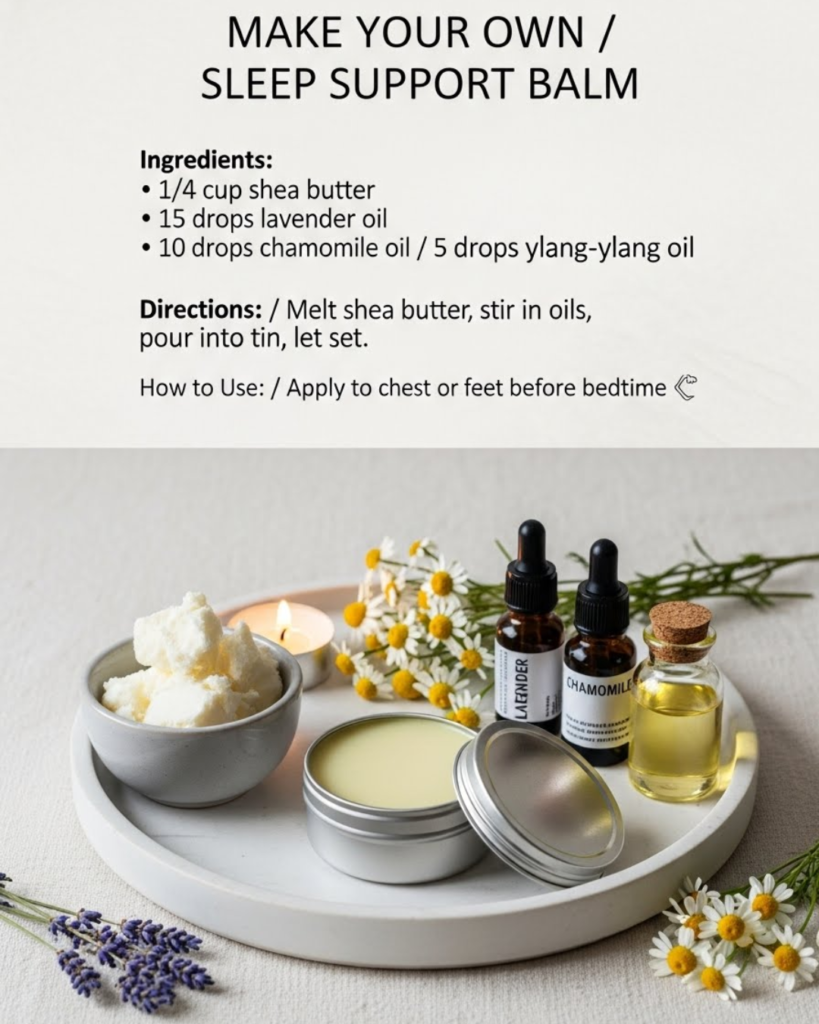
- The Base: 1/2 cup of Sweet Almond Oil or Grapeseed Oil.
- The Structure: 2 tablespoons of Beeswax pellets (this gives it the “balm” texture).
- The Nourishment: 1 tablespoon of Shea Butter.
- The Sleep Blend: 25 drops of Lavender essential oil and 10 drops of Cedarwood or Roman Chamomile.
- Equipment: A small glass bowl, a saucepan (to create a double boiler), and small 2-ounce metal tins or glass jars.
The Core Process
- Melt the Base: Place the oil, beeswax, and shea butter in your glass bowl. Set the bowl over a saucepan with an inch of simmering water. This “double boiler” method ensures you don’t burn the ingredients.
- Stir with Intention: Use a clean spoon or a glass rod to stir the mixture until it is completely liquid and clear.
- The Cooling Phase: Remove the bowl from the heat. Let it sit for about 2 minutes. You want it to be liquid, but not boiling hot. Adding essential oils to boiling liquid can damage their delicate therapeutic properties.
- Incorporate the Oils: Drop in your essential oils. You will immediately smell the calming aroma of your sleep support balm coming to life!
- The Pour: Carefully pour the liquid into your tins. Let them sit undisturbed at room temperature for 2–3 hours. Do not move them until they are completely opaque and solid.
Timing and Planning
The entire process takes about 20 minutes of active time. It is best to make this during the day so it has plenty of time to set before your bedtime routine begins.
Advanced Strategies: Customizing Your Sleep Ritual
Once you have mastered the basic recipe, you can share expert-level insights by tailoring the balm to your specific needs. Personalization is the greatest benefit of the DIY approach!
Creating a “Deep Sleep” Variation
If you find that you fall asleep easily but wake up in the middle of the night, try adding Vetiver essential oil to your mix. Vetiver is known as the “oil of tranquility” and has a very earthy, grounding scent that helps promote longer durations of rest.
The “Pulse Point” Method
Where you apply the balm matters. For maximum results, apply your homemade sleep balm to:
- The Temples: Closest to your sensory receptors.
- The Wrists: The heat of your pulse points helps diffuse the scent.
- The Soles of the Feet: A traditional wellness tip; many believe the large pores on the feet allow for faster absorption.
Featured Snippet: How do you use a sleep balm effectively?
To use a sleep support balm, take a pea-sized amount and warm it between your fingers. Massage it into your pulse points (wrists, temples, or neck) while taking three slow, deep breaths. This combined action of massage and aromatherapy signals to your brain that it is safe to transition into sleep mode.
Troubleshooting: Common Challenges and Solutions
Even the best DIY projects can have small hiccups. Here is how to address frequent obstacles with solutions:
- The Balm is Too Hard: If you find it difficult to scoop out, you likely used a bit too much beeswax. You can melt it down again and add a tablespoon of carrier oil.
- The Balm is Too Soft: If it feels more like an oil than a balm, melt it down and add half a teaspoon of beeswax pellets.
- The Scent is Too Faint: Essential oil potency can vary. If you feel you need more, you can safely add up to 10 more drops of Lavender, provided you aren’t applying it to broken or highly sensitive skin.
Preventive Measures
To keep your sleep support balm fresh, always use clean, dry hands when scooping it out. Introducing water into the tin can cause the oils to go rancid faster. Store your tins in a cool, dark place to preserve the essential oils.
Maximizing Results: Building a Sleep Sanctuary
To build upon the success of your balm, consider how it fits into your broader lifestyle. A balm is a powerful tool, but it works best when paired with other healthy habits.
Complementary Strategies
- Digital Detox: Apply your balm and then put your phone away. The blue light from screens can undo the work of the calming oils.
- Internal Linking Opportunity: Pair your balm with a DIY clay diffuser stone on your nightstand for a layered aromatic experience.
- Internal Linking Opportunity: Learn how to make a natural chest rub for those nights when seasonal sniffles are keeping you awake.
- Internal Linking Opportunity: Explore simple home rituals that can help you decompress after a stressful workday.
Long-Term Considerations
A batch of this balm will usually stay fresh for 6 to 12 months. Since you are in control of the ingredients, you can make fresh batches as the seasons change. In the winter, you might want more warming scents like Marjoram, while in the summer, a lighter Lavender-only blend might feel more refreshing.
Conclusion: You Are the Architect of Your Rest
By choosing to make your own sleep support balm, you have taken a significant step toward a more natural and empowered lifestyle. You’ve moved from the foundation of understanding plant power to the satisfaction of creating a tangible remedy. This balm is a reminder that you have the capability to nurture yourself and solve your own challenges.
The transformation from restless nights to peaceful mornings is within your reach. We encourage you to keep this balm by your bedside as a nightly anchor of calm. You’ve done the work to support your wellness—now it’s time to enjoy the rest you’ve earned.
Would you like me to help you create a custom essential oil blend for stress-relief during the day? Your journey to better wellness is just beginning!
Important Disclaimer: This article is for informational purposes only and should not replace professional advice. For health-related topics, consult healthcare providers. For financial or legal matters, seek qualified professional guidance. For safety procedures, verify current best practices and local regulations. Individual results may vary, and personal circumstances should always be considered when implementing any suggestions.
Caption: Sweet dreams are just a handmade balm away!