
The DIY candle hack everyone’s copying is transforming home decor by showing you how to upcycle leftover wax and household jars into stunning, professional-grade candles!
Have you ever looked at that expensive designer candle sitting on your coffee table and wondered why it costs $60? We have all been there—loving the ambiance but hating the price tag. Perhaps you have a collection of nearly empty candle jars with just a half-inch of wax left at the bottom, too beautiful to toss but impossible to light. What if you could unlock the secret to professional candle making using items you already have in your kitchen?
The DIY candle hack everyone’s copying is more than just a craft; it is a lifestyle upgrade. By mastering this simple method, you will transform your living space, reduce waste, and discover a creative outlet that is both meditative and rewarding. In this guide, we are going to demystify the candle-making process and show you how to achieve a high-end “glow” without the high-end budget. Get ready to feel empowered—you are about to become your own favorite candle maker!
Foundation: Understanding the “Leftover Wax” Method
Before we dive into the melting pot, let’s build your confidence with the basics. The core of the DIY candle hack everyone’s copying revolves around the concept of “re-batching.” Instead of buying expensive bulk wax, you are utilizing the high-quality wax remnants from your previous purchases.
Why This Hack is Going Viral
This method is trending because it solves three problems at once: it saves money, it’s eco-friendly, and it allows for total customization. Most high-end candles use soy or beeswax blends that are perfectly safe to re-melt. By combining these scraps, you create unique “memory scents” that remind you of your favorite fragrances.
Common Concerns for Beginners
You might be wondering, “Is it safe to melt wax on my stove?” or “Will the scent disappear?” Rest assured, as long as you use the indirect heat method we’ll discuss, it is perfectly safe. As for the scent, while some top notes evaporate during re-melting, you can easily “unlock” the fragrance again with a simple pro tip we have included in the advanced section.
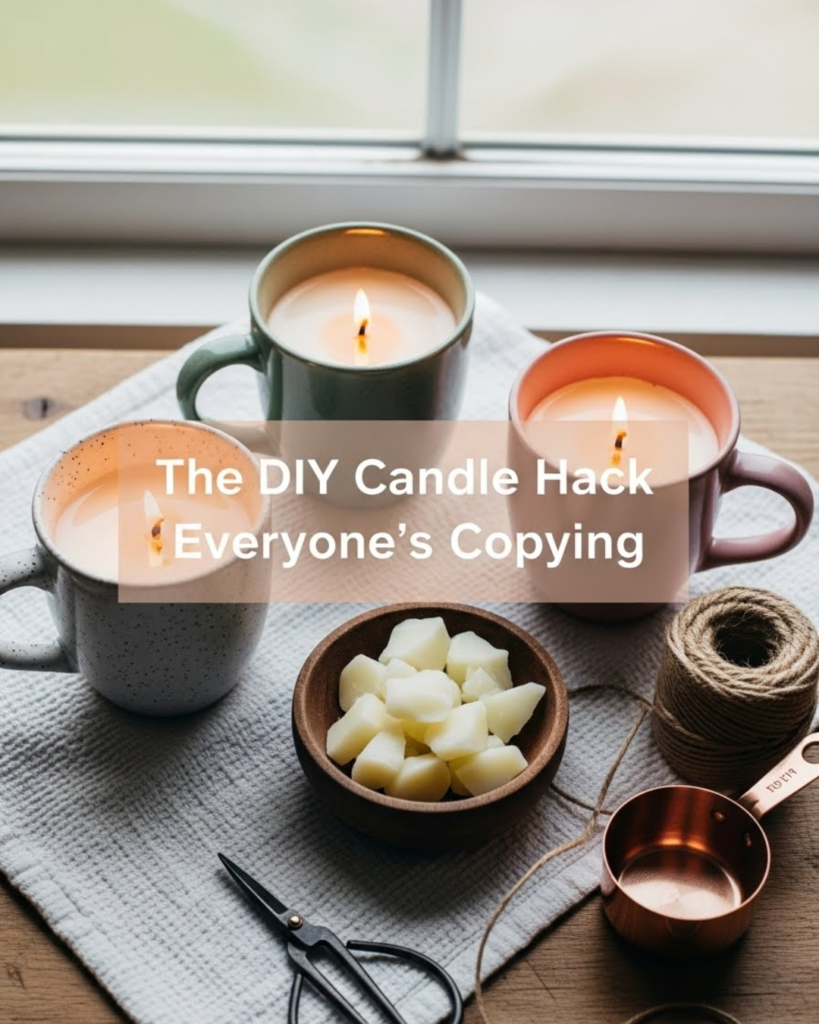
Essential Components
- The Vessel: Thrifted glass jars, old candle containers, or even ceramic mugs.
- The Wax: Your collection of “end-of-life” candles.
- The Wick: The most important part for a clean burn.
- The Heat Source: A simple double-boiler setup (a pot and a heat-safe bowl).
Step-by-Step: How to Master the Candle Hack
Ready to start? Follow this achievable, step-by-step guidance to ensure your first batch looks like it came straight from a boutique.
1. Extract the Old Wax
To get the wax out of your old jars, place them in the freezer for two hours. The wax will shrink, allowing you to pop it out with a butter knife. Alternatively, pour boiling water into the jar; the wax will melt, float to the top, and harden into a puck as the water cools.
2. Prepare Your New Vessel
Wash your new jar with warm, soapy water. Ensure it is completely dry! Even a drop of water can cause your candle to “spit” or crackle. Center your new wick at the bottom using a “wick sticker” or a dot of hot glue. To keep the wick upright, wrap the top end around a pencil laid across the jar’s opening.
3. The Double-Boiler Melt
Fill a saucepan with an inch of water and place a heat-safe glass or metal bowl on top. Place your wax scraps in the bowl. This indirect heat ensures the wax doesn’t reach its “flash point,” keeping you safe and preserving the scent. Stir gently as it melts into a smooth liquid.
4. The Pour and Set
Once the wax is fully liquid, carefully pour it into your prepared jar. Leave about half an inch of space at the top. Now, the hardest part: patience! Let the candle sit undisturbed at room temperature for at least 24 hours. Moving it too early can cause “sinkholes” around the wick.
Advanced Strategies: Expert Insights for a Boutique Finish
Now that you have the basics down, let’s share some expert-level insights to help you customize your approach. This is where you can truly experiment and make the DIY candle hack everyone’s copying your own.
Creating Signature Scents
If your recycled wax has lost some of its punch, you can add essential oils or fragrance oils. A good rule of thumb is about 15-20 drops per 8-ounce candle. Add the oils after you remove the wax from the heat but before you pour. This prevents the heat from burning off the delicate scent molecules.
Aesthetic Variations
Want that “Instagrammable” look?
- Dried Botanicals: Press dried lavender or rose petals against the side of the glass before pouring.
- Layering: Pour a small amount of one color wax, let it semi-harden, then pour a different color on top for a striped effect.
- Crystal Infusion: Gently place a small piece of amethyst or quartz on the surface of the wax just as it begins to cloud over (harden).
Choosing the Right Wick
Different jar widths require different wick sizes. If your jar is wider than 3 inches, consider using a “double wick” to ensure an even melt pool. This prevents “tunneling,” where the candle burns down the center and leaves a ring of wasted wax on the sides.
Troubleshooting: Overcoming Common Challenges
Even pros run into setbacks, but every obstacle has a solution. If your candle doesn’t look perfect the first time, don’t worry!
- Sinkholes or Cracks: If a hole forms near the wick, don’t panic. Use a hair dryer on high heat to melt the top layer of wax. It will flow into the hole and reset perfectly flat.
- Cloudy Wax: This often happens if the wax cools too fast. Try warming your glass jar in the oven on the lowest setting before pouring the wax to encourage a slower, clearer cooling process.
- Weak Scent Throw: If you can’t smell your candle, it might need to “cure.” Cover the candle and let it sit for a week before lighting. This allows the fragrance oils to bind more deeply with the wax molecules.
Featured Snippet: Why is everyone copying this DIY candle hack?
Everyone is copying this DIY candle hack because it allows you to create high-end, luxury-style candles for a fraction of the cost. By upcycling old wax and jars, it promotes a sustainable, zero-waste lifestyle while providing a creative way to customize home fragrances.
Maximizing Results: Maintenance and Longevity
Once you have achieved success with your first few candles, you’ll want to ensure they last. Proper maintenance is the key to a long-lasting, clean-burning candle.
The First Burn Rule
The most important tip for any candle is the first burn. Always let your candle burn until the melted wax reaches all the way to the edges of the jar. This sets the “memory” of the wax. If you blow it out too early, it will tunnel forever.
Trimming the Wick
Always trim your wick to 1/4 inch before every single light. This prevents soot from forming on your beautiful glass and ensures the flame doesn’t get too large or dangerously hot.
Internal Linking Opportunities
To further enhance your home environment, you might enjoy these related topics:
- Eco-friendly cleaning hacks for your newly emptied jars.
- How to grow a “Scent Garden” with herbs like lavender and mint for your candles.
- Creative jar labeling techniques to turn your candles into gifts.
Conclusion: Ignite Your Creativity
The DIY candle hack everyone’s copying is a beautiful reminder that luxury doesn’t have to be expensive. By following these steps, you have transformed waste into wonder and discovered a new skill that brings warmth and light into your home. You have successfully navigated the process from extraction to the final pour, and you should feel incredibly proud of the results.
Candle making is a journey of trial, error, and ultimate satisfaction. Whether you are making these for your own nightstand or as heartfelt gifts for friends, you now have the authority and the tools to succeed. So, go ahead—light that wick, sit back, and enjoy the glow of your hard work. You’ve earned it!
Ready to start? Gather those old jars today and see how easy it is to achieve that boutique look on your own.