This Cocoa Butter Cashmere Body Butter is rich, creamy, and made with just 5 simple ingredients. Transform your dry skin into silky perfection with this DIY recipe! Have you ever stood in a beauty aisle, reading a label with thirty ingredients you can’t pronounce? It feels like you need a chemistry degree just to moisturize your elbows. If you are tired of watery lotions that leave you itchy an hour later, it is time for a change.
In this guide, you will unlock the secret to professional-grade skincare right in your own kitchen. By using high-quality, natural fats, you can achieve a level of hydration that store-bought brands simply cannot match. This homemade body butter doesn’t just sit on top of your skin; it melts in, providing a protective barrier that smells like a luxury spa. Get ready to discover how easy it is to treat yourself to the decadence of cashmere and cocoa. Let’s transform your skincare routine together!

Foundation: Why Natural Body Butter Wins Every Time
Before we dive into the mixing bowl, let’s talk about why this Cocoa Butter Cashmere Body Butter is a game-changer. Most commercial lotions are up to 70% water. While water sounds hydrating, it actually evaporates quickly, often taking your skin’s natural oils with it. A true body butter, however, is anhydrous—meaning it contains no water. It is 100% concentrated nourishment.
If you are a beginner, don’t let the “DIY” tag intimidate you. Making your own skincare is as simple as melting and whipping. By taking control of the process, you ensure there are no phthalates, parabens, or synthetic thickeners. You are providing your skin with raw vitamins and fatty acids that support elasticity and a healthy glow.
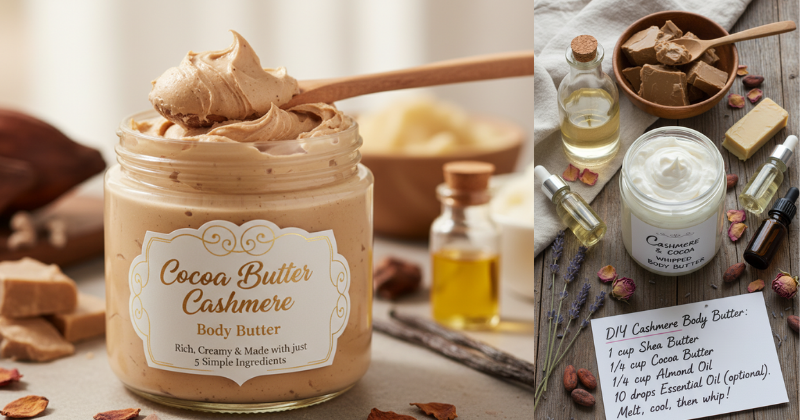
The Power of the “Big Five” Ingredients
To keep things achievable and effective, we focus on a specific blend of five ingredients. Each one plays a vital role in the texture and performance of the final product:
- Raw Cocoa Butter: The star of the show. It provides the “rich” and “creamy” structure.
- Shea Butter: Known for its incredible healing properties and soft, spreadable texture.
- Coconut Oil: Acts as a carrier, helping the butters absorb into the skin faster.
- Sweet Almond Oil: Adds a lightweight slip so the butter doesn’t feel overly greasy.
- Cashmere Fragrance or Essential Oil Blend: Gives it that sophisticated, cozy scent that lingers beautifully.
Addressing Greasiness Concerns
A common hesitation with DIY body butter is the “greasy” feeling. The secret lies in the whipping process. When you incorporate air into the fats, the density changes. You end up with a light, mousse-like consistency that glides on smoothly. Additionally, using a “dry” oil like Sweet Almond oil helps the product sink in within minutes, leaving only a soft sheen behind.
Step-by-Step Process: From Raw Ingredients to Whipped Gold
Creating your rich, creamy body butter is a meditative process. It requires about 20 minutes of active work and a couple of hours of “setting” time. Follow these steps to ensure a perfect result every time.
1. The Gentle Melt
Using a double boiler (or a glass bowl set over a pot of simmering water), combine 1/2 cup of Cocoa Butter and 1/2 cup of Shea Butter. Melt them slowly on low heat. Avoid high temperatures, as overheating can make the Shea butter feel “gritty” later on. Once liquid, stir in 1/4 cup of Coconut Oil and 1/4 cup of Sweet Almond Oil.
2. The Cooling Phase
Once everything is blended, remove the bowl from the heat. Let it sit on the counter for 15 minutes, then move it to the refrigerator. You are looking for a specific consistency: it should be opaque and firming up, but still soft enough to leave a fingerprint when pressed. This usually takes about 45–60 minutes.
3. Adding the Scent
Once the mixture has reached that “soft-solid” state, add your 5th ingredient: the fragrance. If you are using a “Cashmere” fragrance oil, 20–30 drops is usually perfect. If you prefer essential oils, a blend of Vanilla and Sandalwood mimics that cozy cashmere vibe beautifully.
4. The Big Whip
This is the most satisfying part! Using a hand mixer or a stand mixer, whip the mixture on high for 5–10 minutes. You will watch it transform from a yellow translucent goop into a bright white, fluffy cloud. Stop when it forms stiff peaks, similar to whipped cream.
Advanced Strategies: Customizing Your Cashmere Creation
Once you have mastered the basic 5-ingredient body butter, you can start experimenting with professional-level variations. This allows you to adapt the recipe for different seasons or specific skin needs.
What are the best ways to customize texture?
- For Summer: If you live in a hot climate, increase the Cocoa Butter by 10% and decrease the coconut oil. This prevents the butter from melting in the jar.
- For Extra Glow: Add a half-teaspoon of cosmetic-grade mica powder during the whipping phase. This creates a “shimmer butter” that looks stunning on legs and shoulders.
- The “Non-Greasy” Hack: Add one teaspoon of arrowroot powder while whipping. This starch absorbs excess oil and gives the butter a “silky” rather than “oily” finish on the skin.
Seasonal Scents and Variations
While the “Cashmere” scent is a year-round favorite for its warmth, you can easily pivot. For a refreshing spring version, try a Lemon and Basil essential oil blend. For deep winter, a “Cocoa-Coffee” version using coffee-infused almond oil provides a caffeine boost to the skin, which can help with the appearance of firmness.
Troubleshooting: Solving Common Body Butter Obstacles
Even with the best instructions, nature can be unpredictable. If your batch doesn’t turn out perfect, don’t worry! Most issues are easily reversible.
“How do I fix gritty body butter?” Grittiness usually happens when Shea butter cools too slowly, allowing the fat molecules to clump. To fix this, simply melt the batch down again. This time, after melting, put the bowl in the freezer for a “flash chill” rather than the fridge. Rapid cooling keeps the molecules small and smooth.
“My butter melted in the jar!” Since this recipe is made of natural fats, it will melt if kept in a bathroom that gets very steamy or near a sunny window. If it melts, the air you whipped in will escape. You can simply re-chill and re-whip it to restore the fluffiness.
“The scent is too strong (or too weak).” Fragrance is subjective. Always start with 10 drops, whip, and smell. It is much easier to add more than it is to take it away. If it’s too strong, you can make a small “half-batch” of unscented butter and mix the two together to dilute the aroma.
Maximizing Results: Storage and Long-Term Success
To ensure your rich and creamy body butter stays fresh and effective, you need to follow a few simple maintenance steps.
- Jar Selection: Use dark glass jars if possible. Light and air are the enemies of natural oils. If using clear jars, keep them in a drawer or cupboard.
- Application Tip: For the best results, apply your body butter to slightly damp skin right after a shower. This helps lock in the extra moisture and allows the butter to spread even further.
- Shelf Life: Because there is no water, this product can last 6–12 months. Just be careful not to get water inside the jar with your fingers, as that can introduce bacteria. Use a small wooden scoop for the cleanest experience.
- Gifting: This recipe is a fantastic way to save money on holiday or birthday gifts. One large batch can fill four 4-ounce jars, giving you high-end gifts for a fraction of the retail cost.
Internal Linking Opportunities:
- How to Infuse Carrier Oils with Botanicals for DIY Skincare
- The Difference Between Refined and Unrefined Shea Butter
- Sustainable Packaging Ideas for Homemade Beauty Products
Conclusion
You now have the tools and knowledge to create a Cocoa Butter Cashmere Body Butter that is truly world-class. By sticking to these 5 simple ingredients, you have eliminated the fluff and focused on what your skin actually needs: deep, lasting hydration. You should feel empowered knowing exactly what is going onto your body and the satisfaction of having made it yourself.
Remember, skincare is a form of self-care. Taking those few minutes to whip up a batch of butter is an investment in your well-being. Whether you’re making it for yourself or sharing the love with friends, you are proving that luxury doesn’t have to come in an expensive, chemical-filled bottle. You’ve got the capability to achieve glowing, healthy skin—now go enjoy that creamy, cashmere-soft result!
Important Disclaimer: This article is for informational purposes only and should not replace professional advice. For health-related topics, consult healthcare providers. For financial or legal matters, seek qualified professional guidance. For safety procedures, verify current best practices and local regulations. Individual results may vary, and personal circumstances should always be considered when implementing any suggestions.