
Create your own DIY shower steamers for instant congestion relief and relaxation. Learn how to use essential oils to transform your shower into a spa retreat today.
Have you ever stepped into a hot shower when you were feeling under the weather, hoping the steam would finally clear your head? There is something incredibly soothing about that warm mist, but sometimes steam alone isn’t enough to cut through heavy sinus pressure. What if you could supercharge that experience and turn your daily rinse into a powerful therapeutic session? Today, you are going to discover how to make DIY shower steamers for instant congestion relief & relaxation. These fizzy, aromatic tablets are like bath bombs for people who prefer showers, releasing concentrated essential oils that open up your airways and melt away the day’s stress.
By learning this simple craft, you are taking a major step toward achievable, natural wellness. You don’t need to spend a fortune at a high-end boutique to enjoy the benefits of aromatherapy. You have the capability to create a customized “spa-in-a-jar” right in your kitchen. Get ready to discover how this engaging DIY project can achieve a total breakthrough in your seasonal health and nightly relaxation routine!
Foundation: Understanding the Magic of Shower Steamers
Before we start mixing, let’s build your confidence with the basic concepts behind these aromatic wonders. Understanding how they work will help you customize them perfectly for your needs.
What are Shower Steamers?
Think of a shower steamer as a delivery system for aromatherapy. While bath bombs are designed to moisturize the skin and fizz in a tub, steamers are packed with a higher concentration of essential oils intended for inhalation. As the water hits the tablet, it dissolves, releasing “volatile organic compounds” (the scent) into the steam.
The Power of Essential Oils
To achieve instant congestion relief & relaxation, we rely on specific plant extracts.
- For Congestion: Eucalyptus and Peppermint are the heavy hitters. They contain menthol and eucalyptol, which help thin mucus and reduce inflammation in the nasal passages.
- For Relaxation: Lavender and Bergamot are world-renowned for lowering cortisol levels and preparing the brain for rest.
Encouraging Reassurance for Beginners
If you’ve never made “fizzy” products before, don’t worry about getting it “perfect.” Even if your first batch looks a little crumbly, they will still smell amazing and work perfectly! You are doing a great job by exploring cost-saving, natural ways to support your health. You have everything you need to succeed.
Step-by-Step: Crafting Your Relief Steamers
Ready to get your hands a little dusty? Follow these manageable steps to create your own DIY shower steamers for instant congestion relief & relaxation.
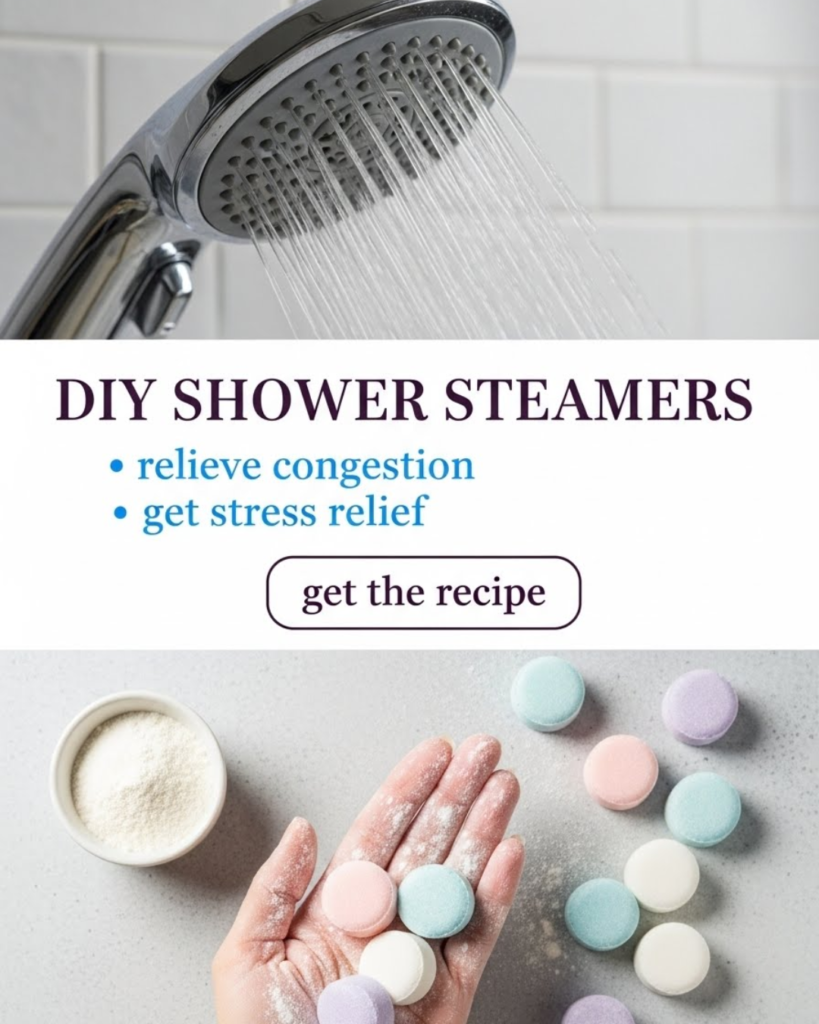
1. Gather Your Supplies
- Dry Ingredients: 2 cups of Baking Soda and 1 cup of Citric Acid (this provides the fizz).
- Liquid Ingredients: 1-2 tablespoons of water (in a spray bottle) and 30-40 drops of high-quality essential oils.
- Tools: A large mixing bowl, a whisk, and silicone molds (muffin tins or ice cube trays work too!).
2. The Mixing Process
- The Base: Whisk the baking soda and citric acid together until there are no clumps.
- The Scent: Add your essential oils directly to the dry mix and whisk quickly.
- The “Sand” Consistency: This is the most important part. Slowly spritz the water onto the powder while whisking. You want it to feel like damp sand—if you squeeze a handful, it should hold its shape without crumbling.
- Pro Tip: If it starts to fizz while you add water, you are adding it too fast! Slow down and keep whisking.
3. Molding and Drying
- The Action: Pack the mixture firmly into your silicone molds. Press down hard—the tighter they are packed, the longer they will last in the shower.
- The Wait: Let them dry for at least 24 hours in a cool, dry place. Once hard, pop them out and store them in an airtight glass jar.
Advanced Strategies: Pro Tips for Customization
Once you’ve mastered the basic recipe, share expert-level insights with yourself by experimenting with these variations.
The “Fever & Chills” Blend
If you are using these specifically for a cold, try adding a few drops of Tea Tree or Lemon oil. These oils have antimicrobial properties that can help support your immune system while the eucalyptus clears your head.
- Internal Link: To further boost your recovery, pair your steamer with a Homemade Congestion Remedy | Amish Fire Water for an internal and external approach to relief.
The “Aesthetic” Spa Look
If you want to give these as gifts, add dried botanicals like lavender buds or rose petals to the bottom of the mold before packing in the powder.
- Expert Secret: Use a tiny amount of mica powder or natural food coloring to distinguish your “Relief” (blue) steamers from your “Relax” (purple) ones.
- Internal Link: To create a full sensory environment, light one of your creations from How to Make Aesthetic Homemade Candles That Smell Like a Luxury Store while you shower.
Featured Snippet: Where do you put a shower steamer?
To get the best results, place your DIY shower steamer on the floor of the shower, away from the direct stream of water but where it still gets splashed. You want it to dissolve slowly. If it sits directly under the showerhead, it will fizz away in seconds. Placing it on a soap ledge or in the corner of the tub allows the scent to release gradually throughout your entire shower.
Troubleshooting: Common Challenges and Solutions
Even seasoned DIYers run into a few snags. Here is how to handle them with an encouraging mindset:
- “My steamers are expanding out of the mold!”: This means the mixture was too wet, causing a premature reaction. Action: Next time, use less water and more spritzing. You can still use the “puffy” ones; they just won’t look as pretty.
- “They crumble when I take them out”: They might be too dry or weren’t packed tightly enough.
- Solution: Add a tiny bit more water to the next batch until it feels like clay.
- Prevention: Ensure they dry in a low-humidity area.
- “I can’t smell them in the shower”: You may need a higher concentration of oil.
- Adjustment: Increase your drop count to 50-60 drops for a 2-cup batch. Remember, the steam dilutes the scent significantly.
- Internal Link: If you find yourself sensitive to strong scents, try a Bentonite Clay Foot Detox Recipe as an alternative way to relax without heavy inhalation.
Maximizing Results: Next-Level Shower Rituals
Now that you have your DIY shower steamers for instant congestion relief & relaxation, let’s show you how to build upon this success for a high-performance wellness routine.
The “Deep Breathing” Habit
- Tip: While the steamer is fizzing, practice Box Breathing (Inhale 4, Hold 4, Exhale 4, Hold 4). The combination of the mentholated steam and deep oxygenation can drastically reduce sinus pressure.
- Internal Link: If your congestion is causing a “heavy head,” apply a DIY Headache Balm to your temples immediately after stepping out of the shower.
Post-Shower Maintenance
- Tip: After the steam has opened your pores and cleared your head, treat your skin.
- Internal Link: Follow up with A Gentle Morning Habit That Makes Your Face Glow All Day to lock in hydration while your skin is still damp from the aromatic steam.
- Internal Link: If stress is your main issue, read A Simple Self-Care Ritual That Feels Like a Reset Button to find more ways to maintain that shower-induced calm all day long.
Conclusion: Transform Your Daily Routine
You have now discovered how to make DIY shower steamers for instant congestion relief & relaxation and, more importantly, you have the achievable steps to make it a reality. You have moved from feeling “stuffed up” to being an empowered creator of your own spa-like relief. By following these methods—balancing your dry ingredients, mastering the moisture level, and choosing the right oils—you have achieved a strategy for better health.
The journey to natural wellness is an achievable and rewarding path. We encourage you to whip up a batch of these today! You are more than capable of achieving a state of total relaxation and clear breathing with the simple tools in your home.
Important Disclaimer: This article is for informational purposes only and should not replace professional advice. For health-related topics, consult healthcare providers. For safety procedures, verify current best practices and local regulations. Individual results may vary, and personal circumstances should always be considered when implementing any suggestions.