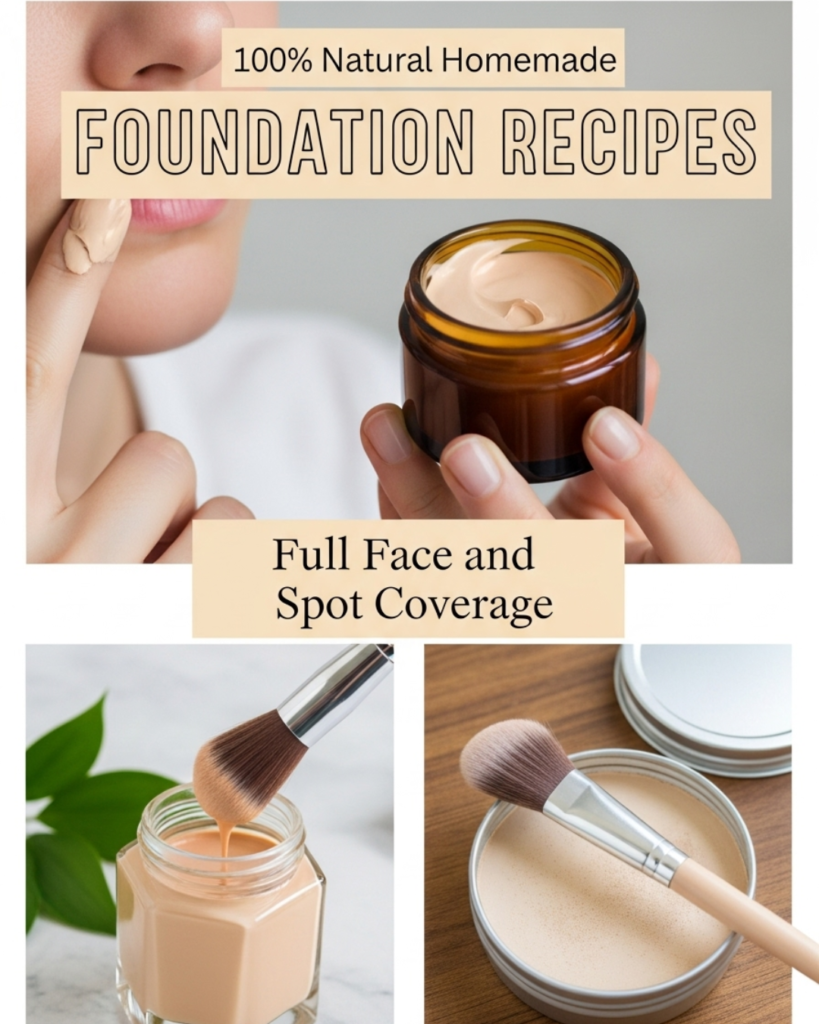
Discover how to create the perfect DIY foundation with 3 homemade makeup recipes. Achieve a flawless, natural glow using clean ingredients right from your pantry today.
Have you ever spent forty dollars on a high-end foundation only to realize the shade is slightly off or, worse, it makes your skin break out? It is a common frustration in the beauty world. Many commercial products are packed with synthetic silicones, parabens, and artificial fragrances that can irritate sensitive skin. But what if you could take back control of your beauty routine? Creating a Perfect DIY Foundation isn’t just a fun weekend project; it is a transformative way to ensure exactly what is touching your face is pure, nourishing, and a perfect match for your unique skin tone.
In this comprehensive guide, we are going to unlock the secrets to homemade cosmetics. You will learn how to blend common kitchen spices and natural minerals into high-performing makeup. Whether you prefer a light powder, a creamy liquid, or a moisturizing tinted balm, you have the capability to achieve professional results at home. By following these 3 homemade makeup recipes, you will save money, reduce plastic waste, and finally get that “your skin but better” glow. Let’s dive into the rewarding world of clean beauty!
Foundation: Why Go the Homemade Makeup Route?
Before we start mixing, it is essential to build confidence in the concept of DIY cosmetics. You might be wondering if a kitchen-made product can truly stand up to a store-bought version. The answer is a resounding yes!
The Benefits of Clean Ingredients
When you make your own foundation, you become the formulator. You can choose anti-inflammatory bases like arrowroot powder or nourishing carriers like jojoba oil. This is a massive win for anyone looking to make [sustainable lifestyle changes] or those with reactive skin. By eliminating “filler” ingredients, you allow your skin to breathe throughout the day.
Customization is King
One of the biggest struggles with makeup is the “undertone.” Commercial brands often lean too orange or too pink. With a Perfect DIY Foundation, you can tweak the color molecule by molecule. If you have a tan from your latest [gardening project], you can easily darken your batch with a pinch of cacao. If you’re feeling pale in the winter, a little extra arrowroot brings it back to your current shade.
Reassurance for Beginners
If you are worried that you need a laboratory to make makeup, take a deep breath! Most of these recipes involve simple stirring and “taste-testing” the color against your jawline. You are fully capable of succeeding on your very first try. The process is forgiving, encouraging, and incredibly satisfying.
Step-by-Step: 3 Homemade Makeup Recipes for Every Skin Type
Ready to transform your vanity? Here are three distinct ways to craft your Perfect DIY Foundation. Choose the one that best fits your daily coverage needs!
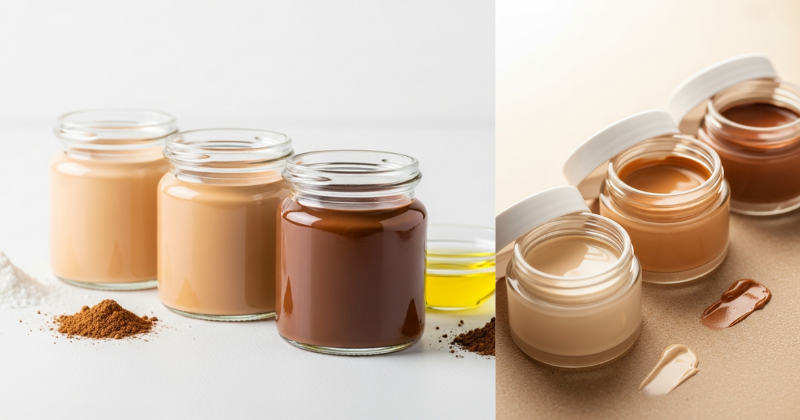
1. The “Kitchen Cabinet” Powder Foundation
This is the easiest place to start. It uses non-toxic kitchen staples to create a breathable, matte finish.
- The Base: 2 tablespoons of Arrowroot Powder (or Cornstarch).
- The Pigment: Slowly add Cocoa Powder (for brown), Cinnamon (for warm undertones), and Nutmeg (for golden tones).
- The Process: Start with your white base in a small bowl. Whisk in 1/4 teaspoon of cocoa powder at a time. Test the color on your hand until it disappears into your skin.
- Pro-Tip: If you have oily skin, add 1/2 teaspoon of Bentonite Clay to help absorb excess oil throughout the day.
2. The Nourishing Liquid Foundation
If you prefer a dewy finish and medium coverage, this liquid version is your best friend.
- The Method: Start with a small amount of your favorite [natural face moisturizer] or a carrier oil like Sweet Almond Oil.
- The Mix: Gradually stir your DIY powder (from Recipe 1) into the cream until you reach your desired consistency.
- The Application: Use a damp beauty sponge to “stipple” this onto your skin for a flawless, airbrushed look.
3. The Protective “Sun-Kissed” Tinted Balm
Perfect for those who want a “no-makeup” look while protecting the skin barrier.
- The Ingredients: 1 tablespoon of Shea Butter, 1 teaspoon of Zinc Oxide (for natural sun protection), and your custom pigment powder.
- The Process: Melt the shea butter in a double boiler. Stir in the zinc oxide and pigments. Pour into a small tin and let it cool.
- The Result: A creamy, protective balm that evens out skin tone while providing deep hydration.
Advanced Strategies: Expert Tips for Color Matching
Once you have the basics down, you can share these expert-level insights to help friends or family members customize their approach.
Mastering the Undertone
To truly achieve a Perfect DIY Foundation, you must look at your veins. If they look blue, you have cool undertones—add a tiny pinch of hibiscus powder for a pinker tint. If they look green, you are warm—use more ginger or cinnamon. If they are a mix, keep your ratio of spices balanced.
Enhancing Longevity
Natural makeup doesn’t contain the “glues” that commercial makeup does. To make your foundation last all day, use a “setting spray” made of distilled water and a splash of witch hazel. This helps the minerals “lock” into the skin. You can also learn [how to make your own DIY magnesium balm] to use as a hydrating night treatment to keep your canvas (your skin!) in top shape.
Creative Solutions for Texture
If your liquid foundation feels too heavy, add a drop of vegetable glycerin. This acts as a humectant, drawing moisture into the skin and giving the makeup a “slip” that makes it feel like a luxury serum. Don’t be afraid to experiment; that is the heart of the DIY journey!
Troubleshooting: Common Challenges and Solutions
Even the most careful DIYer might run into a few hurdles. Here is how to handle frequent obstacles with encouragement.
“My foundation looks a bit chalky.”
- The Solution: This usually means there is too much arrowroot powder and not enough moisture. If it’s a powder, try buffing it into the skin with a denser brush. If it’s a liquid, add a tiny drop of Jojoba oil to the mix to “fatten” the pigments.
- Preventive Measure: Always apply foundation to a freshly exfoliated and moisturized face.
“The color looks right in the jar but orange on my face.”
- The Fix: This is called oxidation. Some natural oils can turn darker when they hit the air.
- Alternative Approach: Next time, make your shade half a tick lighter than you think you need. You can always add more pigment, but it’s harder to take it away!
“I’m having trouble with the zinc oxide clumping.”
- The Advice: When making the tinted balm, use a small mini-whisk or even a battery-operated milk frother. This ensures the minerals are suspended evenly, providing consistent coverage and protection.
Maximizing Results: Sustainable Beauty Maintenance
To build upon your success, think about how your makeup routine fits into your overall lifestyle and long-term skin health.
Storage and Shelf Life
Because these 3 homemade makeup recipes do not contain strong chemical preservatives, you need to be mindful of storage. Keep your powder foundations in a dry, cool drawer—they can last up to a year. Liquid and balm versions should be made in small batches and used within 3 months. Always use clean fingers or a clean brush to prevent introducing bacteria into your jars.
Building Your Kit
Now that you’ve mastered foundation, why stop there? You can use the same principles to create bronzers (more cocoa powder) or highlighters (a touch of skin-safe mica). This holistic approach to beauty is a key part of [sustainable home living]. You are reducing your footprint while looking fabulous!
Featured Snippet: How do I make my own foundation at home?
To make your own foundation at home, start with a base of 2 tablespoons of arrowroot powder. Gradually whisk in small amounts of cocoa powder, cinnamon, and ginger until the shade matches your jawline. For a liquid version, mix this custom powder into a natural carrier oil or moisturizer. This DIY method allows you to avoid synthetic chemicals and achieve a perfect color match for your specific skin tone.
Conclusion
Mastering the Perfect DIY Foundation is an empowering step toward a cleaner, more intentional lifestyle. You have discovered that you have the capability to succeed in creating high-quality beauty products with simple, nourishing ingredients. By using these 3 homemade makeup recipes, you achieve a level of customization that commercial brands simply cannot offer. Your skin will thank you for the extra care, and you’ll love the confidence that comes with knowing exactly what is in your beauty bag.
You’ve got this! Start today by checking your spice cabinet and mixing your first small batch of powder. You are just minutes away from your most natural, radiant look yet.