Learn the art of paper crafting magic! Discover how to transform boring junk mail into beautiful, textured homemade paper with this easy, eco-friendly DIY guide.
Have you ever looked at the mountain of credit card offers, grocery flyers, and envelopes piling up on your kitchen counter and wished you could turn that clutter into something beautiful? You are not alone. Most of us see junk mail as an environmental nuisance, but for a creative soul, that “junk” is actually a goldmine of raw potential. By mastering the art of homemade paper from junk mail, you can transform everyday waste into stunning, artisanal stationery that carries a unique, deckled edge and a personal touch no store-bought card can match.
In this guide, you will discover the satisfying world of paper recycling at home. We will walk through the simple chemistry of breaking down fibers and the rhythmic magic of “pulling” a fresh sheet of paper from a vat of pulp. Not only will you save money on crafting supplies, but you’ll also reduce your household carbon footprint. Whether you want to create custom wedding invitations, rustic journals, or unique gift tags, this process is your gateway to a sustainable and rewarding hobby. Let’s unlock the magic hidden in your mailbox!
Foundation: Understanding the Basics of Paper Recycling
Before you dive into the water and pulp, it helps to understand what is actually happening. Paper is essentially a mat of cellulose fibers. When you make homemade paper from junk mail, you are simply breaking those fibers apart and rearranging them into a brand-new form. It is a process that feels like a cross between a science experiment and a spa day for your creativity.
What Kind of Junk Mail Works Best?
Not all mail is created equal in the world of paper crafting. For the best results, you want to focus on non-glossy materials.
- The Good Stuff: Envelopes (remove the plastic windows!), office paper, non-glossy flyers, and even egg cartons.
- The “Avoid” List: Shiny, waxy magazines or catalogs. These often have plastic coatings that won’t break down in water and can ruin your pulp consistency.
- Color Considerations: Remember that the colors of your junk mail will blend. If you mix a lot of red flyers with blue envelopes, you’ll end up with a lavender or grey sheet.
Essential Tools for Beginners
You don’t need a professional studio to get started. In fact, most of what you need is likely already in your home. The only specialized tool is a “mould and deckle,” which is essentially two wooden frames—one with a fine mesh screen. You can even [DIY your own paper making screen] using old picture frames and window screening!
Overcoming the “Mess” Factor
Many beginners hesitate because they fear a watery mess in the kitchen. With a few towels and a dedicated workspace, paper making is actually quite tidy. Think of it as a structured way to play with water. Once you see your first sheet dry into a firm, textured piece of art, any minor splashes will feel entirely worth it.
Step-by-Step: The Core Method of Making Paper
Making your own paper is an achievable project that follows a very logical, rhythmic flow. Follow these steps to ensure your first batch is a success.
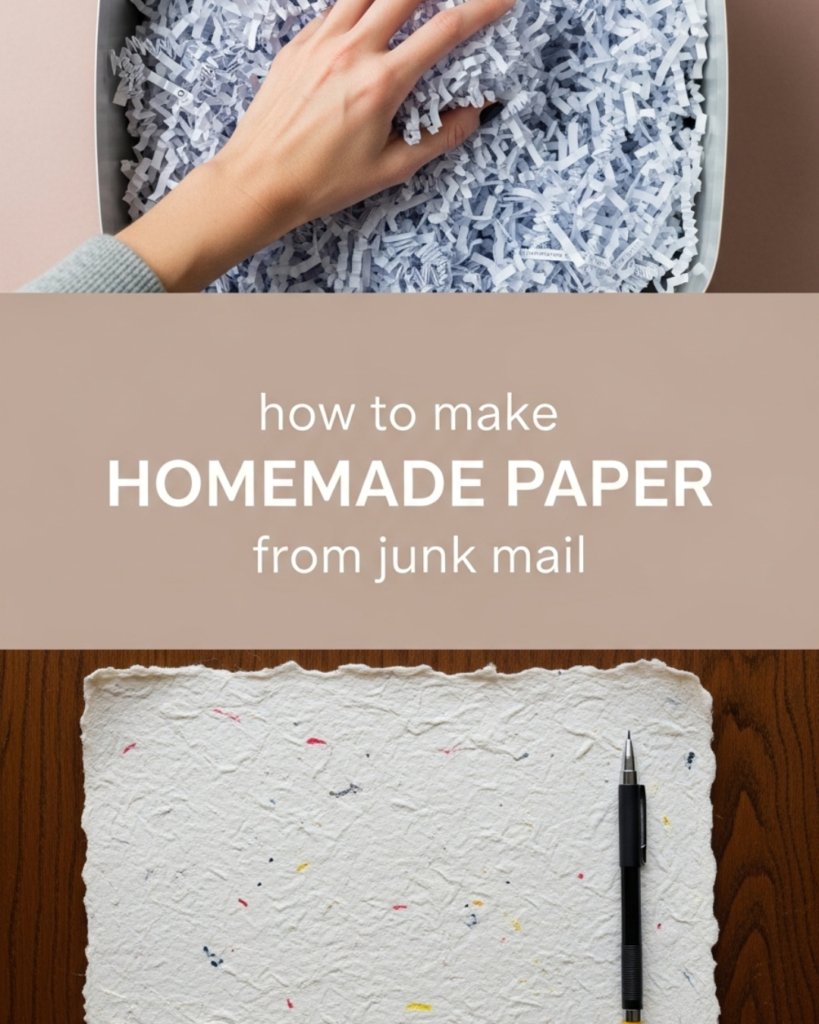
1. Shred and Soak
Start by tearing your selected junk mail into small squares, about one inch in size. Place them in a large bowl and cover them with warm water. Let them soak for at least two hours—or even overnight. This softens the fibers and makes the blending process much easier on your kitchen appliances.
2. Create the Pulp
Fill a blender about halfway with water and add a handful of your soaked paper bits. Pro Tip: Don’t overfill! Blend on high until the mixture looks like a thick, watery soup or a grey smoothie. This is your “slurry.” If you want colored paper, this is the stage where you can add a drop of liquid dye or even some colorful construction paper scraps.
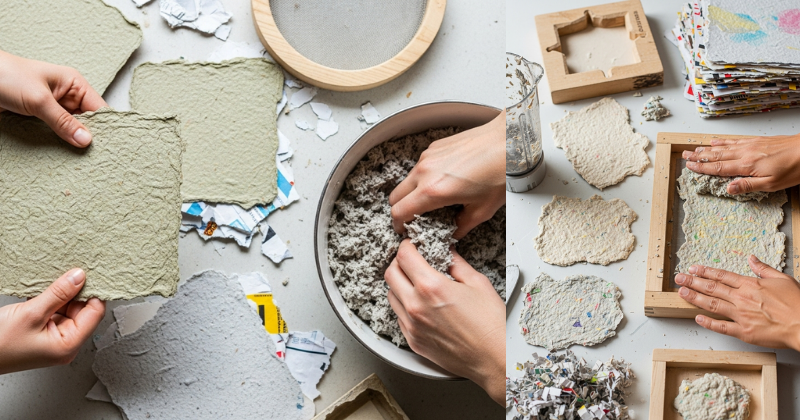
3. The “Pulling” Process
Fill a large plastic tub (big enough to fit your frames) with about 3-4 inches of water. Pour in several blenders full of pulp and stir it with your hand.
- The Dip: Hold your mould (screen side up) and deckle (the empty frame) together firmly.
- The Scoop: Dip them into the vat at a 45-degree angle, then level them out under the water.
- The Lift: Lift straight up. As the water drains through the mesh, you will see a thin layer of fibers trapped on top. This is your new sheet of paper!
4. Couching (Pronounced ‘Koo-ching’)
This is the process of transferring the wet sheet from the screen to a drying surface. Remove the top frame (the deckle). Flip the screen onto a piece of felt or a flat kitchen towel. Press down firmly with a sponge to soak up excess water, then gently lift the screen. Your wet sheet should stay on the fabric.
Advanced Strategies: Pro Tips for Artisanal Paper
Once you’ve mastered the basic sheet, it’s time to experiment and discover your personal style. Homemade paper from junk mail can be customized in endless ways.
Adding Botanical Beauty
Since this process is so connected to nature, why not bring the outside in? You can add dried flower petals, lavender buds, or even small seeds to your pulp vat. If you use wildflower seeds, you’ve created “seed paper” that can be planted in a garden after it’s used as a card! It’s a beautiful way to [nurture a sustainable ecosystem] through your crafts.
Texturing and Scenting
You can change the feel of your paper by varying the blending time. A short blend creates a chunky, rustic texture, while a long blend creates a smooth, professional finish. For a sensory experience, add a few drops of essential oil to your pulp. A hint of eucalyptus or lemon can make your stationery feel like a high-end boutique product.
Sizing for Ink
If you plan to write on your paper with a fountain pen, you might find the ink “bleeds” or feathers. To prevent this, add a small spoonful of liquid cornstarch or unflavored gelatin to your pulp vat. This “sizes” the paper, making the surface less absorbent and better for fine writing.
Troubleshooting: Common Paper Making Challenges
Even the most seasoned crafters run into hiccups. Here is how to handle the most common “oops” moments with confidence.
“My paper is too thick and looks like cardboard.”
- The Cause: There is too much pulp in your vat.
- The Fix: Simply add more water to the tub to thin out the slurry. You want a delicate balance where the fibers just barely cover the screen.
“The paper won’t come off the screen (sticking).”
- The Cause: You might not be pressing enough water out with the sponge during the couching phase.
- The Solution: Use more pressure! Also, ensure your “couching” fabric (the felt or towel) is slightly damp before you start. This helps the fibers release from the screen.
“My paper is curling as it dries.”
- The Cause: Uneven drying or thin edges.
- The Prevention: Once the paper is mostly dry but still slightly damp, place it between two flat boards or inside a heavy book. This “presses” the paper into a perfectly flat, crisp sheet.
Maximizing Results: Taking Your Craft to the Next Level
Your journey doesn’t end with a stack of paper. The real fun begins when you start using it!
Building a Stationery Business
If you find yourself with an abundance of beautiful sheets, consider selling them. Artisans often sell “Maker Bundles” of 10-20 sheets to other crafters. You could also explore [creating handmade journals] by binding your paper with simple twine or leather scraps. This is a fantastic way to turn junk mail into a profitable side hustle.
Seasonal Variations
Adapt your paper making to the time of year. In the fall, add shredded orange and brown leaves to your pulp. In the spring, use fresh grass clippings for a vibrant green hue. This connects your craft to the shifting seasons and keeps your creative process fresh and exciting.
Featured Snippet: How do you make paper from junk mail at home?
To make homemade paper from junk mail, shred non-glossy mail and soak it in warm water for 2 hours. Blend the soaked paper with water to create a pulp slurry. Pour the pulp into a tub of water, dip a mesh screen (mould and deckle) into the mixture, and lift to capture the fibers. Flip the wet sheet onto a felt cloth, sponge away excess water, and allow the sheet to dry for 24-48 hours.
Conclusion
The transformation from “junk” to “treasure” is a powerful experience. Making homemade paper from junk mail is more than just a DIY project; it is a way to reclaim your environment and express your individuality. You have learned that the process is achievable, affordable, and incredibly versatile.
By following these steps, you’ve unlocked the ability to create something meaningful from the mundane. Don’t be afraid to experiment with colors, textures, and inclusions. Every sheet you pull is a testament to your capability and your commitment to a more creative, sustainable life. Now, go grab that stack of mail and start your first batch!