Learn how to make a DIY anti-aging serum for youthful, radiant skin using natural ingredients. This easy recipe helps reduce wrinkles and boost your glow today.
Important Disclaimer: This article is for informational purposes only and should not replace professional advice. For health-related topics, consult healthcare providers. For safety procedures, verify current best practices and local regulations. Individual results may vary, and personal circumstances should always be considered when implementing any suggestions.
Have you ever stared at the sprawling skincare aisle, overwhelmed by tiny bottles with astronomical price tags? We have all been there, searching for that “magic potion” to restore our skin’s natural glow and smooth out those fine lines. What if I told you that you could skip the chemicals and the steep costs by creating your own high-performance elixir right in your kitchen? By crafting a DIY anti-aging serum for youthful, radiant skin, you are not just saving money; you are taking total control over the purity and potency of what touches your face.
In this guide, you will discover how to harness the power of nature’s most effective botanicals. We will unlock the secrets of antioxidant-rich oils and skin-loving vitamins to help you achieve a complexion that looks refreshed, plump, and luminous. Whether you are a skincare novice or a seasoned DIY enthusiast, this process is empowering, simple, and incredibly rewarding. Get ready to transform your morning routine and discover the radiant confidence you deserve!
Foundation: Why Natural Serums Work Wonders
Before we start mixing, let’s build your confidence by understanding the “why” behind the bottle. A serum is a concentrated treatment designed to deliver potent ingredients deep into the skin. Unlike heavy creams that sit on the surface, a DIY anti-aging serum for youthful, radiant skin uses small-molecule oils that mimic our skin’s natural sebum. This allows for better absorption and faster results.
Many people worry that “oil” will lead to breakouts, but that is a common misconception! When you use the right botanical oils, you are actually signaling to your skin that it has enough moisture, which can help balance oil production. Using a homemade version ensures you avoid synthetic “fillers,” parabens, and artificial fragrances that can often irritate sensitive skin or cause long-term inflammation.
H3: The Power of Carrier Oils
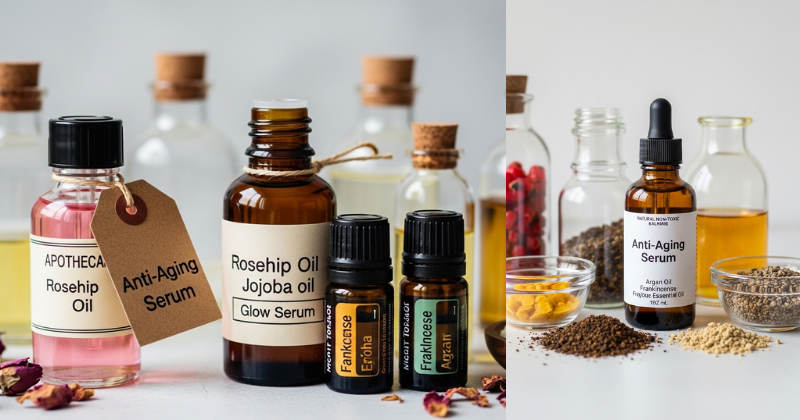
The base of your serum is the carrier oil. For anti-aging, we look for oils high in essential fatty acids and vitamins.
- Rosehip Seed Oil: Often called “nature’s retinol,” it is packed with Vitamin A and C to encourage cell turnover.
- Jojoba Oil: Closely resembles human sebum, making it perfect for all skin types, including oily or combination skin.
- Argan Oil: Known as “liquid gold,” it provides deep hydration and improves skin elasticity.
H3: Essential Oils for Cellular Support
Essential oils are the “active” ingredients in your DIY anti-aging serum for youthful, radiant skin. These concentrated plant extracts provide the antioxidant punch needed to fight free radicals—the primary culprits behind premature aging. Frankincense, for example, has been used for centuries to support skin cell health, while Geranium helps to tighten and brighten the complexion.
Step-by-Step Process: Crafting Your Golden Elixir
Making your serum is an achievable, therapeutic process. Follow these manageable steps to create a professional-grade product at home.
Step 1: Gather Your Tools and Ingredients
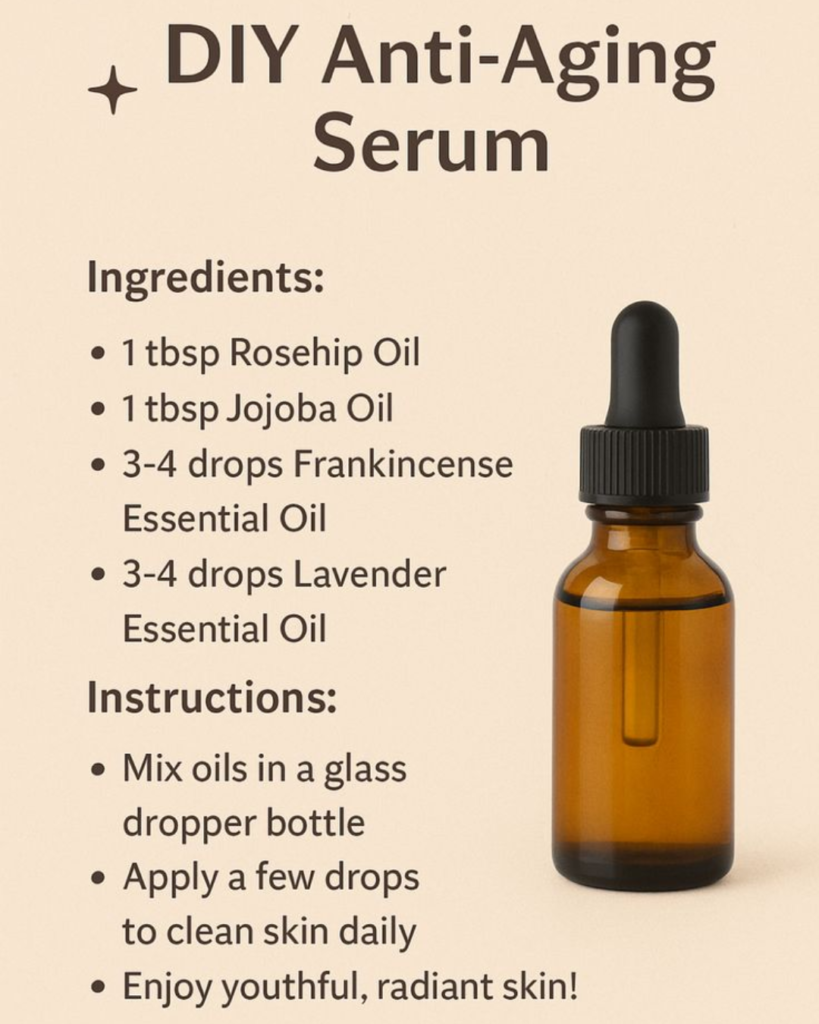
To ensure the longevity of your serum, use a 2-ounce dark amber glass bottle with a dropper. The dark glass protects the delicate oils from light degradation. You will also need:
- 1 oz Rosehip Seed Oil
- 0.5 oz Jojoba Oil
- 0.5 oz Argan Oil
- 10 drops Frankincense Essential Oil
- 5 drops Lavender Essential Oil
- 5 drops Geranium Essential Oil
- Optional: 1/2 teaspoon Vitamin E oil (acts as a natural preservative and skin healer)
Step 2: The Mixing Method
- Sanitize: Clean your glass bottle and dropper with high-percentage rubbing alcohol and let them dry completely.
- The Base: Using a small funnel, pour your Rosehip, Jojoba, and Argan oils into the bottle.
- The Actives: Carefully add the drops of essential oils and the Vitamin E.
- The Seal: Close the bottle tightly and roll it between your palms for 30 seconds. Avoid shaking aggressively, as this introduces air which can speed up oxidation.
Step 3: Timing and Application
For maximum transformation, apply your serum to damp skin. After cleansing and toning, take 3–5 drops and press them into your face and neck using upward motions. Applying it while your skin is still slightly moist “locks in” the hydration. Give it about 2 minutes to sink in before applying your moisturizer or sunscreen.
Advanced Strategies: Pro Tips for Custom Results
Once you have mastered the basic DIY anti-aging serum for youthful, radiant skin, you can share in these expert-level insights to further customize your approach.
H3: Seasonal Adaptations
Your skin’s needs change with the weather. In the harsh winter months, consider adding a few drops of Pomegranate Seed Oil for its thick, protective moisture. During the humid summer, you might increase the ratio of Jojoba oil, which feels lighter and more breathable on the skin.
H3: Targeting Specific Concerns
- For Hyperpigmentation: Add 3 drops of Lemon or Helichrysum essential oil to help fade dark spots. (Note: Only use Lemon at night, as it can be photosensitive).
- For Extreme Dryness: Incorporate Sea Buckthorn oil. It gives the serum a beautiful orange hue and provides a massive boost of Omega-7.
- The Gua Sha Connection: Use your serum as a lubricant for facial massage or Gua Sha. This increases blood flow and helps the ingredients penetrate even deeper while sculpting your facial contours.
Troubleshooting: Common Challenges and Solutions
Even with a simple recipe, you might face obstacles. Here is how to navigate them with encouragement and ease.
- Problem: My serum feels “greasy” and won’t sink in.
- Solution: You are likely using too much! Start with only 2 drops. If that doesn’t work, ensure you are applying it to damp skin. If it still feels heavy, try increasing the Jojoba oil and decreasing the Argan oil in your next batch.
- Problem: I’m experiencing a slight tingle or redness.
- Solution: Your skin might be sensitive to a specific essential oil. Always perform a patch test on your inner arm for 24 hours before full application. If irritation occurs, dilute the serum further with more carrier oil.
- Problem: The serum smells “earthy” or different than store-bought.
- Solution: This is actually a good sign! It means you are smelling real, unrefined plants rather than synthetic perfumes. If you prefer a floral scent, you can safely increase the Lavender or Geranium drops slightly.
Preventive Measures
To keep your serum fresh, store it in a cool, dark place (like a drawer) rather than on a sunny windowsill. Always ensure your hands are clean before touching the dropper to prevent bacteria from entering the bottle.
Maximizing Results: Next-Level Skin Wellness
To build upon your success, remember that skincare is just one part of a sustainable lifestyle change. Complement your serum with these strategies to achieve long-term brilliance.
- Internal Hydration: No serum can fix what dehydration causes. Drink plenty of water and eat healthy fats like avocado and walnuts to support your skin from the inside out.
- Sun Protection: Even the best anti-aging serum can’t compete with sun damage. Always apply a broad-spectrum SPF as your final step every morning.
- Consistency is Key: Natural ingredients work through cumulative effect. You won’t see a “facelift” in one night, but after 28 days—the time it takes for your skin cells to renew—you will notice a significant shift in texture and tone.
Conclusion: Unlock Your Natural Glow
Embracing a DIY anti-aging serum for youthful, radiant skin is more than a beauty hack; it is an act of self-love. You have now discovered that achieving a vibrant, youthful complexion is well within your reach using the simple, potent gifts of nature. By following this recipe, you are nourishing your skin with the vitamins and antioxidants it craves, without the chemical clutter.
Remember, you have the capability to be your own skincare expert. This journey of experimentation and discovery is your path to a more mindful and effective beauty routine. So, go ahead—mix your first batch, enjoy the soothing aromas, and watch as your skin begins to reflect the health and vitality you feel inside.