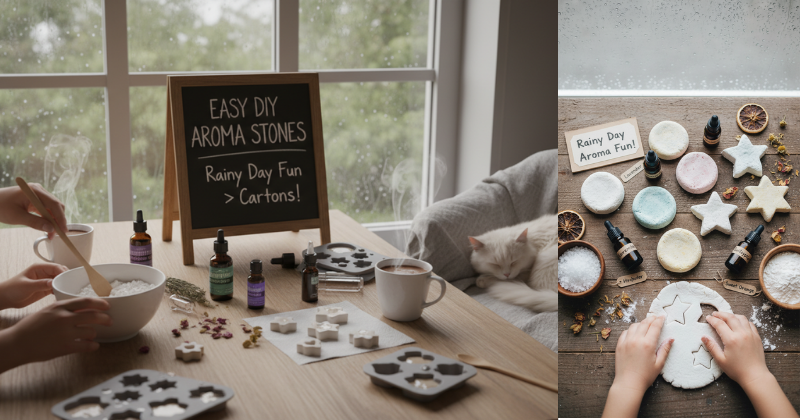
Learn how to make Easy – DIY Aroma Stones with this fun, step-by-step guide. Transform your home’s atmosphere naturally and keep the kids entertained today! There is nothing quite like the sound of rain tapping against the window to make you want to curl up and do something creative. While it is easy to lean on digital entertainment, there is a special kind of magic in rolling up your sleeves and making something with your own hands.
In this guide, you will discover how to unlock the secrets of “stone-making” using simple kitchen ingredients. These DIY aroma stones are essentially porous, handcrafted diffusers that hold onto essential oils, slowly releasing beautiful scents into your room. They are cost-effective, eco-friendly, and surprisingly addictive to make. By the end of this article, you’ll have the confidence to turn a gloomy afternoon into a productive, fragrant masterpiece. Let’s dive into this achievable craft that brings a touch of spa-like serenity to any corner of your home!

Foundation: Getting Started with Aroma Stones
If you have never heard of an aroma stone before, think of it as a reusable, unpowered air freshener. Unlike candles, they don’t require a flame, and unlike electric diffusers, they don’t need a plug. This makes them incredibly safe for kids’ rooms, closets, or even your car. You are essentially creating a small piece of “thirst” clay that drinks up essential oils and breathes them back out.
Many beginners worry that they need expensive pottery equipment or a kiln. Fortunately, you don’t! We use a simple air-dry method. The two most popular “bases” for these stones are salt dough or a mixture of plaster of Paris and flour. Both are very forgiving, making this the perfect project for little hands and DIY novices alike.
Why Choose DIY Over Store-Bought?
Making your own scent diffusers allows you to control exactly what goes into your air. Many store-bought sprays contain synthetic fragrances that can be irritating. When you make these stones, you use 100% pure essential oils. Plus, you get to customize the shapes! From stars and hearts to rustic “river rocks,” the creative possibilities are endless.
Essential Supplies You’ll Need
Before we start the mixing, let’s gather our “tools of the trade.” You likely have most of these in your pantry already:
- Flour and Salt: The building blocks of our dough.
- Warm Water: To bind everything together.
- Essential Oils: Lavender for sleep, peppermint for focus, or citrus for energy.
- Cookie Cutters: To get those perfect shapes.
- Mixing Bowl and Spoon: Your standard kitchen gear will do.
Step-by-Step Process: How to Craft Your Stones
Breaking this process down makes it manageable and ensures you get great results on your first try. The key here is patience—especially during the drying phase!
Step 1: Mixing the Base
Combine 1 cup of all-purpose flour with 1/2 cup of salt. Slowly add 1/4 to 1/2 cup of warm water. You want the consistency of playdough—not too sticky, but not crumbly. If it’s too wet, add a dash of flour. If it’s cracking, add a few drops of water. This is a great time to let the kids help with the kneading; it’s a wonderful sensory experience!
Step 2: Shaping and Designing
Roll your dough out to about 1/2 inch thickness. If the dough is too thin, the stone might crack; if it’s too thick, it will take forever to dry. Use your cookie cutters to stamp out shapes. Pro Tip: If you want a more natural look, simply roll pieces of dough into balls and flatten them slightly with your palm to mimic pebbles found in a stream.
Step 3: The Curing Phase
Place your stones on a baking sheet lined with parchment paper. Now comes the hard part: waiting. These stones need to air-dry for at least 48 hours. If you are in a humid climate, it might take an extra day. While you can bake them on the lowest setting of your oven (around 170°F or 75°C) for a few hours, air-drying usually results in a more porous stone that holds scent longer.
Advanced Strategies: Pro Tips for Beautiful Results
Once you have mastered the basic “pebble,” you can start experimenting with aesthetic variations. This is where you can truly customize your aroma stones to match your home decor.
Adding Natural Colorants
Instead of using plain water, try using strong-brewed tea or coffee for an earthy, sepia tone. You can also use beet juice for a soft pink or turmeric for a vibrant yellow. If you prefer a more “polished” look, a single drop of food coloring in the water before mixing will give you a consistent pastel shade throughout the stone.
Texturizing Your Stones
Before the stones dry, press items into the surface to create beautiful imprints.
- Nature Finds: Press a dried leaf or a sprig of rosemary into the dough.
- Fabrics: A piece of lace or burlap pressed onto the surface creates a high-end, textured look.
- Stamps: Use rubber letter stamps to spell out names or “Relax” and “Breathe.”
Custom Scent Blending
Don’t feel limited to one oil. Create a “signature scent” for your home. Mixing 3 drops of Eucalyptus with 2 drops of Lemon creates a refreshing “clean home” vibe. For a cozy winter feel, try Cinnamon and Orange. Always wait until the stone is completely dry before adding your oils, or the oil won’t soak in properly.
Troubleshooting: Common Challenges and Solutions
DIY projects are all about learning, and sometimes things don’t go perfectly. Here is how to fix the most common “oops” moments.
“My stones are cracking as they dry!” This usually happens if the dough was too dry to begin with or if they dried too quickly in a hot spot. To prevent this, ensure your dough is well-kneaded and smooth. If a stone has a small crack, you can often “heal” it by rubbing a tiny bit of damp flour paste into the crack before it’s fully hardened.
“The scent doesn’t seem to last very long.” Aroma stones are meant for “close-range” scenting. If you find the aroma fading, simply add another 2-3 drops of oil. The salt in the dough actually helps preserve the scent, but environmental factors like high airflow can make the oil evaporate faster. Keep your stones in smaller spaces like drawers or bathrooms for maximum impact.
“The dough is sticking to my cookie cutters.” Lightly dust your cutters and your rolling pin with flour, just as you would when making actual cookies. This ensures a clean release and sharp edges for your shapes.
Maximizing Results: Next Level Maintenance
To keep your Easy – DIY Aroma Stones looking and smelling great for months, a little bit of maintenance goes a long way. These stones are surprisingly durable if treated with care.
- Refreshing the Scent: Depending on the quality of your essential oils, you’ll likely want to refresh your stones every week. Simply drop the oil directly onto the center of the stone.
- Cleaning: If your stones get dusty, do not submerge them in water (they will dissolve!). Instead, use a dry cloth or a soft-bristled brush to gently whisk away dust.
- Long-Term Storage: If you want to switch scents, place the old stone in a sealed jar for a few days to let the old scent dissipate before applying a new one.
- Gift Ideas: These make incredible housewarming gifts. Place three or four stones in a mesh bag with a small vial of essential oil. It’s a thoughtful, handmade gesture that anyone would appreciate.
Internal Linking Opportunities:
- Top 10 Essential Oils for Stress Relief and Relaxation
- Creative Rainy Day Activities for Kids That Don’t Involve Screens
- How to Organize Your Craft Room on a Budget
Conclusion
Making Easy – DIY Aroma Stones is more than just a craft; it is a way to reclaim your environment and your time. You have learned how to take basic pantry staples and transform them into functional pieces of art that improve your well-being. Whether you are looking to freshen up a laundry room or find a way to bond with your children on a Saturday afternoon, this project delivers satisfaction that a cartoon simply can’t match.
The beauty of DIY is that you are the creator. You choose the shapes, the colors, and the scents that define your space. So, the next time the clouds roll in, don’t reach for the remote. Reach for the flour and salt instead. You’ve got the skills, the tools, and the inspiration—now go create something beautiful!