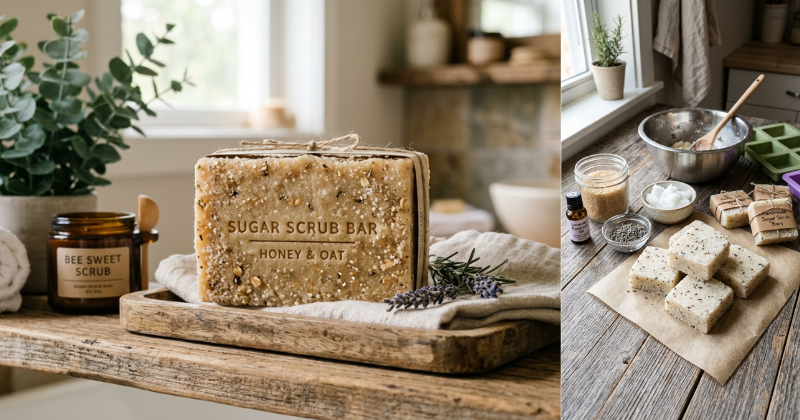
Want soft, glowing skin without spending a fortune? This sugar scrub bar recipe is a simple, mess-free way to exfoliate and moisturize in one step—right from your shower.
Have you ever used a body scrub that left your shower floor greasy and your skin still dry? You’re not alone. Many store-bought scrubs are either too harsh or too oily. The good news? You can make your own sugar scrub bar at home that gently exfoliates, deeply nourishes, and feels like a spa treatment every time you use it.
In this guide, you’ll discover exactly how to make sugar scrub bars, how to customize them for your skin type, and how to avoid common mistakes. Whether you’re new to DIY skincare or already love homemade beauty recipes, this is your step-by-step path to smoother, healthier-looking skin.
Why Make a Sugar Scrub Bar Instead of Using Regular Scrub?
Before we jump into the sugar scrub bar recipe, let’s talk about why this format is a game-changer.
Traditional scrubs come in jars. You scoop them out, they drip, they separate, and sometimes they grow bacteria if water gets inside. Sugar scrub bars solve all of that.
H3: What Is a Sugar Scrub Bar?
A sugar scrub bar is a solid exfoliating bar made from:
- Sugar (natural exfoliant)
- Butters or oils (moisturizing agents)
- A hardening ingredient like beeswax or cocoa butter
Instead of scooping, you simply rub the bar directly onto damp skin.
H3: Benefits of Sugar Scrub Bars
- Less mess in the shower
- Pre-measured exfoliation
- Travel-friendly
- Longer shelf life
- Doubles as exfoliator + moisturizer
Plus, sugar is a natural humectant. It helps draw moisture into your skin while removing dead skin cells. According to dermatology research, gentle physical exfoliation can improve skin texture and enhance product absorption when done correctly.
If you’ve been searching for a DIY exfoliating bar that’s beginner-friendly and effective, this is it.
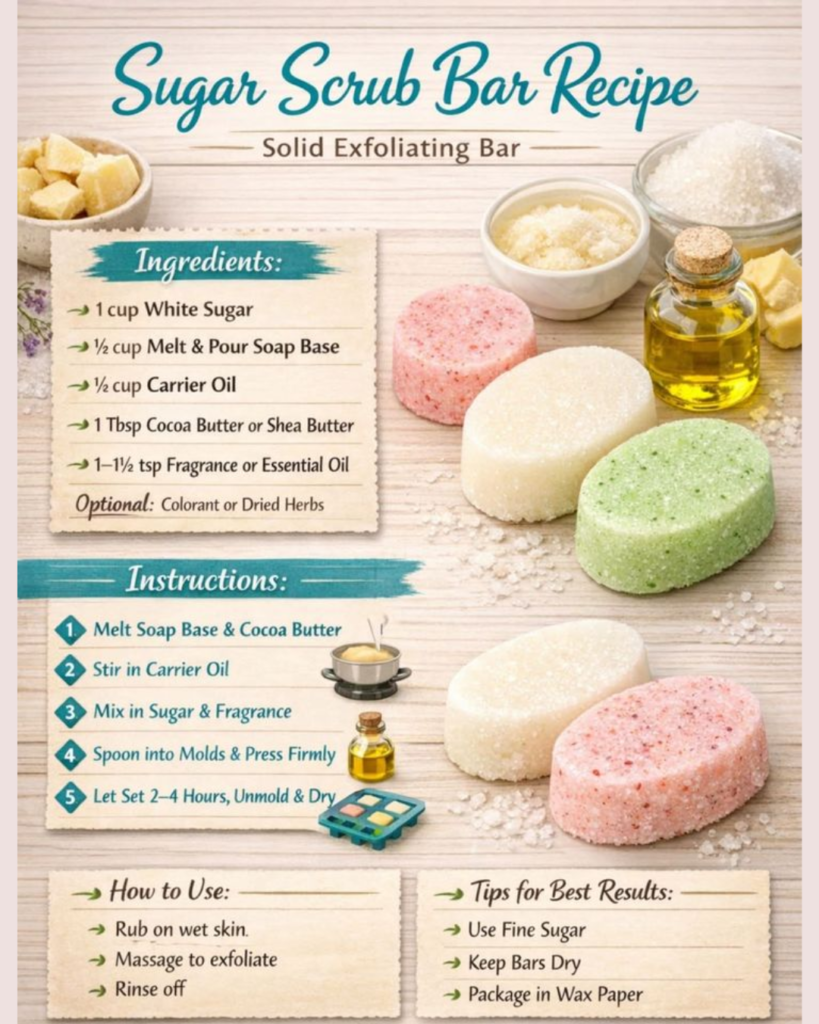
Sugar Scrub Bar Recipe (Step-by-Step Guide)
Let’s make your first batch.
H3: Ingredients You’ll Need
- 1 cup granulated sugar
- ½ cup shea butter (or cocoa butter)
- ¼ cup coconut oil
- 2 tablespoons beeswax (for firmness)
- 15–20 drops essential oil (optional)
- Silicone molds
These ingredients are easy to find and budget-friendly. You may already have some in your kitchen.
H3: Tools Required
- Double boiler (or heat-safe bowl over a pot)
- Mixing spoon
- Measuring cups
- Silicone molds
H3: Step-by-Step Instructions
Step 1: Melt the Base
In a double boiler, melt the shea butter, coconut oil, and beeswax over low heat. Stir gently until fully liquid.
Step 2: Let It Cool Slightly
Remove from heat and allow it to cool for 3–5 minutes. This prevents the sugar from dissolving when added.
Step 3: Add Sugar
Slowly mix in the sugar. Stir until evenly combined.
Step 4: Add Fragrance (Optional)
Add essential oils and stir gently.
Step 5: Pour Into Molds
Transfer mixture into silicone molds. Press firmly to remove air pockets.
Step 6: Let It Harden
Place molds in the refrigerator for 1–2 hours until fully solid.
Once hardened, pop them out and store in an airtight container.
That’s it. You just made your own homemade sugar scrub bars.
Pro Tips to Customize Your Sugar Scrub Bars
Now that you know the basic sugar scrub bar recipe, let’s elevate it.
H3: For Dry Skin
- Increase shea butter slightly
- Add vitamin E oil
- Use finely ground sugar for gentler exfoliation
H3: For Oily or Acne-Prone Skin
- Use light oils like grapeseed oil
- Add a few drops of tea tree essential oil
- Keep exfoliation gentle and limit to 1–2 times weekly
H3: For Sensitive Skin
- Use brown sugar (softer texture)
- Avoid strong essential oils
- Test on a small patch first
You can also experiment with:
- Coffee grounds for a caffeine boost
- Lemon zest for brightening (avoid sun exposure after use)
- Oat powder for soothing effects
This is where DIY skincare becomes empowering. You’re not just following a recipe — you’re designing it for your skin.
Common Mistakes and How to Fix Them
Even simple recipes can go wrong. Let’s troubleshoot.
H3: My Bars Are Too Soft
Possible causes:
- Not enough beeswax
- Too much coconut oil
- Warm storage area
Fix:
Add more beeswax and remelt the mixture.
H3: The Sugar Dissolved
This happens if the mixture was too hot when you added sugar.
Solution:
Let oils cool slightly before mixing in sugar.
H3: Bars Feel Too Harsh
Try:
- Using finer sugar
- Reducing sugar ratio slightly
- Applying with lighter pressure
Remember, exfoliation should never feel painful. Gentle and consistent wins every time.
How to Use Sugar Scrub Bars for Best Results
Using your sugar scrub bar properly makes all the difference.
H3: Step-by-Step Use
- Start with damp skin in the shower.
- Rub the bar directly onto your body using circular motions.
- Focus on rough areas (elbows, knees, heels).
- Rinse thoroughly.
- Pat dry gently.
Because these bars contain oils and butters, you may not need lotion afterward.
H3: How Often Should You Use It?
For most skin types:
- 1–3 times per week is ideal
Over-exfoliating can damage your skin barrier. Balance is key.
How to Store Sugar Scrub Bars Properly
To maximize shelf life:
- Keep bars dry between uses
- Store on a draining soap dish
- Avoid leaving in standing water
- Use within 3 months for best freshness
If you’re making a batch as gifts, wrap them in parchment paper and store in a cool place.
Can You Sell Homemade Sugar Scrub Bars?
Many small businesses start with a simple sugar scrub bar recipe. If you plan to sell:
- Follow cosmetic safety regulations in your area
- Label ingredients clearly
- Test stability and shelf life
- Avoid making medical claims
DIY skincare can evolve into something bigger when done thoughtfully.
Related DIY Ideas You Might Love
If you enjoyed this sugar scrub bar recipe, you may also want to explore:
- DIY body butter recipes
- Homemade shower steamers
- Coffee scrub for cellulite
- Natural lip scrub recipes
- Clay face masks for oily skin
These all pair beautifully with exfoliation-focused routines.
Conclusion: Your Skin Deserves This Simple Upgrade
Making your own sugar scrub bar recipe isn’t just about saving money. It’s about taking control of what touches your skin. It’s about simplicity, confidence, and creating something that works for you.
You don’t need complicated formulas. You don’t need expensive brands. You just need a few ingredients, a little time, and the willingness to try.
Start small. Make one batch. Test it. Adjust it. And enjoy the transformation in your skin’s texture and glow.
You absolutely can create spa-level results at home.