Salut les gourmands!
There exists a culinary paradox that has mystified home bakers for generations: how can something so extraordinarily complex in flavor, texture, and appearance emerge from merely three humble ingredients? This artisan bread represents not just a recipe, but a revelation—a doorway into understanding that true mastery lies not in complexity, but in profound respect for time, temperature, and the ancient alchemy of fermentation.
I discovered this transformative recipe during a moment of profound frustration, standing in my kitchen surrounded by bags of specialty flours, exotic yeasts, and complicated equipment that promised bakery-quality results yet delivered only disappointment. Then, almost by accident, I stumbled upon this method—so simple it seemed impossible, yet so effective it borders on magical. The first time I pulled a golden, crackling loaf from my oven, its crust shattering beneath my fingers to reveal an impossibly airy crumb, I understood that I had been overcomplicating bread for years. This recipe requires no kneading, no special equipment, no bakery expertise—just patience, three ingredients, and a willingness to let time perform its miraculous work.
The Philosophy Behind Simplicity: Understanding Artisan Bread
Before we embark on this culinary journey, we must first comprehend why this three-ingredient approach succeeds where complicated recipes often fail. Artisan bread represents the purest expression of baking—flour, water, salt, and time transforming through fermentation into something transcendent.
The Science of Slow Fermentation
Traditional bread-making relied on extended fermentation periods, allowing wild yeasts and beneficial bacteria to develop complex flavor compounds while simultaneously breaking down gluten proteins into digestible structures. Modern commercial baking accelerated these processes, prioritizing speed over flavor development. This recipe returns us to ancestral wisdom, employing an overnight fermentation that requires minimal effort yet yields maximum results.
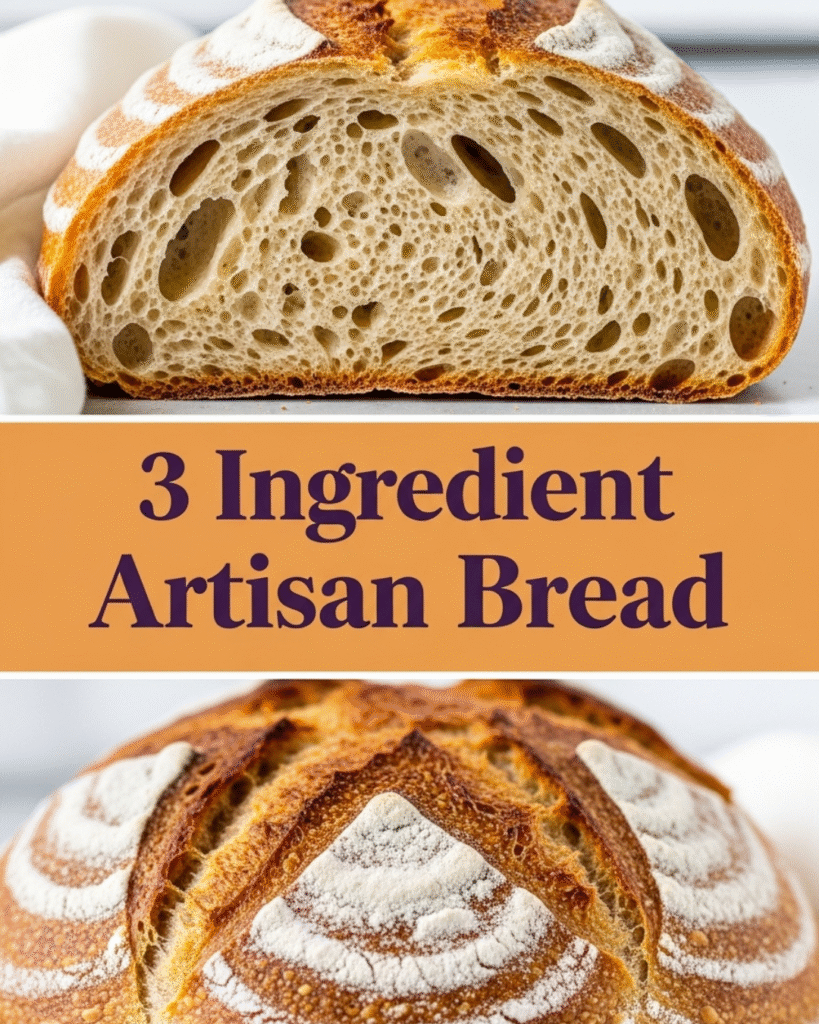
The extended resting period allows enzymatic activity to fully develop the dough’s potential. Amylase enzymes convert starches into sugars, providing food for yeast while creating the caramelized crust we crave. Protease enzymes partially digest gluten, creating that coveted open crumb structure with irregular holes that signify genuine artisan bread.
Why Three Ingredients Work Perfectly
Flour: We use all-purpose flour, accessible in every pantry, containing sufficient protein (typically 10-12%) to develop adequate gluten structure without requiring the specialized techniques that high-protein bread flour demands.
Water: The hydration ratio in this recipe (approximately 80%) creates a wet, sticky dough that initially seems unmanageable. This high hydration is precisely what generates those beautiful irregular air pockets and creates steam during baking, producing a crackling crust that rivals professional bakeries.
Salt: Beyond flavor, salt regulates yeast activity, strengthens gluten bonds, and enhances the bread’s keeping qualities. The precise amount creates perfect balance—enough to develop flavor without inhibiting fermentation.
Présentation de la Recette
Temps de préparation: 5 minutes (active time)
Temps de fermentation: 12-18 hours (passive time)
Temps de cuisson: 45 minutes
Portions: 1 magnificent loaf (serves 6-8)
Niveau de difficulté: Débutant (surprisingly simple despite impressive results)
Origine: This method derives from the revolutionary no-knead bread technique popularized by Jim Lahey of Sullivan Street Bakery, itself inspired by centuries-old European artisan traditions where time, not labor, creates exceptional bread.
Ingrédients
The beauty of this recipe lies in its radical simplicity. You likely possess everything required in your kitchen right now:
- 3 cups (400g) all-purpose flour – unbleached preferred for superior flavor development
- 1½ cups (350ml) lukewarm water – approximately 90-100°F (32-38°C), feeling pleasantly warm but not hot to the touch
- ¼ teaspoon instant yeast – yes, truly just ¼ teaspoon! This minuscule amount works miracles given sufficient time
- 1¼ teaspoons fine sea salt – avoid iodized salt, which can impart metallic flavors
Optional enhancements (maintaining the spirit of simplicity):
- Seeds for topping (sesame, poppy, sunflower)
- Fresh herbs (rosemary, thyme)
- Whole wheat flour (substitute up to 25% of all-purpose flour for nutty complexity)
Préparation: The Transformative Journey
Étape 1: The Initial Mixing Ritual
In a large mixing bowl—I prefer glass or ceramic for their non-reactive properties—combine the flour, yeast, and salt. This preliminary mixing ensures even distribution of yeast throughout the flour, preventing concentrated fermentation spots that create uneven texture.
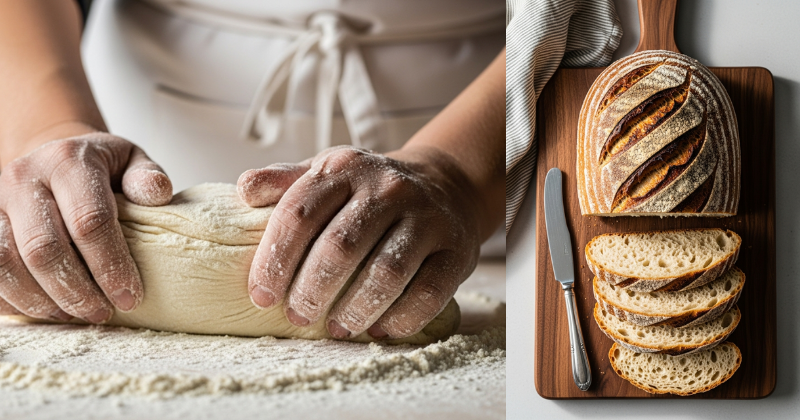
Create a well in the center of the dry ingredients, then pour in the lukewarm water all at once. Using a wooden spoon or your hand (my preferred method for connecting with the dough), stir vigorously until no dry flour remains visible. The dough will appear shaggy, impossibly wet, and utterly unpromising—this is precisely correct.
Resist every instinct to add more flour. This sticky, almost batter-like consistency transforms through fermentation into perfectly structured bread dough. The high hydration allows gluten to develop spontaneously through autolysis—the dough essentially kneading itself through enzymatic action and time.
Étape 2: The Fermentation Transformation
Cover your bowl with plastic wrap or a damp kitchen towel. This covering prevents surface drying while allowing gases produced during fermentation to escape. Place the bowl in a warm, draft-free location—I favor the top of my refrigerator, where ambient warmth from the appliance creates an ideal microclimate.
Now begins the most critical yet effortless phase: waiting. Allow the dough to ferment for 12-18 hours at room temperature (68-72°F/20-22°C). During this extended period, the microscopic amount of yeast multiplies exponentially, producing carbon dioxide bubbles that create bread’s characteristic structure while developing complex flavor compounds that distinguish artisan bread from commercial varieties.
After 12 hours minimum, the dough will have doubled or tripled in volume, displaying a bubbly, almost honeycomb-like surface. The transformation is visually stunning—what was dense and compact becomes alive, active, ready.
Étape 3: The Shaping Ceremony
Generously flour a clean work surface—don’t be timid here; the dough remains quite sticky. Turn out the risen dough, which will deflate somewhat (this is expected and beneficial). The dough will spread and relax, appearing almost liquid.
Dust the top surface with additional flour, then, using floured hands or a bowl scraper, fold the dough over itself several times—imagine folding a letter into thirds, then rotating and repeating. This brief shaping session (literally 30 seconds) creates surface tension that helps the loaf maintain its shape during the final rise.
Form the dough into a rough ball. Don’t obsess over perfection; rustic irregularity contributes to artisan bread’s charm. Place the shaped dough on a piece of parchment paper generously dusted with flour or cornmeal (which prevents sticking while adding textural interest to the bottom crust).
Étape 4: The Second Rise Renaissance
Cover the shaped dough loosely with a kitchen towel and allow it to rise for 2 hours at room temperature. During this final fermentation, the dough will puff noticeably, though not double. The surface should feel pillowy and spring back slowly when gently pressed—indicators that gluten structure has developed perfectly while yeast remains active enough for oven spring.
Étape 5: The Oven Preparation Ritual
Approximately 30 minutes before the second rise completes, position a rack in the lower third of your oven and place your baking vessel inside—either a heavy Dutch oven with lid, a cast-iron combo cooker, or a deep roasting pan with a metal bowl cover. Preheat oven to 450°F (230°C).
This preheating step proves absolutely critical. The intensely hot vessel creates a mini-steam environment when the wet dough enters, mimicking professional steam-injected bakery ovens. This steam keeps the crust flexible during the initial baking phase, allowing maximum oven spring before the crust sets, while simultaneously creating that coveted crackling, blistered crust.
Étape 6: The Scoring Signature
Just before baking, use a sharp knife, razor blade, or bread lame to score the dough’s surface with one or several decisive cuts, approximately ½ inch deep. This scoring serves both functional and aesthetic purposes: it provides a controlled weak point where expanding gases can escape (preventing random tearing), while creating the distinctive patterns that mark artisan bread.
Score with confidence—hesitant, shallow cuts produce inferior results. A single slash down the loaf’s center works beautifully, or try a cross pattern for visual drama.
Étape 7: The Baking Transformation
Here we approach the moment of truth. Carefully remove your preheated vessel from the oven (it will be dangerously hot—use heavy oven mitts). Using the parchment paper as a sling, lift and lower the dough into the vessel. The parchment prevents sticking and makes transfer effortless.
Immediately cover with the lid and return to the oven. Bake covered for 30 minutes—during this phase, trapped steam works its magic, creating oven spring and initial crust development.
After 30 minutes, remove the lid and continue baking for an additional 15-20 minutes, until the crust achieves a deep golden-brown color, approaching mahogany. This uncovered phase drives off excess moisture, creating that shattering crust while developing the caramelized, almost burnt flavors that make artisan bread irresistible.
Étape 8: The Cooling Patience
This final step challenges every baker: you must resist cutting into your magnificent creation immediately. Transfer the bread to a cooling rack and wait at least one hour before slicing.
This cooling period isn’t mere tradition—it’s essential chemistry. The bread’s interior continues baking through residual heat while excess steam escapes through the crust. Cutting too soon releases this steam prematurely, creating a gummy texture rather than the perfectly tender crumb you’ve worked to achieve.
Petit Conseil Pro: Mastering the Variables
Through countless loaves, I’ve discovered nuances that elevate good bread to transcendent:
Temperature precision: If your kitchen runs cool (below 68°F), fermentation requires longer—potentially 20-24 hours. Conversely, warmer environments (above 75°F) accelerate fermentation, requiring monitoring after 10 hours to prevent over-fermentation, which creates overly sour, dense bread.
The float test: Before baking, test your dough’s readiness by placing a small piece in water. If it floats, fermentation has progressed sufficiently. If it sinks, allow additional rising time.
Crust darkness courage: Many home bakers remove bread too early, fearing burnt crust. True artisan bread demands a deeply colored, almost intimidating crust—this is where flavor lives. Trust the process.
Dutch oven alternatives: No Dutch oven? Create steam by placing a metal pan on the oven’s bottom rack and adding boiling water just before placing your bread inside. Cover the bread loosely with an inverted metal bowl for the first 30 minutes.
Flavor variations: Once you’ve mastered the basic formula, experiment conservatively. Add ¼ cup seeds, 2 tablespoons chopped fresh herbs, or substitute ½ cup whole wheat flour. Maintain the hydration ratio—any additions require slight water adjustments.
The Science Behind the Magic
Understanding why this simple method works transforms you from recipe-follower to bread artisan capable of adapting and innovating.
Gluten Development Without Kneading
Traditional bread recipes demand extensive kneading to develop gluten—the protein network that gives bread structure. This recipe employs autolysis, where flour and water, given time, spontaneously develop gluten through enzymatic action and hydration. The wet dough facilitates this process, as water molecules help align gluten proteins naturally.
Flavor Compound Development
Extended fermentation allows yeast and naturally present bacteria to produce organic acids, alcohols, and esters—aromatic compounds that create bread’s complex flavor profile. Quick-rise breads lack these compounds, tasting flat and one-dimensional by comparison.
The Maillard Reaction Magic
That gorgeous caramelized crust results from the Maillard reaction—a chemical transformation between amino acids and reducing sugars that occurs at temperatures above 285°F (140°C). The deeply colored crust contains hundreds of flavor compounds absent from the interior, making it arguably the loaf’s most delicious element.
Accompagnements Suggérés: Honoring Your Creation
This bread deserves accompaniments that respect its artisanal quality:
For breakfast: Thick slices toasted golden, spread with cultured butter and fig preserves, or topped with creamy avocado, flaky sea salt, and red pepper flakes.
For lunch: The foundation for extraordinary sandwiches—the sturdy crumb supports generous fillings without becoming soggy. Try prosciutto, fresh mozzarella, arugula, and balsamic reduction.
For dinner: Serve alongside rustic soups—the bread’s open crumb perfect for soaking up broths. Pair with quality olive oil infused with garlic and herbs for dipping.
For entertaining: Present the whole loaf on a wooden board with artisanal cheeses, cured meats, olives, and roasted vegetables. Let guests tear pieces directly from the loaf—a convivial, authentic experience.
Storage wisdom: This bread maintains optimal quality for 2-3 days stored cut-side down on a cutting board at room temperature. Avoid plastic bags, which soften the crust. For longer storage, slice and freeze in portions, toasting directly from frozen.
Troubleshooting: Solving Common Challenges
Even this forgiving recipe occasionally presents challenges. Here’s how to diagnose and correct:
Problem: Dense, heavy bread without large air pockets
Solution: Insufficient fermentation time or water too hot (which killed yeast). Ensure full 12+ hours rise and lukewarm (not hot) water.
Problem: Dough spreading flat rather than rising upward
Solution: Over-fermented dough or insufficient shaping tension. Reduce fermentation time slightly and practice the folding technique to build surface tension.
Problem: Pale, soft crust
Solution: Oven not preheated sufficiently or bread removed too early. Ensure full 30-minute preheat and bake until deeply golden-brown.
Problem: Overly sour flavor
Solution: Extended fermentation in warm conditions encouraged bacterial acid production. Reduce fermentation time or ferment in cooler location.
À Vos Tabliers: Your Bread Journey Begins
This three-ingredient artisan bread represents more than a recipe—it’s an invitation into bread’s transformative world, where patience and simplicity yield results that seem impossible given the minimal effort required.
I encourage you to embrace this method’s meditative quality. The brief moments of active involvement bookend long periods of passive fermentation, creating a baking rhythm that fits naturally into life rather than dominating it. Mix the dough before bed, wake to its transformation, shape before leaving for work, return to the intoxicating aroma of baking bread filling your home.
Each loaf teaches lessons: you’ll develop intuition for dough texture, recognize optimal fermentation through appearance and aroma, understand how environmental factors influence results. This bread becomes not just sustenance but a living connection to millennia of bakers who understood that exceptional bread requires not complicated techniques but respect for time and natural processes.
Share your experiences—the triumphs, the learning opportunities, the moment you pulled your first perfect loaf from the oven. This communal knowledge enriches all of us.
Bon appétit, and may your kitchen always smell of freshly baked bread!