
Learn how to make an Aloe Vera Lip Balm DIY at home with this easy guide to soothe dry lips, save money, and use 100% natural, chemical-free ingredients.
Have you ever stared at the long list of unrecognizable ingredients on the back of your favorite lip care tube and wondered if there was a better way? We’ve all dealt with those frustrating, cracked lips that seem to ignore every store-bought “solution” we throw at them. If you’re tired of spending money on products that offer temporary relief but leave your lips feeling drier an hour later, it’s time to take matters into your own hands.
In this comprehensive guide, you will learn exactly how to create your own Aloe Vera Lip Balm DIY using simple, botanical ingredients that actually nourish your skin. Aloe vera is nature’s ultimate healer, known for its incredible ability to soothe inflammation and lock in moisture. By making this yourself, you aren’t just saving money; you are unlocking a professional-grade beauty secret right in your kitchen. Get ready to transform your smile and discover the immense satisfaction of creating a product that is as kind to your body as it is to the planet!
Section 1: Why Choose an Aloe Vera Lip Balm DIY?
Before we start melting and mixing, let’s build your confidence by exploring why this specific project is a game-changer for your self-care routine. Many commercial lip balms contain petroleum jelly or alcohols that create a temporary barrier but don’t actually hydrate the skin. This Aloe Vera Lip Balm DIY works differently because it uses active plant mucilage to penetrate the delicate skin on your lips.
If you are a beginner, you might feel a bit nervous about “making cosmetics.” Don’t be! DIY lip balm is one of the easiest home projects you can tackle. It requires no special machinery and uses ingredients that are likely already in your pantry or garden. Aloe vera is packed with vitamins A, C, and E, which promote healthy cell turnover. When you combine this with a protective wax, you create a powerhouse product that shields you from the wind, sun, and cold.
H3: The Natural Benefits of Aloe Vera
- Intense Hydration: Aloe is mostly water, but it’s “structured” water that stays in the skin longer.
- Anti-Inflammatory: It quickly calms the “burning” sensation of sunburnt or wind-chapped lips.
- Healing Properties: It contains glucomannan, which helps repair small cracks and fissures in the skin.
H3: Sustainable and Cost-Effective Beauty
Making your own lip care is a brilliant way to reduce plastic waste. You can reuse old tins or glass jars instead of buying new plastic tubes every month. Plus, the bulk cost of the ingredients is significantly lower than buying high-end organic brands, giving you a premium result on a “pocket-change” budget.
Section 2: How to Make Your Aloe Vera Lip Balm (Step-by-Step)
Ready to get started? This core method is designed to be manageable and fun. You’ll be amazed at how quickly these ingredients transform into a smooth, professional-feeling balm.
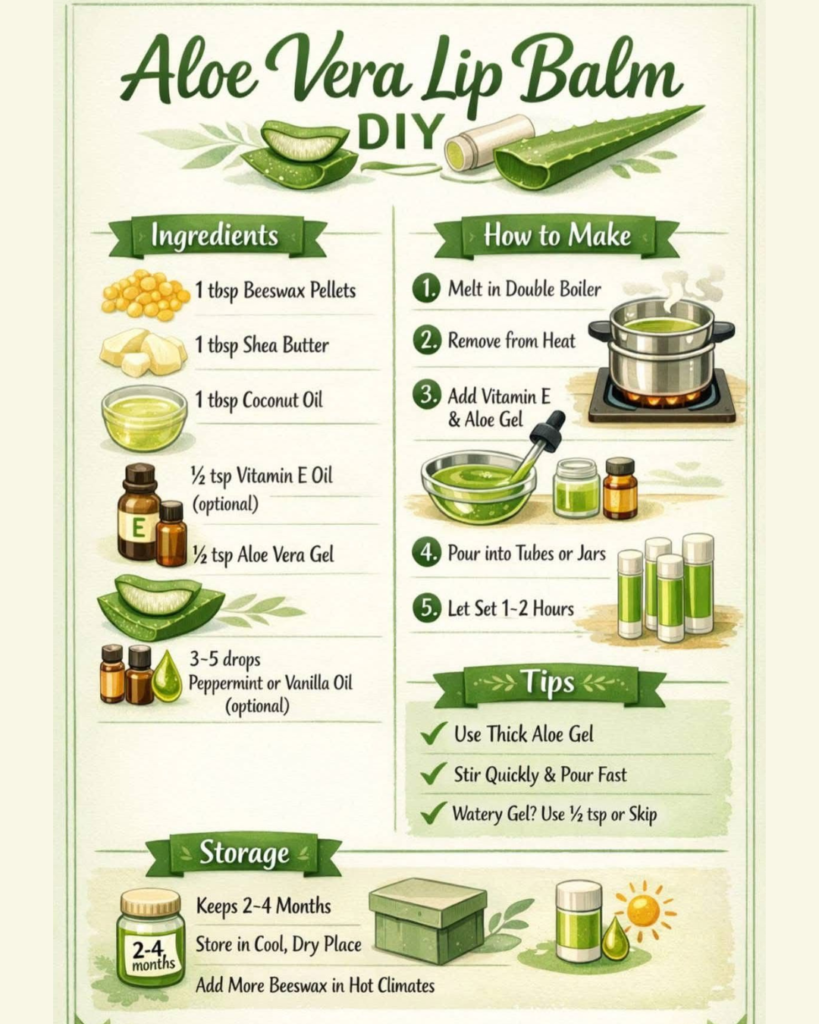
Tools and Ingredients You’ll Need
- 2 Tbsp Beeswax Pellets (or Candelilla wax for a vegan version)
- 2 Tbsp Coconut Oil (provides the creamy base)
- 1 Tsp Pure Aloe Vera Gel (fresh from the plant or 100% pure bottled)
- 1/2 Tsp Vitamin E Oil (acts as a natural preservative and skin healer)
- Optional: 5 drops of Peppermint or Lavender essential oil
- Tools: A double boiler (or a glass bowl over a pot of water), a whisk, and small containers.
The Core Method:
- Melt the Base: Place your beeswax and coconut oil in the double boiler over medium-low heat. Stir gently until they are completely melted into a clear liquid.
- Incorporate the Aloe: This is the most important part! Slowly whisk in the aloe vera gel. Since aloe is water-based and oil/wax are fat-based, they don’t naturally want to stay together. Whisk vigorously for about 30 seconds to emulsify them.
- Add the Extras: Remove from heat and quickly stir in your Vitamin E oil and any essential oils. Do this fast so the mixture doesn’t start to harden in the bowl!
- The Pour: Carefully pour the liquid into your tins or tubes. Let them sit undisturbed at room temperature for at least 2 hours.
- The Reveal: Once they are opaque and firm, your Aloe Vera Lip Balm DIY is ready for its first application!
Section 3: Pro Tips and Creative Customizations
Now that you’ve mastered the basics, let’s look at some expert-level ways to customize your approach. Everyone’s skin is different, and the beauty of DIY is that you can adapt the recipe to suit your specific preferences.
H3: Adjusting the Consistency
If you live in a very hot climate, your lip balm might get too soft. Simply melt it down again and add another teaspoon of beeswax to “firm it up.” Conversely, if you live in a freezing environment and the balm feels like a rock, add a teaspoon more of coconut oil or sweet almond oil to give it more “slip.”
H3: Adding Natural Tints
Want a bit of color with your care? You can easily turn this into a tinted lip gloss!
- Beetroot Powder: Add a tiny pinch for a soft pink hue.
- Cocoa Powder: Gives a beautiful nude/brown tint and smells like chocolate.
- Hibiscus Powder: Provides a vibrant berry stain that looks gorgeous on all skin tones.
Advanced Strategy: Infusing Oils
For a truly expert-level balm, try infusing your coconut oil with dried calendula or chamomile flowers a week before you make the balm. This adds an extra layer of herbal healing that is particularly effective for those with chronic skin sensitivity.
Section 4: Troubleshooting Common Challenges
Even the best DIYers run into obstacles sometimes! Here is how to handle the most frequent issues with your Aloe Vera Lip Balm DIY.
- Problem: “My aloe vera is sinking to the bottom of the jar.”
- Solution: This happens because the aloe didn’t emulsify. The trick is to whisk the mixture as it cools. If you see separation, pop the mixture back into the heat, melt it, and whisk it while the bowl is sitting in an ice bath to force it to set quickly while mixed.
- Problem: “The balm feels grainy or gritty.”
- Solution: This usually happens with Shea butter (if you added it) or if the beeswax cooled too slowly. Always melt your ingredients thoroughly and try to cool the balm at a steady room temperature.
- Problem: “I don’t have an aloe plant!”
- Solution: That’s okay! Just make sure you buy “100% Pure Aloe Vera Gel” from the store. Avoid the bright green “after-sun” gels, as those often contain alcohol and artificial dyes that will irritate your lips.
Preventive Measures
To keep your balm fresh, always use a clean finger or a small spatula to apply it. Since we are using natural aloe, which contains water, the Vitamin E oil is essential to help keep the balm stable for 3–6 months.
Section 5: Maximizing Your Results for Long-Term Lip Health
To get the most out of your new creation, consider these complementary strategies to keep your smile healthy year-round:
- Exfoliate First: Before applying your balm, gently rub your lips with a mix of sugar and olive oil. This removes dead skin so the aloe can penetrate deeper.
- Hydrate Internally: No balm can fix a body that is dehydrated! Make sure you are drinking plenty of water throughout the day.
- Nighttime Mask: Apply a thick layer of your Aloe Vera Lip Balm DIY right before bed. This acts as an overnight “lip mask,” allowing the vitamins to repair your skin while you sleep.
- Garden Connection: If you grew the aloe yourself, take a moment to appreciate the cycle of nature. Using a plant you nurtured to now nurture yourself is a powerful form of self-care.
Conclusion: Empower Your Beauty Routine
You have officially unlocked the secret to perfect, hydrated lips! By following this Aloe Vera Lip Balm DIY guide, you’ve moved beyond being a consumer and become a creator. You now have a reliable, transformative tool that solves the problem of dry lips using the healing power of nature.
Remember, the best part of DIY is the journey of experimentation. Don’t be afraid to try different essential oils or tints until you find your “signature” blend. You are more than capable of achieving professional results at home, and your lips will thank you for the extra love.