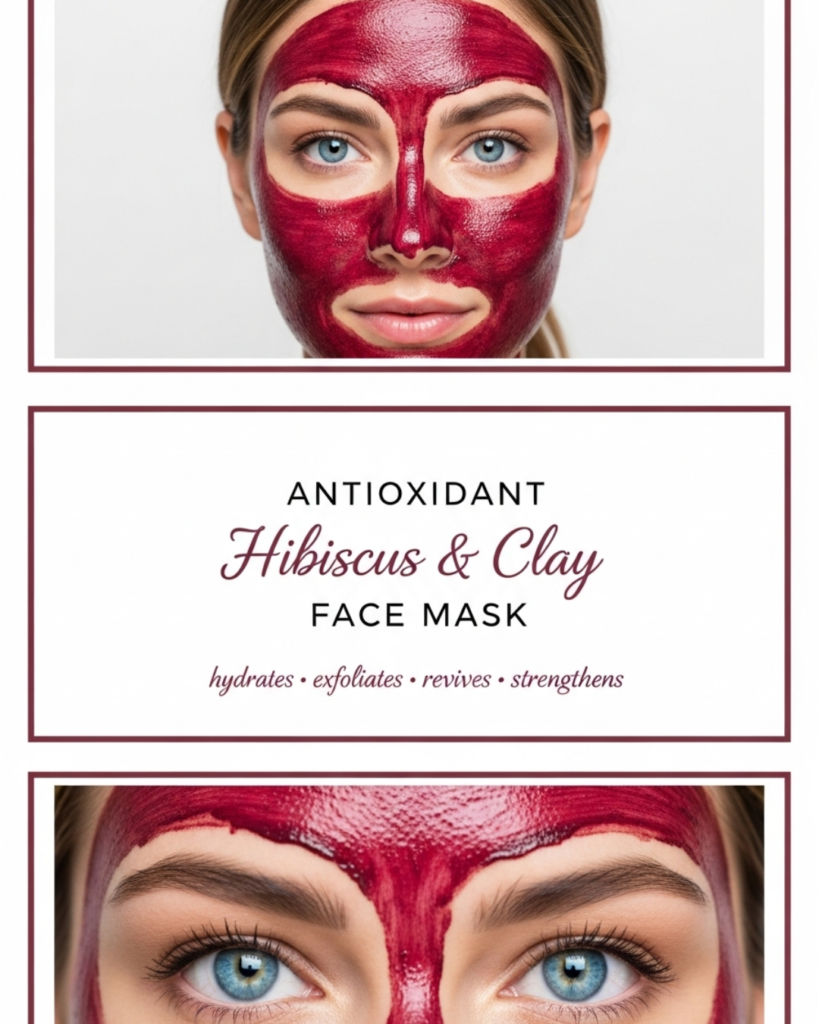
Make your skin glow with our Antioxidant Hibiscus and Clay Face Mask guide. Discover how to create this natural DIY treatment to firm, brighten, and detoxify your pores.
Important Disclaimer: This article is for informational purposes only and should not replace professional advice. For health-related topics, consult healthcare providers. Individual results may vary, and personal circumstances should always be considered when implementing any suggestions.
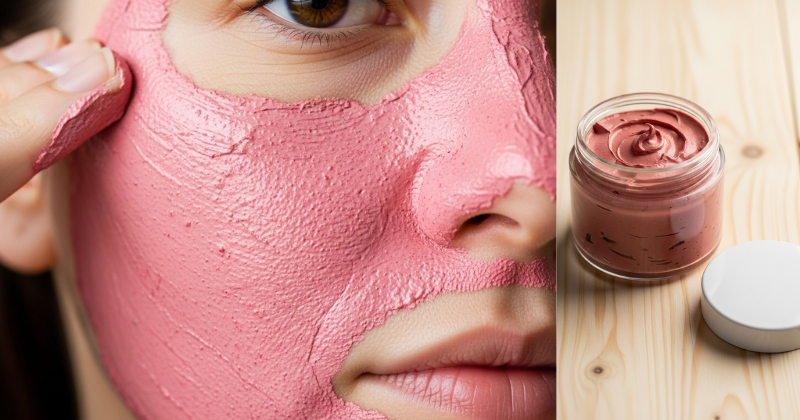
Have you ever looked in the mirror after a long week and felt like your skin had lost its spark? Between environmental pollutants, stress, and the natural aging process, our faces often bear the brunt of our busy lives. But you don’t need a luxury spa membership to reclaim your radiance. You can unlock the power of nature right in your kitchen with an Antioxidant Hibiscus and Clay Face Mask. This vibrant, pink-hued treatment is affectionately known as the “natural Botox” plant for a reason—it is packed with AHAs and antioxidants that transform dull skin into a firm, luminous canvas.
In this guide, we are going to explore the botanical magic of hibiscus combined with the purifying strength of earth clays. You will discover how this simple ritual can become a cornerstone of your [self-care and wellness] routine. We will provide a step-by-step recipe, troubleshooting tips, and pro-level customization strategies. You have the capability to achieve professional-grade results at home. Let’s dive into the world of botanical skincare and discover your most vibrant self!
Foundation: Why Hibiscus and Clay?
Before we start mixing, it is essential to build confidence in the ingredients. Understanding the “why” behind the Antioxidant Hibiscus and Clay Face Mask helps you appreciate the transformation happening on your skin.
The “Botox” Plant: Hibiscus
Hibiscus is more than just a beautiful flower in your [sustainable garden]. It is a powerhouse of antioxidants called anthocyanocides. These compounds not only protect against environmental stressors but also have slightly astringent properties that help pores look smaller. The natural acids in hibiscus gently exfoliate, removing dead skin cells to reveal the fresh, glowing layer underneath.
Purifying Clays
The “clay” part of your mask acts like a vacuum for your pores. Depending on your skin type, you might use:
- Bentonite Clay: Best for oily or acne-prone skin, as it has a strong “pull.”
- Kaolin Clay: A gentle, white clay perfect for sensitive or dry skin.
- French Pink Clay: A beautiful middle ground that provides minerals without being overly drying.
Addressing Common Concerns
You might worry that a clay mask will leave your skin feeling tight or stripped. I want to reassure you: when formulated correctly with hibiscus and a few hydrating extras, this mask balances detoxification with nourishment. If you’ve already tried [14 days without sugar] to improve your skin from the inside, this mask is the perfect external complement to that journey.
Step-by-Step: Crafting Your Antioxidant Hibiscus and Clay Face Mask
Ready to create your spa-quality treatment? This process is manageable, rewarding, and takes less than five minutes to prep.
1. Gather Your Supplies
To make enough for 2-3 applications, you will need:
- 2 tablespoons of your chosen Clay (Bentonite or Kaolin).
- 1 tablespoon of organic Hibiscus Powder (finely ground).
- 1-2 tablespoons of liquid (water, rose water, or cooled green tea).
- Optional: 1/2 teaspoon of honey or a few drops of jojoba oil for added moisture.
2. The Core Method
- Mix the Dry Ingredients: In a small glass or wooden bowl, whisk the clay and hibiscus powder together. Pro-tip: Avoid using metal spoons with bentonite clay, as it can de-activate the clay’s ionic charge.
- Add Your Liquid: Slowly stir in your liquid of choice until you reach a smooth, yogurt-like consistency.
- Customize: This is the time to add your honey or oil if your skin feels particularly dry.
3. Application and Timing
- Cleanse: Start with a fresh face.
- Apply: Use a brush or your fingers to spread an even layer, avoiding the delicate eye area.
- Relax: Let the mask sit for 10-15 minutes.
- Rinse: Use warm water and a soft cloth to gently buff the mask away.
Advanced Strategies: Pro Tips for Customization
Once you’ve mastered the basic Antioxidant Hibiscus and Clay Face Mask, you can share expert-level insights by tailoring the formula to specific needs.
For Intense Hydration
If you have dry skin, replace the water in your recipe with full-fat plain yogurt or aloe vera juice. The lactic acid in the yogurt works synergistically with the hibiscus to brighten, while the fats provide a protective barrier.
The “Aromatherapy” Boost
You can transform your masking session into a full sensory experience. If you’ve [just started using essential oils], consider adding one drop of Lavender or Frankincense. This turns your skincare into a [somatic technique for stress relief], helping your mind relax while the antioxidants work on your face.
Seasonal Variations
In the winter, your skin may need more protection. Consider adding a small amount of vitamin E oil to your mask. In the summer, using cooled peppermint tea as your liquid base can provide a refreshing, cooling sensation that reduces puffiness after a day in the sun.
Troubleshooting: Common Challenges and Solutions
Even the best DIY projects can have hiccups. Here is how to navigate frequent obstacles with encouraging solutions.
“My face is slightly red after I wash it off!”
- The Solution: Don’t panic! Hibiscus increases blood flow to the surface of the skin (vasodilation), which can cause a temporary flush. This usually fades within 20-30 minutes and is a sign that the antioxidants are active.
- Preventive Measure: Reduce the “wear time” to 5-8 minutes next time, and always follow with a soothing moisturizer or [homemade magnesium oil] for the body while you wait for your face to settle.
“The mask is too clumpy.”
- The Fix: This usually happens if the liquid is added too fast. Next time, add the liquid drop by drop while stirring constantly. If it’s already clumpy, a quick pulse in a small blender can smooth it out.
“I can’t find hibiscus powder.”
- Alternative Approach: You can use high-quality hibiscus tea bags! Simply brew a very strong, small cup of tea and use that as your liquid base with plain clay. It’s a great [home DIY] shortcut.
Maximizing Results: Next-Level Glowing Skin
To build upon your success, look at your skincare as part of a larger, holistic lifestyle.
Maintenance and Frequency
For best results, use your Antioxidant Hibiscus and Clay Face Mask once a week. Over-masking can disrupt your skin’s natural oil balance. Consistency over time will yield better results than doing it three days in a row before a big event.
Complementary Strategies
Skincare is a “top-down” approach, but don’t forget the “bottom-up” factors. Support your mask’s results by staying hydrated and exploring [simple evening rituals that help your body heal while you sleep]. When your body is rested, your skin cells regenerate faster, making the effects of your antioxidant mask even more dramatic.
Featured Snippet: What are the benefits of a hibiscus face mask?
The primary benefits of an Antioxidant Hibiscus and Clay Face Mask include natural exfoliation through AHAs, increased skin elasticity, and deep pore detoxification. Hibiscus is rich in antioxidants that fight free radicals, while the clay draws out impurities and excess oil. Together, they firm the skin, brighten the complexion, and provide an anti-aging effect often compared to a natural botox alternative.
Conclusion
Creating your own Antioxidant Hibiscus and Clay Face Mask is an empowering act of self-love. You have discovered that you have the capability to succeed in making high-performance skincare that is both safe and effective. By embracing these botanical ingredients, you achieve a level of radiance that reflects your commitment to a natural, healthy lifestyle.
You’ve got this! Start by ordering your hibiscus powder today and carve out fifteen minutes this weekend for a “me-time” session. Your skin will thank you for the antioxidant boost, and your mind will relish the quiet moment of care.