Salut les gourmands!
There exists a threshold between mere dessert and culinary poetry—a precise convergence of butter, fruit, spice, and patience where flavors transcend individual components to become something approaching transcendence. Apple pie, when crafted with reverence for tradition and attention to nuance, occupies this sacred territory, transforming humble orchard fruit into an expression of comfort so profound it speaks not merely to appetite but to memory, belonging, and the ineffable sensation of home.
My initiation into the mysteries of truly exceptional apple pie occurred not in a professional kitchen but in the farmhouse of my grandmother, a woman whose weathered hands carried the accumulated wisdom of seven decades spent coaxing extraordinary results from ordinary ingredients. I remember watching her work—the rhythmic precision with which she cut butter into flour, the intuitive feel with which she assessed dough hydration, the careful selection of apples from varieties she’d grown herself, each chosen for specific contributions to the final symphony of texture and flavor. That first slice, served warm with cream so fresh it still held the sweetness of clover, revealed what apple pie could be: not the soggy, overly-sweet disappointment of commercial bakeries, but a balanced masterpiece where buttery crust shattered delicately beneath the fork, where apples maintained distinct texture while yielding their essence into spiced juices, where every element existed in perfect equilibrium.
What distinguishes transcendent apple pie from merely acceptable versions lies not in exotic techniques or rare ingredients but in understanding the delicate interplay between crust architecture, apple selection, moisture management, and spice harmony. The crust must achieve that elusive balance between tender flakiness and structural integrity—crisp enough to shatter yet substantial enough to contain generous filling without collapse. The apples require careful variety selection and preparation techniques that preserve texture while developing concentrated flavor. The spicing demands restraint, enhancing rather than overwhelming apple’s natural complexity. This recipe guides you toward that ideal, honoring both the science underlying pastry chemistry and the intuitive wisdom that separates confident bakers from tentative ones.
Présentation de la Recette: Understanding Pie Philosophy and Timing
Preparation time: 45 minutes of mindful dough preparation and apple orchestration (plus 2 hours chilling time for optimal crust development)
Baking time: 50-60 minutes while your kitchen transforms into an aromatic sanctuary of cinnamon, butter, and caramelized fruit
Cooling time: 2-3 hours of discipline rewarded with perfect slice integrity
Total time: Approximately 6 hours from initial impulse to that first revelatory bite
Yield: One 9-inch deep-dish pie serving 8-10 people, depending on generosity and restraint
Difficulty level: Intermediate—requires attention to technique and willingness to trust the process
Origin: American culinary tradition with roots in English, Dutch, and French pastry heritage
Apple pie occupies unique territory in the pantheon of American desserts—simultaneously humble and iconic, accessible yet capable of extraordinary refinement. Its prominence in cultural consciousness reflects both the apple’s agricultural importance in American history and the pie’s role as centerpiece in celebrations, holidays, and gatherings that mark the rhythm of communal life. The phrase “as American as apple pie” captures this dessert’s symbolic weight, though the roots extend across Atlantic to European baking traditions that colonists adapted to New World ingredients and conditions.
The evolution of apple pie technique mirrors broader developments in baking science: from early versions featuring dense, bread-like crusts designed primarily as cooking vessels rather than edible components, through the 19th century refinement of flaky pastry achieved through better understanding of fat-flour interactions, to contemporary approaches that draw on both traditional wisdom and modern knowledge of gluten development, moisture control, and enzymatic processes affecting fruit texture during baking.
This particular recipe represents my synthesis of techniques learned from family tradition, professional training, and countless experiments testing variables—butter versus shortening, vodka additions to pastry, different apple varieties and proportions, various thickening agents and spice combinations. The goal: achieving what bakers call the “perfect slice”—a wedge that holds its shape when plated yet yields effortlessly to the fork, where crust and filling exist in harmonious proportion, where every bite delivers balanced sweetness, acidity, spice, and buttery richness without any single element dominating.
Ingrédients: The Architecture of Autumn Perfection
For the All-Butter Pie Crust (Double Crust):
The Foundation:
- 2½ cups (315g) all-purpose flour, plus additional for rolling—choose unbleached flour for superior flavor and slightly more protein for structural integrity
- 2 tablespoons (25g) granulated sugar—provides subtle sweetness and promotes browning through caramelization
- 1 teaspoon fine sea salt—essential for flavor development and gluten strengthening
- 1 cup (230g) unsalted butter, extremely cold, cut into ½-inch cubes—European-style butter with higher fat content produces even flakier results; freeze butter pieces for 15 minutes before use
- 6-8 tablespoons (90-120ml) ice water—literal ice water, with ice cubes floating, ensuring minimal gluten development
For the Apple Filling:
The Fruit Symphony:
- 3 pounds (1.4kg) mixed apples, peeled, cored, and sliced ¼-inch thick—variety selection determines success; use combinations detailed below
- 2 medium Granny Smith apples—tart, firm, holding texture beautifully during extended baking
- 2 medium Honeycrisp or Jonagold apples—sweet-tart balance, becoming tender but not mushy
- 2 medium Golden Delicious apples—subtle sweetness, breaking down slightly to create sauce binding firmer varieties
The Flavor Enhancement:
- ¾ cup (150g) granulated sugar—adjust based on apple sweetness and personal preference
- ¼ cup (30g) all-purpose flour—provides gentle thickening without starchy aftertaste
- 2 tablespoons cornstarch—creates glossy, cohesive filling that doesn’t weep excessively
- 1½ teaspoons ground cinnamon—warm, sweet spice that defines apple pie character
- ¼ teaspoon freshly grated nutmeg—subtle complexity that elevates beyond one-dimensional spicing
- ⅛ teaspoon ground cardamom—secret ingredient adding sophisticated, citrusy-floral notes
- ¼ teaspoon fine sea salt—amplifies fruit flavor and balances sweetness
- 2 tablespoons fresh lemon juice—preserves apple color while brightening overall flavor profile
- 1 teaspoon vanilla extract—rounds flavors, adding aromatic depth
- 2 tablespoons (30g) unsalted butter, cut into small pieces—enriches filling, promotes caramelization
For Assembly and Finishing:
- 1 egg beaten with 1 tablespoon cream or milk—egg wash for golden, glossy crust
- 2 tablespoons coarse sugar (turbinado or demerara)—textural interest and additional caramelization
- Optional: ½ teaspoon apple pie spice instead of individual spices if preferred
Petit conseil pro: Apple variety selection represents perhaps the most critical decision in apple pie success. Single-variety pies, regardless of which apple you choose, produce one-dimensional texture and flavor—some pieces dissolve into mush while others remain too firm, and the overall taste lacks complexity. The three-variety approach I recommend creates a filling where some apples maintain distinct texture providing satisfying bite, others break down partially creating natural sauce that binds everything together, and the combination of tart and sweet varieties produces balanced flavor that neither cloys nor puckers. Visit farmers markets in autumn where heirloom varieties like Winesap, Arkansas Black, or Northern Spy offer even more complex flavor possibilities. Avoid Red Delicious (mealy, flavorless when cooked), Gala (too sweet, minimal acidity), and Fuji (texture becomes unpleasant when baked). The perfect pie celebrates apple diversity, not uniformity.
Préparation: The Ritual of Transformation
Step 1: Crafting the Foundation—All-Butter Pie Dough
The creation of exceptional pie crust represents perhaps the most technically demanding aspect of pie baking, requiring understanding of gluten development, fat distribution, and hydration management that determines whether you achieve flaky, tender perfection or dense, tough disappointment. Begin by establishing both physical and mental space—clear your workspace, chill your tools (including the mixing bowl if possible), and prepare yourself for work requiring focus and, paradoxically, relaxation. Tense, aggressive handling develops excessive gluten; gentle confidence produces superior results.
In a large mixing bowl, whisk together flour, sugar, and salt until uniformly combined—this aeration and blending ensures even distribution before introducing fat. Add your very cold butter cubes (they should feel firm and cold to touch, not softening at room temperature). Using a pastry cutter, two knives, or your fingertips, work the butter into the flour with decisive but brief movements. You’re aiming for a mixture resembling coarse meal with some larger, pea-sized butter pieces remaining visible. These larger butter pieces, when rolled and baked, create the steam pockets that generate flakiness—the hallmark of superior pie crust.
This cutting-in process takes approximately 5-7 minutes by hand, less if using a food processor (though I prefer manual methods for greater control). The mixture should appear shaggy and dry, with no areas of pure flour remaining but also substantial butter pieces still distinct. Your hands will warm the butter if you work too long, so efficiency without rushing proves essential.
Drizzle 6 tablespoons of ice water over the flour-butter mixture, distributing it evenly across the surface rather than pouring in one spot. Using a fork or your hands, toss and squeeze the mixture gently, encouraging hydration without compressing or kneading. The dough will appear dry and shaggy initially—resist the urge to add water too quickly. As you work, pockets of moistened dough will form alongside dry flour. Continue gently working until these pockets coalesce.
Test the dough by squeezing a handful: if it holds together, hydration is sufficient; if it crumbles apart immediately, add additional water one tablespoon at a time, mixing gently after each addition. Remember that different flours absorb water at different rates, ambient humidity affects hydration needs, and it’s always easier to add water than remove it. Err slightly on the dry side—the dough will hydrate further during resting.
Once the dough just begins holding together, turn it onto a clean work surface. Using your palms, gently press and fold the shaggy mass several times—not kneading, but rather encouraging cohesion. Divide the dough into two portions, one slightly larger (for bottom crust) than the other (for top crust). Shape each portion into a disk about 1 inch thick, wrap tightly in plastic wrap, and refrigerate for at least 2 hours, preferably 4 hours or overnight.
This chilling serves multiple essential functions: it allows flour to fully hydrate, creating more cohesive, workable dough; it firms the butter, making rolling easier and preventing excessive melting during handling; and it relaxes gluten that developed during mixing, ensuring tender rather than tough baked crust. This waiting period tests modern patience but represents investment that pays dividends in superior texture.
Step 2: Preparing the Apple Filling—Orchestrating Fruit and Spice
While dough chills, prepare your apple filling—work that transforms mundane fruit into the pie’s soul. Begin by peeling your carefully selected apples, then quarter and core them. The peeling decision sometimes sparks debate among pie enthusiasts; I strongly advocate for peeled apples because skins, even when cooked, create textural interference that distracts from the filling’s harmony. However, if you prefer rustic texture and are using thin-skinned varieties, leaving skins on is acceptable—the pie will simply express different character.
Slice each apple quarter into ¼-inch thick pieces—consistency in thickness ensures even cooking, preventing some pieces from dissolving while others remain crunchy. As you work, place sliced apples in a large bowl and immediately toss with lemon juice. This acidulation serves dual purposes: preventing enzymatic browning that turns cut apples unappealing gray-brown, and contributing brightness that balances sweetness in the finished pie.
In a separate small bowl, whisk together sugar, flour, cornstarch, cinnamon, nutmeg, cardamom, and salt until uniformly combined. This dry mixture will coat apple slices, providing thickening power while distributing spices evenly. Sprinkle this mixture over the lemon-tossed apples, then add vanilla extract. Using your hands or a large spoon, toss everything together thoroughly, ensuring every apple slice receives coating of spiced-sugar mixture.
At this stage, you face a critical decision: should you macerate the apples (letting them sit at room temperature for 30-60 minutes to release juices) or proceed directly to assembly? Each approach offers distinct advantages. Macerating draws out apple liquid that you can then reduce on the stovetop into concentrated syrup, which you’ll add back to the filling—this creates more intensely flavored, less watery filling but requires additional time and steps. Proceeding directly to assembly produces excellent results with traditional approach, though the filling may be slightly looser.
For this recipe, I recommend the maceration-and-reduction method for optimal results: after tossing apples with sugar-spice mixture, transfer them to a colander set over a bowl. Let drain for 45-60 minutes, gently stirring occasionally. You’ll collect approximately ½ to ¾ cup of liquid—this isn’t waste but concentrated apple essence. Transfer this liquid to a small saucepan and simmer over medium heat until reduced by half, creating thick, syrupy consistency (about 10 minutes). This reduction concentrates flavor dramatically while removing excess moisture that would otherwise create soggy bottom crust. Cool this syrup, then toss it back with the drained apples just before filling the pie.
Step 3: Rolling the Bottom Crust—Geometry and Patience
Remove your larger dough disk from refrigerator and let stand at room temperature for 5-10 minutes—dough that’s too cold cracks when rolled; dough too warm becomes sticky and difficult. You’re seeking that Goldilocks zone where the dough feels firm yet pliable, cold yet not brittle.
Lightly flour your work surface and rolling pin. Place the dough disk in the center and begin rolling from the center outward, rotating the dough 45 degrees after each roll. This rotation ensures even thickness and circular shape while preventing sticking. Apply firm but not aggressive pressure—you’re guiding rather than forcing the dough to expand. If cracks appear at edges, pinch them together immediately; if the dough sticks, lift it carefully and dust more flour underneath.
Roll to approximately ⅛-inch thickness and 12-13 inches in diameter—sufficient to line a 9-inch pie plate with overhang. To transfer without tearing, fold the dough circle in half, then in half again to create a quarter-circle. Position the point at the pie plate center, then unfold carefully. Alternatively, roll the dough loosely around your rolling pin, then unroll it over the pie plate.
Gently press dough into the plate bottom and sides, ensuring no air pockets remain trapped (these create gaps during baking). Let excess dough drape over the rim—don’t trim yet. Place the lined pie plate in refrigerator while you prepare the top crust and final assembly.
Step 4: Assembling the Pie—Layering Intention and Care
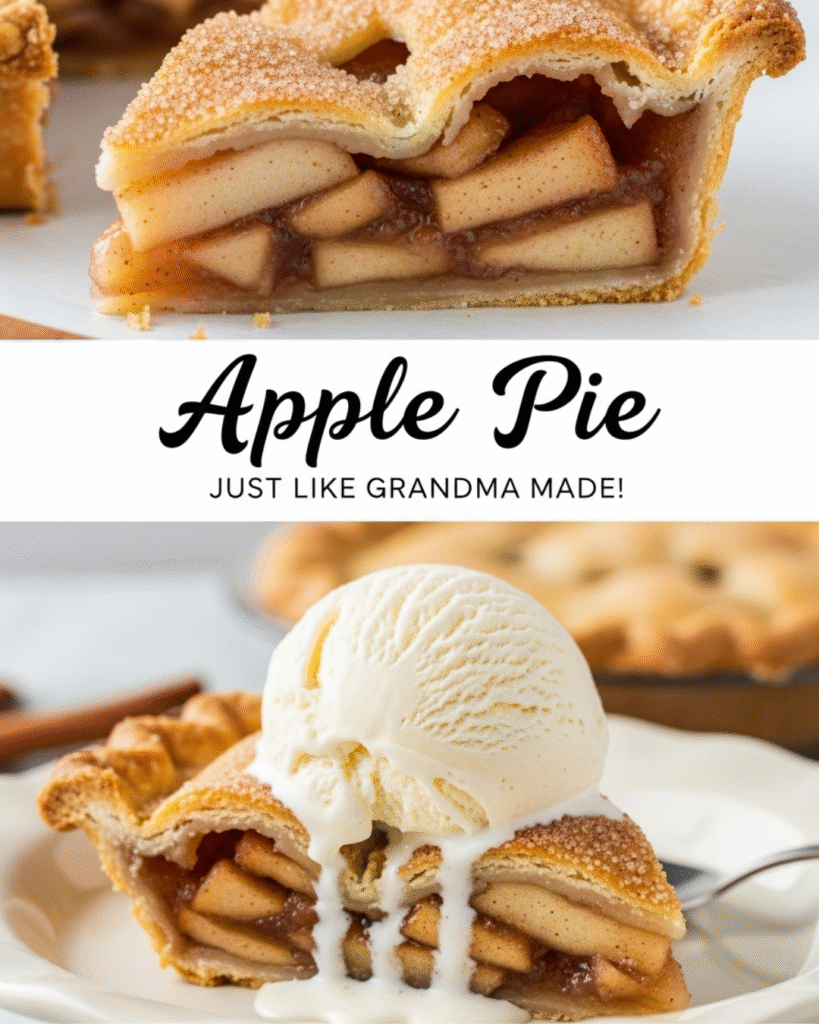
Remove your chilled, lined pie plate from refrigerator. If you followed the maceration-and-reduction method, combine the drained apples with the cooled, reduced syrup, mixing gently to coat. Transfer this filling into the prepared bottom crust, arranging it thoughtfully rather than simply dumping it in. Mound the apples slightly higher in the center—they will settle during baking, and this mounding prevents the dreaded “gap” between filling and top crust that occurs when filling shrinks more than anticipated.
Dot the top of the filling with the 2 tablespoons of butter pieces—these will melt during baking, enriching the filling and promoting caramelization of any exposed apple surfaces.
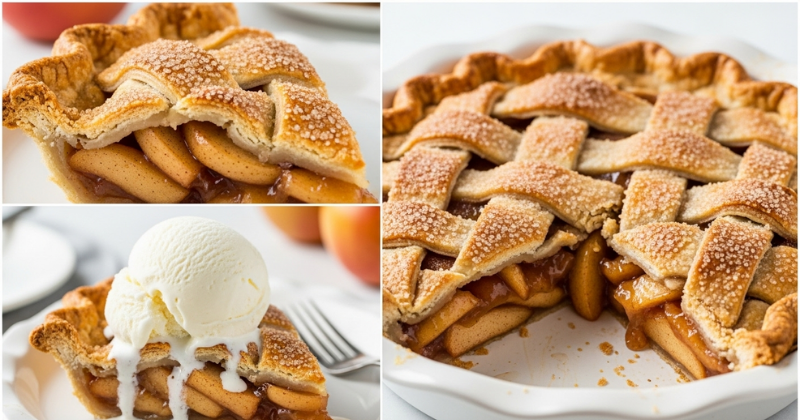
Roll out your second, slightly smaller dough disk following the same technique used for the bottom crust, creating a circle approximately 11-12 inches in diameter. Decide on your top crust style: full coverage with decorative vents, lattice work (which requires more time but creates stunning visual impact), or cutout designs. For classic approach, drape the full circle over the filling, centering it carefully.
Trim both crusts to leave approximately 1 inch of overhang beyond the pie plate rim. Fold this overhang under itself, creating a thick rope of dough resting on the rim. Crimp this edge using your fingers, fork tines, or decorative crimping tools—this sealed edge prevents filling from bubbling out while creating attractive border. For full top crust, cut several steam vents using a sharp knife—these allow moisture to escape, preventing soggy crust and filling overflow.
Brush the entire top surface with egg wash, ensuring even coverage that will create golden, glossy finish. Sprinkle with coarse sugar for textural interest and additional caramelization. Place the assembled pie on a rimmed baking sheet (catching any drips) and refrigerate for 30 minutes before baking—this final chilling firms the butter in the crust, contributing to flakiness while helping the pie maintain its shape during initial oven exposure.
Step 5: Baking to Golden Perfection—Heat’s Transformative Journey
Position oven racks in the lower third (for the pie) and center (for potential shielding). Preheat to 425°F (220°C)—this high initial temperature sets the crust quickly, promoting flakiness before filling heats sufficiently to generate steam. Place your chilled pie on the preheated baking sheet in the lower third position and immediately reduce oven temperature to 375°F (190°C). This two-temperature approach gives you the best of both worlds: initial high heat for crust development, sustained moderate heat for thorough filling cooking.
Bake for 25 minutes at this temperature, then check the crust color. If edges are browning too quickly (they often do), create shields from aluminum foil strips and gently drape them over the crimped edges. This protection prevents burning while allowing the pie center to continue cooking. Continue baking for an additional 25-35 minutes, until the crust achieves deep golden brown color and filling bubbles vigorously through vents—these bubbles indicate that the filling has reached temperature sufficient for starch thickening to activate.
Total baking time typically ranges from 50-60 minutes depending on your oven’s characteristics, filling thickness, and crust thickness. Trust visual and auditory cues: deep golden color, vigorous bubbling (you’ll hear it), and the aroma that fills your kitchen signaling complete caramelization and spice infusion.
Step 6: The Cooling Discipline—Structure Setting Through Patience
Remove your beautifully bronzed pie from the oven and place it on a wire cooling rack. Now begins perhaps the most difficult instruction in the entire recipe: walk away and leave the pie completely alone for at least 2 hours, preferably 3-4 hours, or even overnight. Every instinct screams to cut into that gorgeous creation immediately, to taste the fruits of your labor while warmth still radiates from flaky crust.
Resist with every fiber of your being. Warm pie filling is molten liquid—cutting releases this lava-like interior that floods your plate, creating puddles rather than cohesive slices. The starches and pectin that thicken the filling require cooling to fully gel and set. The structural transformation happening during cooling proves as important as any that occurred during baking.
If you absolutely must serve warm pie (understandable during holiday gatherings), allow at least 2 hours of cooling, then rewarm individual slices gently in a 350°F oven for 10 minutes. This compromise preserves slice integrity while providing the warm-pie experience. However, pie that has cooled completely, preferably overnight, slices with surgical precision, each wedge maintaining architectural integrity that showcases your work beautifully.
Petit Conseil Pro: The Secrets Behind Consistent Excellence
The butter temperature imperative: Cold butter—genuinely cold, not merely cool—determines flakiness more than any other single factor. I keep my butter in the freezer for 15 minutes before cutting into the flour, and I’ve even frozen the flour itself during summer heat waves when kitchen temperatures threaten to sabotage pastry work. If at any point during rolling or assembly your dough feels warm or greasy, immediately return it to refrigerator for 15-20 minutes. This patience prevents the butter from fully incorporating into the flour, which would create cookie-like crumb rather than flaky layers.
The vodka technique: Some professional bakers replace 2-3 tablespoons of water in pie dough with vodka (yes, actual vodka from the liquor store). Ethanol doesn’t promote gluten development the way water does, so vodka-enhanced dough can be worked more without toughening while achieving better hydration and workability. During baking, the alcohol evaporates completely, leaving no taste but resulting in exceptionally tender, flaky crust. This technique remains controversial among purists who prefer all-butter, all-water approaches, but it produces consistently excellent results for bakers who struggle with tough crusts.
Apple preparation science: Apples contain enzymes called polyphenol oxidases that, when exposed to oxygen through cutting, create brown pigments. Lemon juice’s acidity deactivates these enzymes while its vitamin C serves as antioxidant, preventing browning through dual mechanisms. Additionally, acidic environment affects pectin gelation—the natural gelling that occurs during baking—optimizing texture. Don’t skip the lemon juice step even if appearance doesn’t concern you; the chemical effects on texture justify its inclusion.
Blind baking considerations: Some bakers advocate for blind baking (pre-baking) the bottom crust to ensure it doesn’t become soggy from filling moisture. For this double-crust apple pie with properly reduced filling, blind baking isn’t necessary and adds complexity. However, if you consistently experience soggy bottom crusts despite other precautions, try this: after lining your pie plate but before adding filling, place the crust-lined pan in freezer for 15 minutes until firm, then bake at 400°F for 10-12 minutes until just beginning to set. Cool completely before filling. This partial pre-baking creates barrier that resists moisture absorption.
The overnight revelation: Like many fruit pies, apple pie improves on the second day as flavors meld and filling fully sets. While fresh-baked pie offers undeniable appeal, pie that has rested overnight at room temperature (covered loosely—don’t seal completely or steam will soften the crust) achieves flavor integration and textural perfection impossible to achieve immediately after baking. Plan accordingly for special occasions: baking the day before removes pressure while actually improving results.
Accompagnements Suggérés: Elevating Perfection
While apple pie achieves completeness independently, thoughtful accompaniments create contrast and complement that transform individual excellence into transcendent experience.
Vanilla ice cream remains the classic pairing for profound reasons beyond tradition: the cold, creamy contrast against warm (or room-temperature) pie creates textural magic, while vanilla’s subtle perfume complements rather than competes with apple and spice. Choose real vanilla ice cream made with cream, eggs, and vanilla bean—quality matters when pairing with quality pie. The ice cream melting into warm pie creates spontaneous sauce that no deliberate preparation could improve upon.
Aged sharp cheddar cheese represents a pairing that initially surprises but quickly converts skeptics. The tradition originates from New England and English culinary heritage where cheese-and-fruit desserts carry long history. The sharp, savory, slightly salty cheddar creates flavor tension with sweet, spiced apples that somehow resolves into harmonious perfection. Serve thin slices alongside pie, allowing guests to alternate bites, or melt thin cheese slices over warm pie for those willing to embrace this unconventional combination.
Fresh whipped cream offers lighter alternative to ice cream while providing similar temperature and textural contrast. Whip heavy cream to soft peaks with modest sugar addition (1-2 tablespoons per cup of cream) and vanilla extract. The cream’s fat content carries apple and spice flavors across the palate while its airiness balances pie’s density. Whip cream immediately before serving; it deflates and weeps if prepared too far in advance.
Salted caramel sauce creates indulgent enhancement for those embracing decadence. The caramel’s butter-sugar richness amplifies pie’s existing flavors while salt prevents cloying sweetness. Drizzle warm caramel over individual slices, watching it pool around the plate edges. The combination tastes like autumn distilled into pure edible luxury.
Strong coffee or black tea provides beverage pairing that cleanses palate between bites while its slight bitterness balances sweetness. The warming effect of hot beverages alongside warm pie creates holistic comfort—sustenance for both body and spirit. Choose robust coffee or malty black tea (Assam, English Breakfast) rather than delicate varieties that pie would overwhelm.
The Cultural Tapestry and Emotional Architecture of Apple Pie
Apple pie occupies unique territory in American cultural consciousness, transcending mere dessert to become symbol, metaphor, and touchstone for collective identity. Understanding this cultural weight enriches appreciation for what emerges from your oven—you’re not merely baking pie but participating in tradition that connects contemporary kitchens to centuries of agricultural heritage, immigrant adaptation, and familial transmission of culinary knowledge.
The apple itself carries remarkable history: none of the varieties we use for baking are native to North America. Every apple tree growing in American orchards descends from European and Asian stock brought by colonists who understood that successful settlement required not just survival crops but the familiar fruits of homeland. Johnny Appleseed (John Chapman) achieved folk-hero status not through random scattering of seeds but through deliberate establishment of nurseries providing settlers with grafted apple trees as they moved westward.
The pie format represents similar cultural synthesis: English colonists brought traditions of fruit-filled pastry, Dutch settlers contributed techniques for flaky crust, French culinary influences refined the form, and American innovation adapted recipes to local ingredients and preferences. What emerged—double-crust fruit pie distinguished by generous filling, relatively sweet flavor profile, and emphasis on flaky, buttery crust—became distinctly American despite European roots.
Pie’s prominence in American holidays—particularly Thanksgiving—reinforces its symbolic resonance. The sight and aroma of cooling pie communicates “home” and “celebration” through sensory channels bypassing conscious thought to trigger memories and associations formed across lifetimes. Grandmother’s pie becomes not just food but edible connection to generations past, to childhood, to the comforting certainty that some things remain constant despite time’s relentless transformation of all else.
When you bake apple pie, you’re simultaneously creating dessert and participating in this cultural conversation—honoring tradition while making it your own, connecting individual expression to collective heritage, transforming ingredients into meaning that nourishes more than body.
À Vos Tabliers: Embracing Your Pie-Baking Journey
You now possess the knowledge, technique, and understanding necessary to create apple pie that honors tradition while achieving excellence calibrated to contemporary standards. These instructions represent accumulated wisdom spanning generations—techniques refined through countless iterations, failures transformed into insights, and the patient observation of how flour, butter, fruit, and heat interact to create something greater than their sum.
Yet recipes function as frameworks, not formulae—invitations to engage with ingredients and process, to develop intuitive understanding that transforms mechanical execution into creative mastery. Your first apple pie might not achieve perfection. The crust might be slightly tough, or excessively fragile. The filling might be too loose, or too firm. The spicing might lean heavily sweet or carry excessive cinnamon. None of this constitutes failure; rather, these represent learning opportunities that every accomplished baker has navigated.
Each pie you bake teaches lessons unavailable from written instructions: how dough feels when properly hydrated, how filling appears when optimally reduced, when crust achieves that perfect golden hue signaling doneness. This tactile, visual, aromatic education develops across time and repetition, gradually building confidence that allows you to adapt recipes to circumstances—substituting apple varieties based on market availability, adjusting sweetness for particularly tart or sweet fruit crops, modifying spicing according to preference.
Most importantly, remember that apple pie exists not for competition or judgment but for sharing, comfort, celebration. Whether your creation presents flawlessly or shows the honest imperfections of handwork matters far less than the intention, care, and love infused through the process. A slightly uneven pie baked with attention and served with warmth provides more genuine nourishment than technically perfect specimen lacking soul.
What memories will this pie help create? What holiday tables will it grace? What conversations will unfold around its presence? These questions have no answers yet—they await your living of them, your baking of this recipe and discovery of what it means within your life and relationships.
Begin today. Gather your apples, chill your butter, and let your hands learn what words can only approximate. As you roll dough, layer apples, and wait patiently for baking and cooling, remember that you’re participating in something larger than a single recipe—a tradition of home baking that connects contemporary kitchens to countless generations who understood that the best food emerges not from commercial production but from individual care, seasonal awareness, and the ancient human impulse to transform raw ingredients into nourishment that feeds both body and spirit.
Bon appétit, and may your apple pie always emerge golden, flaky, and filled with the essence of autumn—may your kitchen always smell of cinnamon and butter, and may you always find joy in the patient work of creating something beautiful and delicious to share with those you love.