Growing fresh vegetables within the intimate confines of your kitchen transforms ordinary windowsills and countertops into productive landscapes where life cycles unfold at arm’s reach, where the distance between seed and table collapses into mere footsteps, and where the ancient human relationship with cultivation finds contemporary expression in the smallest of spaces.
I discovered this remarkable possibility during a particularly bleak winter, when the farmers market had closed for the season and grocery store produce—shipped from distant continents, harvested weeks prior—left me yearning for the vibrancy and flavor that only truly fresh vegetables possess. A single pot of basil on my sunny kitchen window became the gateway: watching those emerald leaves unfurl, inhaling their incomparable aroma released by the gentlest touch, snipping fresh sprigs directly into pasta sauce still simmering on the adjacent stove. This wasn’t gardening as I had understood it—no outdoor space required, no seasonal constraints, no weather dependencies. This was something more intimate: botanical companionship within the heart of domestic life, edible beauty integrated seamlessly into daily rhythms.
What makes kitchen vegetable growing genuinely transformative lies not in the quantities produced—your windowsill won’t replace the grocery store—but in the quality of connection it creates. You witness germination’s quiet miracle, observe growth with daily attention, harvest with intention, and consume with profound awareness of the journey from seed to sustenance. This article unveils the essential knowledge for establishing productive edible gardens within your kitchen’s microclimate, selecting vegetables suited to indoor cultivation, and nurturing them toward abundant harvest through techniques honoring both plants’ biological needs and your space’s unique conditions.

Understanding Your Kitchen’s Microclimate: Reading Light, Temperature, and Humidity
Before your hands touch soil or seeds, develop literacy in the environmental language your kitchen speaks. Indoor spaces create distinct growing conditions—microclimates shaped by window orientation, heating patterns, cooking activities, and architectural features—that determine which vegetables will thrive and which will languish despite your most devoted care.
The Light Geography of Kitchen Spaces
Light represents the fundamental currency of plant life, the energy source powering photosynthesis that transforms carbon dioxide and water into the sugars fueling growth. Yet indoor light differs profoundly from outdoor illumination, both in intensity and duration, creating the primary challenge and constraint for kitchen vegetable cultivation.
South-facing windows in the Northern Hemisphere (north-facing in Southern Hemisphere) receive the most intense, longest-duration sunlight, creating conditions approaching outdoor growing. These premium locations support fruiting vegetables like cherry tomatoes, peppers, and even compact cucumber varieties—plants requiring 6-8 hours of direct sun daily for productive harvest. The light streaming through these windows carries sufficient intensity for the energy-demanding processes of flowering and fruit development.
East-facing windows capture gentle morning light—softer, cooler, gradually intensifying as dawn transitions to mid-morning. These locations suit leafy greens like lettuce, arugula, and Asian greens that appreciate bright conditions but wilt under harsh afternoon intensity. The morning light regime mimics spring conditions, triggering robust vegetative growth while preventing bolting (premature flowering) that bitter heat stress induces.
West-facing windows experience afternoon sun—intense, warm, sometimes scorching during summer months. This harsh light can stress delicate greens but suits heat-loving herbs like basil once they’ve established sufficient size. The challenge lies in managing temperature spikes that accompany this orientation, particularly if windows lack adequate ventilation.
North-facing windows (south-facing in Southern Hemisphere) receive indirect, diffuse light throughout the day—the dimmest but most consistent illumination. These locations challenge most vegetables but can support shade-tolerant leafy greens, microgreens, and sprouts that complete their cycles before requiring intense light for maturity.
Assess your kitchen’s light by observing sun patterns across a full day—note where direct beams fall, for how many hours, and with what intensity. Your hands can gauge intensity: if reading a book by window light feels comfortable without supplemental lighting, conditions likely support vegetable growing. If shadows appear crisp and defined, light intensity approaches outdoor levels. Weak, diffuse shadows or inability to read comfortably signal inadequate light requiring supplementation through grow lights.
Temperature and Humidity: The Invisible Influences
Kitchens fluctuate thermally more dramatically than other indoor spaces—heating through cooking activities, cooling when unoccupied, experiencing steam and moisture pulses that create transient humidity spikes. Understanding and working with these fluctuations rather than fighting them determines success.
Most vegetables prefer temperatures between 65-75°F (18-24°C) during day and slightly cooler at night. Kitchens often exceed these ranges during cooking, creating stress unless plants are positioned away from direct heat sources. Conversely, winter kitchens near poorly insulated windows can drop toward temperatures that slow growth or damage cold-sensitive species.
The humidity generated by cooking, dishwashing, and plant transpiration itself creates conditions more favorable than typical heated indoor environments. Many vegetables, particularly leafy greens and herbs, appreciate the 40-60% relative humidity that occupied kitchens naturally maintain. This ambient moisture reduces water stress and prevents the crispy leaf edges that plague plants in arid heated homes during winter.
Monitor temperature with a simple indoor thermometer positioned at plant height—temperatures vary significantly between floor level and countertop, particularly near windows. Adjust plant positioning based on thermal patterns: move heat-sensitive greens away from stove proximity, position warmth-loving tomatoes and peppers where cooking raises ambient temperature beneficially.
Essential Vegetables for Kitchen Growing: Selecting Productive Indoor Crops
Not all vegetables translate successfully to kitchen cultivation. Indoor conditions—limited light, restricted root space, controlled climate—favor certain species while rendering others impractical. Understanding these distinctions prevents frustration while channeling effort toward crops that reward indoor growing with abundant, flavorful harvests.
Leafy Greens: The Indoor Garden Workhorses
Lettuce, arugula, spinach, and Asian greens (mizuna, bok choy, tatsoi) represent ideal kitchen vegetables, combining rapid growth, compact form, continuous harvest potential, and tolerance for the moderate light conditions windowsills provide. These cool-season crops actually prefer the somewhat subdued indoor environment over harsh outdoor summer conditions.
Lettuce varieties particularly suited to containers include loose-leaf types like Oak Leaf, Salad Bowl, and Buttercrunch that allow continuous “cut-and-come-again” harvesting—snipping outer leaves while center continues producing new growth. Avoid heading varieties like Iceberg that require extensive space and time to form solid heads poorly suited to container constraints.
Arugula grows with remarkable speed, producing peppery, nutrient-dense leaves ready for harvest within 3-4 weeks of sowing. Its assertive flavor means small quantities suffice for salads and garnishes, making modest windowsill production adequate for regular use. Succession planting—sowing new seeds every 2 weeks—ensures continuous supply.
Spinach and Asian greens provide cold-hardy options that thrive in cooler kitchen microclimates, particularly near windows during winter months. Their nutritional density—rich in vitamins A, C, K, and minerals including iron and calcium—makes even modest harvests nutritionally significant.
Herbs: Aromatic Alchemy in Minimal Space
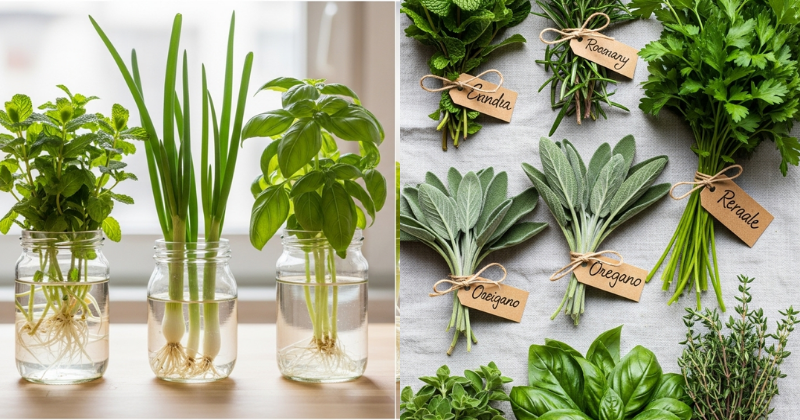
Culinary herbs may represent the single most rewarding category for kitchen cultivation, transforming from expensive grocery purchases to abundant windowsill resources requiring minimal space and care. The flavor and aroma of freshly harvested herbs exceed dried or even store-bought fresh versions so dramatically that once you experience the difference, returning to alternatives becomes nearly impossible.
Basil reigns supreme among kitchen herbs, combining vigorous growth, continuous harvest potential, and culinary versatility. Choose compact varieties like ‘Spicy Globe’ or ‘Greek Columnar’ bred specifically for container growing. Pinch growing tips regularly to encourage bushy growth while preventing flowering that signals the end of leaf production. The ritual of harvesting basil—crushing leaves gently to release their essential oils, inhaling that incomparable aroma before adding to whatever dish inspired your kitchen garden in the first place—becomes a form of aromatherapeutic meditation.
Cilantro and parsley provide fresh herb options for cuisines where these flavors prove essential. Cilantro grows quickly but tends toward bolting (flowering and seed production) in warm conditions; maintain cooler temperatures and harvest regularly to extend productive period. Parsley grows more slowly initially but produces steadily once established, with flat-leaf varieties generally offering superior flavor compared to curly types.
Mint, oregano, and thyme represent perennial herbs that, once established, produce for years with minimal intervention. These Mediterranean species prefer slightly drier conditions than tropical basil, making them forgiving of occasional watering neglect. Their intense flavors mean small quantities suffice, making them ideal for kitchen cultivation where space remains precious.
Compact Fruiting Vegetables: Ambitious Kitchen Gardening
For gardeners with ideal window conditions—south-facing with 6-8 hours direct sun—compact fruiting vegetables become possible, elevating kitchen growing from garnishes and salad greens to substantial produce.
Cherry tomatoes bred for container growing (‘Tiny Tim’, ‘Window Box Roma’, ‘Tumbling Tom’) produce genuine harvests in 5-gallon containers positioned in optimal light. The flavor of sun-ripened tomatoes harvested at peak, still warm from window sunlight, served within minutes of picking, transcends anything purchased in stores where tomatoes are inevitably harvested underripe for shipping durability.
Compact pepper varieties including ornamental types like ‘Thai Hot’ and ‘Black Pearl’ combine productive harvests with decorative appeal. Their glossy foliage and colorful developing fruits (progressing through purple, yellow, orange, red stages depending on variety) create edible ornamental displays.
Microgreens and sprouts deserve special mention as the fastest, most space-efficient kitchen vegetables. These nutrient-dense seedlings—harvested at 1-2 weeks when cotyledons or first true leaves emerge—require minimal equipment (shallow trays, potting mix), minimal space (countertop area equivalent to a dinner plate), and minimal time (days to weeks rather than months). Species including radish, broccoli, sunflower, and pea shoots provide concentrated nutrition and intense flavors that elevate salads, sandwiches, and garnishes dramatically.
Setting Up Your Kitchen Garden: Containers, Soil, and Infrastructure
Successful kitchen vegetable growing requires thoughtful infrastructure—containers providing adequate root space and drainage, growing medium balancing moisture retention with aeration, and optional supplemental lighting extending productive capacity beyond ideal window conditions.
Container Selection: Balancing Function and Aesthetics
Unlike outdoor gardens where mismatched containers disappear among foliage and landscape context, kitchen gardens occupy visual prominence within domestic space, making aesthetic considerations significant alongside functional requirements.
Choose containers with drainage holes—non-negotiable for healthy root development. Excess water must escape; waterlogged soil suffocates roots by displacing oxygen necessary for respiration, leading to root rot, stunted growth, and plant death. Place saucers beneath containers to protect countertops and windowsills from water damage while allowing drainage.
Size matters profoundly: leafy greens and herbs succeed in containers as shallow as 4-6 inches deep, while tomatoes and peppers require minimum 5-gallon capacity (12+ inches deep and wide) for adequate root development supporting fruit production. Err toward larger containers when uncertain—excess space rarely harms, while insufficient volume severely constrains growth.
Material choices each offer distinct advantages: terracotta provides classic aesthetic while porous clay allows air exchange benefiting root health but requires more frequent watering. Plastic containers retain moisture longer, reducing watering frequency while offering lightweight portability and affordable pricing. Ceramic glazed pots combine aesthetic appeal with better moisture retention than terracotta. Self-watering containers with bottom reservoirs reduce maintenance for busy gardeners though initial investment costs more.
Consider using attractive ceramic or decorative containers as outer “cachepots” housing functional plastic growing containers within—this approach combines aesthetic flexibility with practical drainage while allowing easy plant rotation and seasonal changes without disturbing roots.
Growing Medium: The Foundation of Plant Health
Resist the temptation to fill kitchen containers with garden soil, which compacts severely in containers, impeding drainage and root penetration while potentially introducing pests and diseases into your kitchen environment. Instead, use quality potting mix formulated specifically for container growing.
Commercial potting mixes combine multiple components creating the physical properties container plants require: peat moss or coconut coir providing moisture retention, perlite or vermiculite ensuring aeration and drainage, and often compost or slow-release fertilizer supplying initial nutrition. This engineered balance allows roots to proliferate vigorously while maintaining the air-water equilibrium essential for healthy growth.
For organic gardeners or those preferring to create custom blends, combine equal parts coconut coir (sustainable alternative to peat moss), compost, and perlite. This mixture provides excellent structure and fertility while remaining economically competitive with commercial products when purchased in bulk.
Pre-moisten potting mix before filling containers—dry mix resists water initially, creating frustrating situations where water runs through without adequately hydrating the medium. Place mix in a large tub or wheelbarrow, add water gradually while mixing, until the consistency resembles a wrung-out sponge: moist but not soggy, holding shape when squeezed without dripping excessively.
Supplemental Lighting: Extending Productive Capacity
For kitchens lacking ideal natural light or for gardeners seeking year-round production independent of seasonal daylight variations, supplemental grow lights transform marginal growing spaces into productive environments.
Modern LED grow lights offer efficient, cool-operating, full-spectrum illumination mimicking natural sunlight at affordable prices unimaginable a decade ago. Position lights 6-12 inches above plant canopy, adjusting height as plants grow to maintain consistent distance. Operate lights 12-16 hours daily, providing the extended “day length” that supports vigorous growth while allowing plants the dark period necessary for certain metabolic processes.
Grow lights enable cultivation in windowless kitchens, basements, or areas receiving insufficient natural light. They also supplement natural light during winter months when daylight hours decrease and intensity weakens, preventing the leggy, weak growth that results from inadequate illumination.
Planting and Care Routines: Daily Rituals of Kitchen Cultivation
Once infrastructure exists, the actual work of growing vegetables becomes surprisingly minimal, centering on regular watering, occasional feeding, timely harvesting, and the watchful observation that prevents small issues from escalating into harvest-threatening problems.
The Watering Meditation: Reading Plant Signals
Watering represents the most frequent care task yet remains the aspect where novice growers most commonly err—either drowning plants through excessive generosity or allowing them to stress through neglect. Developing what experienced gardeners call “soil sense”—intuitive understanding of moisture levels—takes time but proves learnable through attention.
Insert your finger into the potting mix to the second knuckle: if soil feels moist, wait; if it feels dry, water thoroughly until liquid flows from drainage holes. This simple tactile test proves more reliable than visual assessment or rigid schedules. Different containers, plants, and environmental conditions create varying water demands that change daily based on temperature, humidity, growth stage, and root development.
Water thoroughly when you do water—light sprinklings encourage shallow root development and leave lower soil layers dusty-dry. Thorough soaking encourages roots to explore the entire container volume, building drought resilience and accessing nutrients throughout the medium.
Morning watering proves ideal when possible, allowing foliage that becomes wet during watering to dry before evening, reducing disease risk. However, never allow rigid scheduling to override plant needs—if soil feels dry and leaves begin wilting, water immediately regardless of time.
The kitchen provides unique advantages for watering: proximity to sink eliminates the hassle of lugging watering cans across distances, and daily presence in the space naturally prompts moisture checking during normal kitchen activities. This convenience encourages the consistent attention that prevents problems.
Feeding Your Garden: Nutritional Management in Limited Soil Volume
Container-grown vegetables exhaust available nutrients more quickly than garden-grown counterparts whose roots access vast soil volumes. Regular feeding becomes necessary for sustained production, particularly for heavy feeders like tomatoes and peppers.
Begin feeding 2-3 weeks after planting or when purchased transplants exhaust nutrients from their nursery soil. Use water-soluble organic fertilizer (fish emulsion, seaweed extract, or balanced organic formulas) diluted to half the package-recommended strength applied weekly. This “weakly weekly” approach provides consistent nutrition without the feast-famine cycle of less frequent, full-strength applications.
Leafy greens and herbs require less fertilizer than fruiting vegetables—feed every 2 weeks at half-strength. Over-fertilizing leafy crops produces lush foliage with diluted flavor and attracts pests; modest nutrition yields better-tasting, healthier plants.
Observe your plants for nutritional signals: pale, yellowing leaves suggest nitrogen deficiency; purple-tinged leaves indicate phosphorus shortage; brown, crispy leaf edges may signal potassium insufficiency. Respond to these signals by adjusting fertilization frequency or strength, reading your plants’ needs rather than following rigid schedules.
The Harvest Practice: Gathering with Intention
Harvesting represents kitchen gardening’s ultimate reward—the moment when months of tending transform into immediate culinary application. Yet harvest technique influences future productivity, making knowledge of proper methods essential for sustained yields.
For leafy greens, practice “cut-and-come-again” harvesting: snip outer leaves with scissors, leaving the growing center intact to produce new foliage. This approach extends productive period dramatically compared to harvesting entire plants, providing weeks or even months of continuous supply from a single planting.
Herbs respond to regular harvesting by producing bushier, more vigorous growth. Pinch or cut stems just above leaf nodes (where leaves attach to stem), encouraging branching and preventing the legginess that reduces productivity. Never remove more than one-third of plant mass in a single harvest, allowing adequate foliage to remain for photosynthesis supporting regrowth.
Cherry tomatoes and peppers signal harvest readiness through color changes—wait for full ripening on the plant when flavors reach peak intensity. Underripe tomatoes lack the sugar development that creates characteristic sweetness, while peppers achieve maximum vitamin C content when fully colored.
The harvest ritual itself deserves mindful attention: select what you’ll use immediately, harvest gently to avoid damaging plants, and transport directly to washing and preparation. The time between harvest and consumption profoundly affects flavor and nutritional value—measure this interval in minutes rather than days, experiencing vegetables at a peak of freshness impossible to purchase.
Troubleshooting Common Challenges: Solutions for Kitchen Garden Problems
Even with attentive care, indoor vegetables occasionally encounter difficulties. Understanding common problems and their solutions transforms setbacks into learning opportunities that deepen your cultivation expertise.
Leggy, Weak Growth: The Light Deficit
Plants stretching toward light—developing elongated, weak stems with excessive space between leaves—signal inadequate illumination. Move affected plants closer to windows or supplemental lights, or increase artificial lighting duration. For plants already leggy, pinching back growing tips encourages bushier, more compact growth, though correcting the underlying light deficiency proves essential.
Yellowing Leaves: Diagnosing the Cause
Yellowing (chlorosis) stems from multiple possible causes requiring diagnosis: lower leaves yellowing while new growth remains green suggests natural aging or nitrogen deficiency—increase fertilization frequency. Uniform yellowing across the plant indicates overwatering—allow soil to dry more between waterings and ensure adequate drainage. Yellowing between leaf veins while veins remain green signals iron deficiency (chlorosis)—adjust soil pH or supplement with iron chelate.
Pests in the Kitchen: Managing Unwanted Visitors
Indoor growing minimizes pest problems compared to outdoor gardening, yet occasional invaders appear: aphids clustering on new growth, whiteflies fluttering when plants are disturbed, or fungus gnats emerging from overly moist soil.
Address aphids and whiteflies by washing plants under gentle spray in the sink, physically removing pests. Follow with applications of insecticidal soap or neem oil if populations persist. Fungus gnats indicate overwatering—allow soil to dry more thoroughly between waterings, eliminating the moist conditions larvae require.
Prevention proves more effective than treatment: inspect new plants carefully before introducing them to your kitchen garden, isolate them for a week observing for pest emergence, and maintain good air circulation around plants discouraging pest establishment.
Bolting: When Plants Flower Prematurely
Leafy greens and herbs occasionally “bolt”—rapidly producing flower stalks that signal the end of vegetative growth and leaf production. Bolting typically results from temperature stress (too hot), day length triggers (species evolved to flower under certain light regimes), or plant maturity.
Prevent bolting by maintaining cooler temperatures, providing adequate water during warm periods, and harvesting regularly to keep plants in vegetative phase. Some crops like cilantro bolt inevitably; succession planting every 2-3 weeks ensures continuous supply as older plants decline.
Maximizing Your Kitchen Garden: Advanced Techniques and Seasonal Adaptations
Once you’ve mastered basic kitchen vegetable growing, explore advanced techniques maximizing productivity while diversifying your indoor harvest across seasons and extending cultivation into year-round practice.
Succession Planting: Continuous Harvests
Rather than planting all seeds simultaneously, sow small quantities every 2-3 weeks. This staggered approach ensures continuous supply as new plants mature while older ones decline, preventing the feast-or-famine pattern where everything matures simultaneously followed by gaps without fresh produce.
Succession planting proves particularly valuable for quick-maturing crops like lettuce, arugula, and radish microgreens. Dedicate specific containers to rolling production schedules, sowing fresh seeds as you harvest from maturing containers.
Companion Planting in Containers: Maximizing Space
Combine compatible species in larger containers, creating diverse mini-ecosystems where different plants occupy distinct ecological niches. Tall, upright tomatoes can share space with trailing herbs that cascade over container edges, maximizing vertical dimension while basil’s pest-repellent properties potentially benefit tomato health.
Plant leafy greens beneath taller plants, utilizing the partial shade taller neighbors provide while maximizing soil surface productivity. This intensive approach mirrors permaculture principles, creating productive complexity within limited space.
Seed Saving: Closing the Loop
Allow a few herb or lettuce plants to flower and set seed, collecting and storing these seeds for future plantings. This practice reduces costs, maintains varieties you particularly enjoy, and completes the full plant life cycle—a profound satisfaction connecting you to agricultural traditions stretching millennia.
Properly dried and stored seeds remain viable for years: collect when fully mature, dry thoroughly in paper envelopes, store in cool, dark, dry conditions labeled with variety and collection date.
Conclusion: The Kitchen Garden as Daily Companion
The transformation awaiting your kitchen extends beyond additional vegetables to encompass a fundamental shift in how you inhabit domestic space and relate to food. These growing plants become daily companions whose needs structure your routines, whose growth you witness in real time, whose harvests you integrate immediately into meals prepared steps away from where they grew.
Begin modestly—a single pot of basil, a container of mixed lettuce, whatever speaks to your culinary preferences and growing conditions. As you gain confidence and experience, expand gradually, learning through observation what thrives in your specific microclimate. Some experiments will disappoint; others will exceed expectations wildly. This journey of discovery, of developing the practical wisdom that transforms textbook knowledge into living relationship with plants, represents the true reward of kitchen growing.
Remember that success is measured not in pounds of produce but in quality of connection, in the daily ritual of tending living things, in the incomparable flavor of ingredients harvested moments before use, in the quiet satisfaction of participating in the ancient human practice of cultivation even within the most modern, urban, space-constrained circumstances.
Your kitchen awaits transformation. Seeds and potting mix wait at garden centers. Knowledge now resides in your mind and hands. What remains is simply beginning—filling that first container, sowing those first seeds, and discovering the remarkable potential hidden within the intersection of sunlight, water, soil, and your devoted attention. Welcome to the world of kitchen vegetable growing, where every windowsill becomes a garden and every harvest becomes a celebration of what’s possible when we invite nature into our daily lives.