
Salut les gourmands!
There exists a moment in every baker’s journey when simplicity reveals itself as the ultimate sophistication—when three humble ingredients transform into something so transcendent that it challenges every assumption about what constitutes culinary mastery. This condensed milk cheesecake represents precisely that revelation: a dessert of such ethereal lightness, such profound creaminess, such delicate balance between sweetness and tang that it seems impossible it could emerge from a formula this elegantly minimal.
I discovered this recipe during a period of creative exhaustion, standing in my kitchen surrounded by elaborate cheesecake failures—cracked surfaces, dense textures, overly sweet profiles that masked rather than celebrated the beauty of cream cheese itself. Then, almost by accident, I encountered this condensed milk method, initially dismissing it as too simple to produce anything remarkable. That first bite proved transformative—a texture so impossibly light it seemed to dissolve on the tongue, a flavor so perfectly calibrated between sweet and tangy that it required no embellishment, no fruit compote, no chocolate drizzle to justify its existence. This cheesecake stands complete in its purity, a meditation on the magic that occurs when quality ingredients meet patient technique and the courage to trust simplicity over complexity.
Présentation de la recette: The Philosophy of Minimal Intervention
Temps de préparation: 20 minutes (active engagement with ingredients)
Temps de cuisson: 50-60 minutes (the patient transformation)
Temps de refroidissement: 6-8 hours or overnight (the essential maturation)
Portions: 8-10 generous slices of heaven
Niveau de difficulté: Intermédiaire (simple in components, precise in execution)
Origine culinaire: This condensed milk approach to cheesecake represents a fascinating cultural convergence—born from Latin American dulce de leche traditions, refined through Japanese cotton cheesecake techniques, and perfected in home kitchens where resourceful bakers discovered that sweetened condensed milk provides not just sweetness but structural support, moisture regulation, and that indefinable quality the French call moelleux—a tender, melt-in-mouth texture that standard sugar cannot achieve.
The genius lies in condensed milk’s dual functionality: its concentrated milk solids contribute to structure while its caramelized sugars create depth of flavor that granulated sugar alone cannot provide. The result? A cheesecake that achieves professional pastry shop refinement through home kitchen accessibility—no water baths, no elaborate temperature protocols, no anxiety-inducing crack prevention rituals. Just pure, unadulterated cream cheese perfection.
Ingrédients: The Sacred Trio and Their Supporting Cast
The beauty of this condensed milk cheesecake emerges from ingredient quality rather than quantity. Each component plays an irreplaceable role in the final symphony of texture and flavor.
Pour la croûte (The Foundation of Dreams)
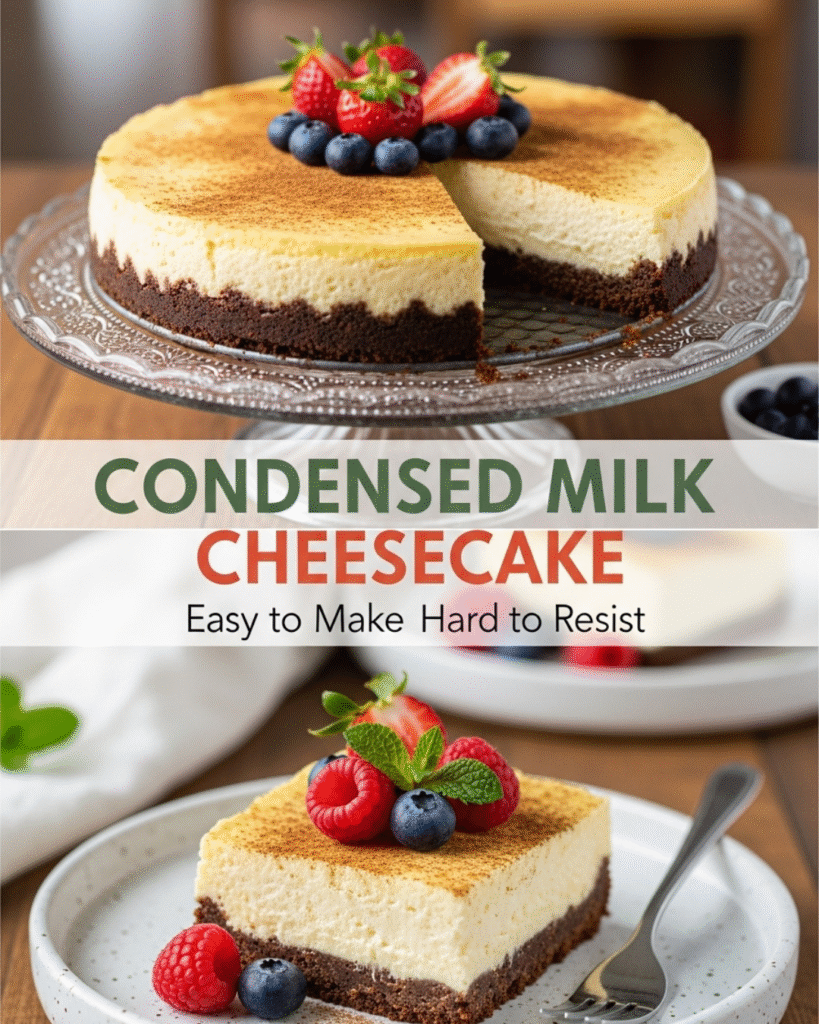
- 200g digestive biscuits or graham crackers – these British digestives or American graham crackers provide the slightly sweet, wheaty foundation that contrasts beautifully with the creamy filling. Choose quality biscuits without excessive additives; their flavor will shine through.
- 100g unsalted butter, melted – European-style butter with higher fat content (82-84%) creates richer, more cohesive crusts than standard butter. The golden, nutty flavor of quality butter becomes part of the dessert’s aromatic profile.
- Pinch of fine sea salt – this tiny addition transforms the crust from one-dimensional sweetness into a nuanced base that heightens every other flavor by contrast.
Pour la garniture (The Creamy Heart)
- 600g full-fat cream cheese, at room temperature – this ingredient quality matters profoundly. Seek cream cheese with minimal stabilizers and gums—brands like Philadelphia or artisanal cream cheese provide superior texture. Room temperature is non-negotiable; cold cream cheese creates lumps no amount of mixing can eliminate.
- 1 can (397g) sweetened condensed milk – the magical ingredient that revolutionizes traditional cheesecake methodology. This concentrated, caramelized milk provides sweetness, moisture, and that characteristic silky texture. Choose quality brands; inferior versions contain excessive stabilizers that compromise texture.
- 3 large eggs, at room temperature – eggs provide structure through protein coagulation while contributing to the filling’s luxurious richness. Room temperature eggs incorporate more readily, creating smoother batter without overmixing.
- 2 teaspoons pure vanilla extract – seek real vanilla extract rather than imitation; the complex floral, woody notes of genuine vanilla elevate the entire flavor profile.
- 2 tablespoons fresh lemon juice – this acidic component serves multiple functions: brightening the overall flavor, balancing sweetness, and contributing to the filling’s tender set through subtle protein modification.
- Optional: Zest of one lemon – for those who appreciate aromatic complexity, lemon zest introduces bright, citrus essential oils that dance across the palate.
Préparation: The Meditative Journey from Ingredients to Art
This recipe demands presence—not frantic activity, but calm, intentional engagement with each phase of transformation. Rushing produces inferior results; patience yields transcendence.
Étape 1: La préparation spirituelle (The Mindful Beginning)
Remove cream cheese and eggs from refrigeration 60-90 minutes before beginning. This seemingly minor detail determines success or failure—cold ingredients resist incorporation, requiring overmixing that introduces excess air, creating cracks during baking. Touch the cream cheese; it should yield easily to gentle pressure, soft but not warm.
Preheat your oven to 160°C (320°F). This moderate temperature—lower than traditional cheesecake recipes—allows gentle, even cooking that preserves the delicate texture condensed milk creates. Position the oven rack in the center, ensuring even heat distribution.
Étape 2: La construction de la base (Building the Foundation)
Place digestive biscuits in a heavy-duty ziplock bag, pressing out excess air and sealing. Using a rolling pin, crush biscuits into fine crumbs—some texture remains desirable, but avoid large chunks that create structural weakness. Alternatively, pulse in a food processor for 10-15 seconds until fine, uniform crumbs form.
Transfer crumbs to a mixing bowl. Pour melted butter over them, add the pinch of salt, and mix thoroughly using a fork. The mixture should resemble wet sand—when squeezed in your palm, it should hold together without being greasy or dry. If too dry, add a tablespoon more melted butter; if too wet, add more crumbs.
Press this aromatic mixture firmly into the bottom of a 23cm (9-inch) springform pan. Use the bottom of a flat glass or measuring cup to compact the crust evenly, paying particular attention to edges where crust tends to be thinner. Extend the crust slightly up the sides—about 2cm—creating a shallow bowl that will cradle the filling.
Place the crust in the freezer for 10-15 minutes while you prepare the filling. This brief chill sets the butter, preventing the crust from becoming soggy when filling is added.
Étape 3: L’alchimie de la garniture (The Filling Alchemy)
In a large mixing bowl or the bowl of a stand mixer, beat the room-temperature cream cheese on medium speed for 2-3 minutes until completely smooth, fluffy, and free of lumps. Stop periodically to scrape down the sides and bottom of the bowl—cream cheese loves to hide in corners, creating lumps that mar the final texture.
This initial beating serves crucial purposes: it breaks down the cream cheese’s structure, creating a smooth base that readily accepts other ingredients; it incorporates a small amount of air that contributes to the final light texture; and it ensures absolute smoothness before adding liquid ingredients that cannot remedy existing lumps.
Petit conseil pro: If you detect any lumps at this stage, press the cream cheese through a fine-mesh sieve before continuing. This extra step, while seemingly tedious, guarantees the silky texture that defines exceptional cheesecake.
Étape 4: L’intégration harmonieuse (The Harmonious Integration)
With the mixer on low speed, pour in the condensed milk in a steady stream. Watch as the cream cheese transforms—its stark white color mellowing to warm ivory, its thick consistency loosening to flowing cream. Beat for 1-2 minutes until completely incorporated and smooth.
Add eggs one at a time, beating on low speed just until each egg disappears into the mixture before adding the next. This gradual incorporation prevents overmixing—the enemy of tender cheesecake. Overmixed batter incorporates excess air that expands during baking, then collapses upon cooling, creating those dreaded cracks and dense texture.
Add vanilla extract and lemon juice, mixing briefly—perhaps 30 seconds—just until incorporated. The batter should flow like thick cream, dropping from a spatula in a slow, continuous ribbon. If it seems stiff, you may have overmixed; if it seems thin, your cream cheese may not have been full-fat.
Taste the raw batter (it contains raw eggs, so just a tiny taste for assessment). You should perceive balanced sweetness with subtle tang, the warm floral notes of vanilla, and a bright citrus undertone. This flavor will intensify slightly during baking as water evaporates and flavors concentrate.
Étape 5: La cuisson contemplative (The Contemplative Baking)
Remove the chilled crust from the freezer. Pour the filling into the prepared crust, using a spatula to guide it evenly across the surface. Tap the pan gently on the counter several times—this releases any large air bubbles trapped within the batter that could create unsightly holes in the finished cheesecake.
Place the springform pan on a baking sheet (this catches any butter that might leak from the crust) and transfer to the preheated oven. Set a timer for 50 minutes—this represents the minimum baking time for this size cheesecake.
The art of judging doneness: Unlike cakes that emerge fully set, cheesecake perfection requires removing it while the center remains slightly wobbly. At 50 minutes, gently shake the pan. The outer 5-7cm should appear set, barely moving, while the center wobbles like softly set jelly—not liquid, but definitely not solid.
If the entire surface wobbles loosely, continue baking in 5-minute increments, checking after each interval. If only the very center (approximately 8-10cm diameter) wobbles, remove from the oven immediately. Carryover cooking will complete the setting as it cools.
Petit conseil pro: The condensed milk in this recipe provides insurance against overbaking—its milk proteins and sugars create a more forgiving texture than traditional recipes. However, extreme overbaking still produces dry, crumbly results. Trust the wobble test over timing alone.
Étape 6: Le refroidissement patient (The Patient Cooling)
Turn off the oven, crack the door open about 10cm, and leave the cheesecake inside for one hour. This gradual temperature reduction prevents thermal shock—the rapid temperature change that causes dramatic cracking as the filling contracts faster than the set edges can accommodate.
After one hour, remove the cheesecake from the oven and allow it to cool at room temperature for another hour. The surface will no longer shimmer with moisture; it will appear matte and fully set.
Cover loosely with plastic wrap (don’t let it touch the surface) and refrigerate for minimum 6 hours, preferably overnight. This extended chilling serves multiple purposes: it allows the filling to firm completely for clean slicing; it permits flavors to meld and mature, developing complexity impossible in freshly baked cheesecake; and it sets the starches and proteins in their final configuration, creating that signature creamy-yet-firm texture.
The transformation during chilling: As the cheesecake rests, molecular magic occurs. Proteins that were loosely associated during baking form organized networks. Fats that were fluid at warm temperatures solidify into smooth matrix. Flavors that tasted separate—vanilla here, lemon there, sweetness in front—integrate into unified harmony. This is why warm cheesecake, while edible, never achieves the textural and flavor perfection of properly chilled cheesecake.
Étape 7: Le démoulage cérémoniel (The Ceremonial Unmolding)
When ready to serve, run a thin knife or offset spatula around the inside edge of the springform pan, separating any filling that adhered to the sides during baking. Unlatch the springform ring carefully, lifting it straight up. If any filling sticks, gently coax it free with a knife.
For professional presentation, warm a large, sharp knife under hot water, wipe dry, and slice through the cheesecake in one smooth motion. Clean and warm the knife between each slice—this hot knife technique creates those pristine, professional slices you admire in bakery display cases.
Petit conseil pro: The Secrets of Cheesecake Mastery
Through countless cheesecakes—successes, failures, and everything between—I’ve discovered subtle techniques that separate good cheesecakes from transcendent ones.
The room temperature imperative: I cannot overemphasize this enough. Cold cream cheese creates lumps that no amount of mixing eliminates without incorporating so much air that your cheesecake becomes more soufflé than cheesecake. If you forgot to remove ingredients from refrigeration in time, place wrapped cream cheese in a bowl of warm (not hot) water for 10 minutes, rotating occasionally. For eggs, submerge in warm water for 5 minutes.
The mixing speed wisdom: High-speed mixing incorporates excessive air—those tiny bubbles expand during baking, then collapse, creating cracks and uneven texture. Keep your mixer on low to medium-low throughout the process. Yes, it takes longer, but patience prevents problems.
The surface crack prevention: Should small surface cracks appear despite your best efforts, don’t despair—they’re purely cosmetic. Disguise them with fresh berries, a fruit compote, whipped cream, or a simple dusting of powdered sugar. Or embrace them as badges of homemade authenticity—proof this came from your kitchen, not a factory.
The flavor variation playground: Once you’ve mastered this basic formula, infinite variations await:
- Chocolate condensed milk cheesecake: Replace 100g cream cheese with melted dark chocolate, using chocolate-flavor condensed milk if available. The result tastes like the most refined chocolate cheesecake imaginable.
- Coffee-infused version: Add 2 tablespoons instant espresso powder dissolved in 1 tablespoon hot water to the filling. Coffee and condensed milk create magic together—anyone familiar with Vietnamese coffee understands this instinctively.
- Tropical coconut variation: Replace 100ml condensed milk with coconut cream, add ½ cup shredded coconut to the filling, and use coconut biscuits for the crust. You’ve created a tropical paradise in cheesecake form.
- Berry swirl artistry: Reserve 3 tablespoons filling, swirl in 2 tablespoons berry puree (raspberry, strawberry, or blackberry), then marble this mixture through the main filling just before baking using a knife or skewer. The result looks and tastes like professional patisserie work.
The storage strategy: This cheesecake stores beautifully for 5-7 days refrigerated, covered loosely with plastic wrap or in an airtight container. The flavor actually improves after 24-48 hours as it continues maturing. It also freezes excellently—wrap individual slices in plastic wrap, then aluminum foil, storing in freezer bags for up to 3 months. Thaw overnight in refrigerator for best texture.
Accompagnements suggérés: Honoring Simplicity with Strategic Enhancement
This cheesecake’s perfection requires no adornment, yet strategic accompaniments can create inspired combinations that honor rather than mask its delicate flavor.
Pour le service classique: Fresh berries—strawberries, raspberries, blackberries, or blueberries—provide textural contrast and tartness that cuts the cheesecake’s richness. Simply wash, pat dry, and arrange artfully. No sugar, no maceration—let the fruit speak for itself.
Pour les puristes: Serve completely unadorned with excellent coffee—espresso, pour-over, or French press. The coffee’s bitterness creates perfect counterpoint to the cheesecake’s sweetness while the warmth contrasts with the cold, creamy texture.
Pour les occasions festives: Create a simple berry coulis by blending 200g fresh or frozen berries with 2 tablespoons sugar and 1 tablespoon lemon juice, straining to remove seeds. This bright, tart sauce provides professional polish while taking mere minutes to prepare.
Pour les amateurs de caramel: Drizzle dulce de leche (essentially slow-cooked condensed milk) over individual slices. This creates a beautiful flavor circle—condensed milk in the cheesecake, its caramelized cousin atop—while adding visual drama.
Pour les explorateurs de textures: Serve with a small scoop of vanilla ice cream or softly whipped cream. The temperature contrast—cold cream against even colder ice cream—creates an interesting sensory experience while the whipped cream’s airy texture opposes the dense creaminess.
The beverage pairing philosophy: Beyond coffee, consider these thoughtful pairings:
- Sweet dessert wines: Moscato d’Asti, late harvest Riesling, or Sauternes provide honeyed sweetness that harmonizes with the condensed milk.
- Port or sherry: The nutty, oxidative notes in these fortified wines create sophisticated contrast.
- Earl Grey tea: The bergamot’s citrus notes echo the lemon in the cheesecake while the tea’s tannins cut through richness.
- Champagne or sparkling wine: The bubbles refresh the palate between bites, preventing sweetness fatigue.
La science derrière la magie: Understanding the Chemistry
For those who, like me, find fascination in understanding why recipes work, let’s explore the biochemistry that makes this condensed milk cheesecake so extraordinary.
The protein network formation: When cream cheese and eggs are heated, their proteins denature—unfolding from their compact, coiled structures and forming new bonds with neighboring proteins. This creates the three-dimensional network that gives cheesecake its structure. Gentle heating (our lower oven temperature) creates a fine, delicate network—firm yet tender. Rapid, high-heat cooking creates a coarse, tough network.
Condensed milk’s structural role: Beyond its obvious sweetness contribution, condensed milk provides milk proteins (casein) and lactose (milk sugar) that integrate into the protein network, creating additional structural support while retaining moisture. This is why condensed milk cheesecakes achieve incredibly creamy texture—those milk proteins hold water molecules in the matrix, preventing the dry, crumbly texture of overbaked standard cheesecakes.
The Maillard reaction contribution: During baking, a small amount of Maillard browning occurs—the reaction between proteins and sugars that creates hundreds of flavor compounds. This is why baked cheesecake tastes more complex than no-bake versions, developing subtle nutty, caramelized notes absent from the raw batter.
The role of acid: Lemon juice serves multiple functions beyond flavor. Its acidity slightly destabilizes the casein proteins in dairy, creating a more tender set (similar to how acid in buttermilk creates tender cakes). It also activates taste receptors that perceive sweetness, allowing you to use less sugar while perceiving equivalent sweetness—though in this recipe, the condensed milk’s sweetness is integral.
À vos tabliers: The Invitation to Create
This condensed milk cheesecake represents more than a dessert recipe—it’s an invitation into the transformative magic that occurs when quality ingredients meet patient technique and the wisdom to trust simplicity over complexity. Each time you prepare it, you participate in a tradition of home bakers who discovered that spectacular results need not require professional equipment, exotic ingredients, or culinary school training.
The first time you pull this cheesecake from the oven, watching it wobble with that perfect jiggle, you’ll understand viscerally what “doneness” means in ways no written description can convey. The first time you slice through its creamy interior, hearing that satisfying whisper as the hot knife glides through, you’ll feel the pride every baker experiences when technique manifests as beauty. And the first time someone closes their eyes after tasting your creation, transported by that impossibly light texture and perfectly balanced flavor, you’ll know that you’ve achieved something genuinely special.
I encourage you to make this cheesecake not once but repeatedly—each iteration deepening your understanding, refining your technique, building that intuitive knowledge that transforms recipe-followers into confident bakers. Notice how the batter’s consistency changes with ingredient temperature. Observe how oven temperature affects setting time. Experiment with flavor variations once you’ve mastered the foundation.
Share your experiences—your triumphs, your questions, your innovations. What flavor combinations did you create? How did your family respond? What challenges did you encounter, and how did you solve them? This communal knowledge enriches all of us, connecting bakers across distances through shared passion for creating beauty and deliciousness.
À vos tabliers, and may your kitchen always smell of vanilla and possibility!
Bon appétit!