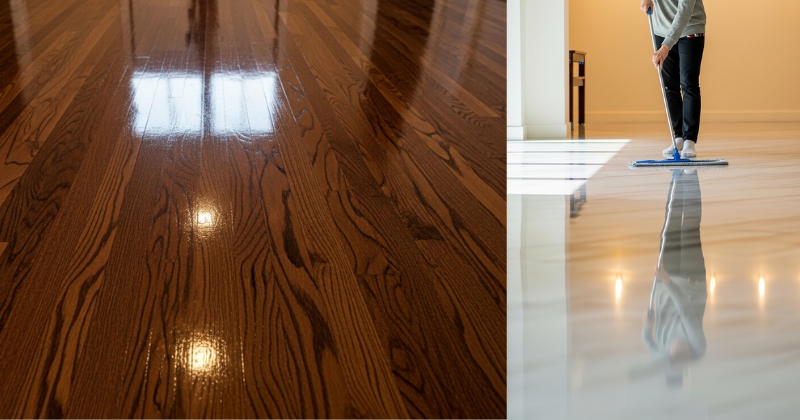
Walk into any home with gleaming, spotless floors and you immediately feel the difference. Shiny floors signal cleanliness, care, and comfort — and achieving that mirror-like brilliance doesn’t require a professional cleaning crew or hours of backbreaking work. Whether you’re dealing with hardwood, tile, laminate, or vinyl, the secret to effortlessly shiny floors lies in understanding your floor type, using the right techniques, and building smart habits that maintain that fresh-cleaned look between deep cleans. You’re about to discover a complete system that transforms dull, streaky, or grimy floors into surfaces that genuinely gleam — without exhausting yourself in the process. Get ready to unlock the kind of floors that make guests ask what your secret is.
Understanding Your Floor Type: The Foundation of Lasting Shine
The single biggest mistake people make when trying to achieve shiny floors is using the wrong products or methods for their specific floor type. What works brilliantly on ceramic tile can permanently damage hardwood. What makes vinyl gleam can leave laminate looking worse than before. Before you reach for any cleaner or polish, knowing exactly what you’re working with is the essential first step.
Hardwood and Engineered Wood Floors
Hardwood floors are arguably the most beautiful — and the most demanding — when it comes to achieving that deep, lustrous shine. The key thing to understand is that hardwood and water are enemies. Excess moisture causes warping, swelling, and dullness that no amount of polishing can reverse. Shiny hardwood floors require minimal moisture, pH-neutral cleaners specifically formulated for wood, and regular buffing to maintain the finish layer that produces their characteristic glow.
Engineered wood behaves similarly but tolerates slightly more humidity variation. Both types benefit enormously from the two-step approach: routine dry cleaning to remove abrasive grit that dulls the finish, followed by targeted damp cleaning with wood-specific solutions. Never use vinegar, ammonia-based cleaners, or all-purpose sprays on hardwood — the acid and harsh chemicals strip the protective finish over time, leaving floors looking flat and worn.
Tile, Vinyl, and Laminate Surfaces
These hard surface flooring types offer more flexibility in cleaning methods but each has distinct needs. Ceramic and porcelain tile achieve maximum shine when grout lines are clean (dirty grout visually destroys even the cleanest tile surface) and when a light buffing follows mopping to eliminate water spots and streaks. Vinyl and luxury vinyl plank (LVP) floors respond exceptionally well to pH-neutral cleaners and benefit from occasional application of vinyl-specific floor polish that fills microscopic surface imperfections and amplifies reflection.
Laminate floors present a unique challenge because their photographic surface layer can show streaks and residue more dramatically than other floor types. The golden rule for shiny laminate is less is more — minimal water, highly diluted cleaner, and thorough drying prevent the hazy film that makes laminate look perpetually dirty.
The Step-by-Step Shiny Floor Method That Actually Works
Achieving effortlessly shiny floors consistently comes down to a repeatable process rather than occasional intense cleaning sessions. Here’s the method that professional cleaners and flooring experts consistently recommend.
Step 1: Dry Clean First, Every Single Time. Before any liquid touches your floors, remove all loose dirt, dust, pet hair, and debris. Use a microfiber dust mop rather than a traditional broom — brooms scatter fine particles while microfiber traps them. This step is non-negotiable. Mopping over grit is like sanding your floors with every stroke, creating micro-scratches that accumulate into visible dullness over time.
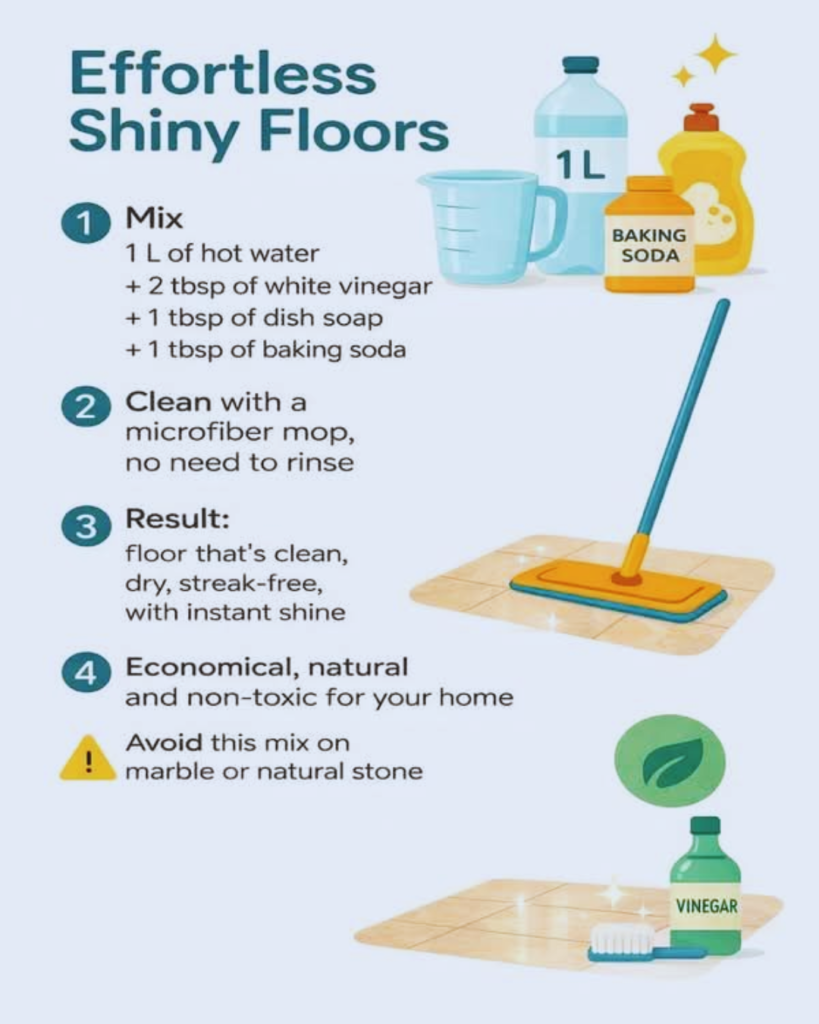
Step 2: Prepare the Right Cleaning Solution. Match your cleaner to your floor type. For hardwood, use a manufacturer-recommended wood floor cleaner diluted according to instructions. For tile and vinyl, a few drops of dish soap in warm water works effectively, or use a floor-specific cleaner. The critical detail: use less cleaner than you think you need. Residue from over-concentrated solutions is the primary cause of streaky, dull floors after cleaning.
Step 3: Mop with a Damp — Not Wet — Mop. Wring your mop until it feels barely damp to the touch. You should be able to wring it without effort and see almost no dripping. Work in sections, moving backward toward a doorway so you never step on cleaned areas. Overlap your strokes slightly to avoid missed strips that show as dull lines when dry.
Step 4: Dry and Buff Immediately. This is the step most people skip — and it’s where the shine actually happens. After damp mopping, follow immediately with a clean, dry microfiber mop or cloth to absorb residual moisture and buff the surface. This action removes water spots before they form and creates the light-reflecting smoothness that produces genuine shine. On tile floors, a flat microfiber pad moved in circular motions amplifies brilliance dramatically.
Step 5: Polish on a Schedule. For hardwood and vinyl, apply a floor-appropriate polish every 2-3 months to restore the protective layer that generates deep shine. These products fill surface imperfections and create a smooth, reflective coating that regular cleaning maintains but cannot replicate.
Pro Tips and Advanced Strategies for Next-Level Shine
Once you’ve mastered the basics, these expert-level insights help you achieve and maintain the kind of floors that look professionally cleaned every day.
The Microfiber Advantage
Not all mops deliver equal results. Microfiber technology represents a genuine revolution in floor cleaning — the split microfibers create millions of tiny hooks that physically grab and hold dirt, bacteria, and debris rather than just pushing it around. A quality microfiber mop outperforms traditional string mops and sponge mops dramatically, both in cleaning effectiveness and in the streak-free finish it leaves behind. Invest in at least two microfiber mop pads: one for damp cleaning and one dedicated exclusively to dry buffing. Wash them regularly (without fabric softener, which clogs the fibers) to maintain their effectiveness.
The Two-Bucket System
Professional cleaners universally use a two-bucket system: one bucket containing your cleaning solution and a separate bucket of clean rinse water. After each mopping stroke, rinse the mop in the clean water bucket before re-wetting it in the solution bucket. This prevents you from redepositing dirty water onto floors you’ve already cleaned — the primary reason floors look dull and streaky immediately after mopping. This single technique visually transforms results, and once you try it, you’ll never go back to single-bucket mopping.
Strategic Lighting for Spotting Problem Areas
Here’s a professional secret that transforms your cleaning effectiveness: use a flashlight or handheld lamp held at a low, oblique angle to your floors before and after cleaning. Light raking across the surface at a low angle reveals streaks, footprints, dried residue, and missed spots that overhead lighting completely hides. Clean what you can see in normal light, then do a final check with oblique lighting to catch anything that needs attention. This technique is how professional cleaners achieve that genuinely flawless finish rather than a surface that just looks clean in dim lighting.
Natural Shine-Boosting Solutions by Floor Type
Several natural ingredients enhance shine when used correctly. For tile floors, a final rinse with water containing a small amount of rubbing alcohol (1/4 cup per gallon) evaporates quickly and leaves virtually no residue, dramatically reducing streaking. For hardwood floors, a few drops of plain mineral oil on a buffing cloth — used sparingly and buffed completely into the surface — restores depth and luster between polishing treatments. For vinyl, baby oil diluted heavily in water (just 3-4 drops per gallon) provides a subtle shine boost without the greasy residue that undiluted oil creates.
Troubleshooting the Most Common Shiny Floor Challenges
Even with the best technique, specific problems can persist. Here’s how to diagnose and solve the most frequent obstacles to genuinely gleaming floors.
Stubborn Streaks and Hazy Film
Streaking after cleaning almost always indicates one of three causes: too much cleaner in your solution, a dirty mop redepositing residue, or insufficient drying/buffing. Address this by first stripping the existing residue buildup with a floor-appropriate deep cleaner or a dilute solution of plain warm water with minimal cleaner. Then implement the two-bucket system going forward and follow every damp mop with a dry buff. If streaking persists on hardwood, the finish may be worn and require professional recoating rather than just better cleaning technique.
Floors That Dull Quickly After Cleaning
If your floors look great immediately after cleaning but lose their shine within hours or days, the culprit is usually surface traffic reintroducing fine grit and oils. Implement entryway mats at every exterior door — research by the Building Service Contractors Association indicates that 80% of floor soil enters homes on the soles of shoes. A quality mat captures this material before it reaches your floors. Establishing a no-outdoor-shoes policy indoors amplifies this effect dramatically, keeping floors cleaner between cleaning sessions.
White Haze on Tile and Grout
White hazy deposits on tile floors indicate mineral buildup from hard water — calcium and magnesium deposits left behind as water evaporates. These don’t respond to regular floor cleaners because they’re mineral deposits, not organic soil. Address existing buildup with a dilute white vinegar solution (note: never use vinegar on natural stone like marble or travertine, which it etches). Going forward, add a water-softening rinse aid to your mop water in hard water areas, or use distilled water for the final rinse to eliminate mineral deposits entirely.
Scratched or Dull Hardwood
If hardwood floors appear scratched or permanently dull despite proper cleaning, the protective finish layer may be worn through. Light scratches in the finish (not the wood itself) can often be addressed with a hardwood floor refresher product that fills and levels the finish layer. Deeper wear typically requires professional screening (light sanding) and recoating. Prevent future finish wear by ensuring furniture legs have felt pads, keeping pet nails trimmed, and using area rugs in high-traffic zones.
Maintaining Your Shine: Long-Term Strategies for Effortlessly Beautiful Floors
Achieving shiny floors is satisfying. Maintaining them effortlessly transforms your entire experience of living in your home.
Building a Simple Maintenance Routine
The homeowners with the most consistently beautiful floors aren’t cleaning more than others — they’re cleaning smarter and more frequently in smaller doses. Daily dry mopping with a microfiber dust mop takes 3-5 minutes and prevents the grit accumulation that requires intensive cleaning to address. Weekly damp mopping with proper technique maintains freshness. Monthly spot treatments address any buildup in high-traffic zones. Quarterly polishing restores and protects the shine-generating surface layer. This layered approach means you’re never facing floors that require hours of heavy cleaning because small, consistent maintenance prevents problems from compounding.
Protective Measures That Multiply Your Efforts
Several protective strategies dramatically reduce how hard you need to work to maintain shine. Entry mats capture soil at the source. Furniture pads prevent the micro-scratches that accumulate into dullness. Area rugs in dining rooms protect floors from food and chair movement. Prompt spill cleanup prevents staining and residue buildup. These preventive measures don’t take extra time — they simply become part of how you interact with your home, and their cumulative effect on floor appearance is remarkable.
Seasonal Deep Cleaning and Renewal
Twice yearly — typically spring and fall — schedule a more comprehensive floor treatment that goes beyond routine maintenance. This includes moving furniture to clean underneath and along baseboards, deep cleaning grout lines on tile, applying fresh polish or floor finish to hardwood and vinyl, and inspecting for any damage or wear that needs addressing before it worsens. Think of these seasonal sessions as the foundation that makes your weekly maintenance effortless, resetting your floors to their best possible baseline and extending the life of your flooring investment significantly.
Conclusion
Effortlessly shiny floors are completely within your reach — and now you have the complete system to achieve them. The transformation starts with understanding your specific floor type, using the right tools and techniques, and building consistent habits that maintain brilliance between deep cleans. You don’t need expensive equipment or professional-grade chemicals. You need the right knowledge applied consistently, and that’s exactly what you now possess. Start with the two-bucket system and the dry-buff technique on your next cleaning day and watch the immediate difference. Your floors will reward every small, smart effort with the kind of lasting shine that makes your entire home feel cleaner, brighter, and more welcoming every single day.