Salut les gourmands!
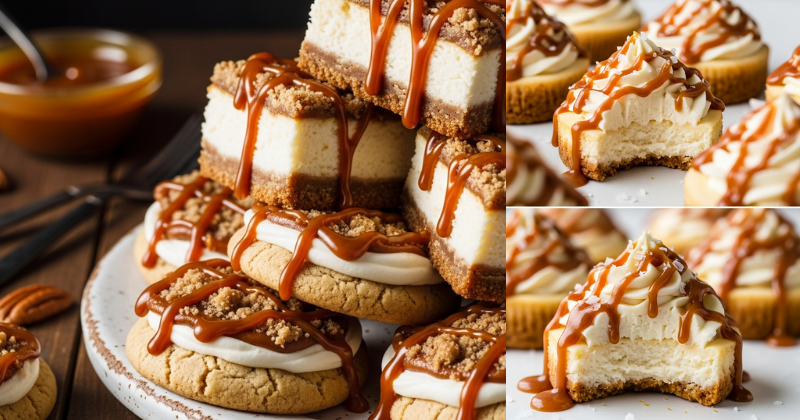
There exists a moment in patisserie alchemy when three iconic desserts—the buttery crumble of American cookies, the luxurious tanginess of New York cheesecake, and the bittersweet complexity of French caramel au beurre salé—converge into something transcendent. I first experienced this revelation in a Brooklyn bakery, where a pastry chef named Sarah was experimenting with hybrid desserts that defied categorization. She handed me what appeared to be a simple cookie, golden at the edges and slightly cracked across its surface, and encouraged me to bite without hesitation.
That first taste remains vivid: the initial crisp exterior yielding to a soft, almost molten interior where cream cheese created pockets of tangy richness, while threads of salted caramel wove through the dough like edible gold, their sweetness tempered by mineral salt crystals that sparked against the tongue. It was simultaneously familiar and revolutionary—comfort and sophistication coexisting in a single, palm-sized creation.
These salted caramel cheesecake cookies represent more than culinary innovation; they embody the beautiful accidents that occur when bakers dare to merge seemingly disparate traditions. The science behind their creation fascinates as much as their flavor: understanding how cream cheese’s moisture affects cookie structure, how caramel’s sugar concentration determines its texture post-baking, why flaky sea salt amplifies rather than competes with sweetness. What I offer you today is both recipe and education—a pathway to creating cookies so extraordinary that they’ll redefine what you believe possible in a handheld dessert.

Présentation de la Recette: The Architectural Marvel
Understanding the temporal choreography and technical complexity of these salted caramel cheesecake cookies establishes both realistic expectations and appreciation for the sophisticated balance you’re creating.
Temps de Préparation: 45-60 minutes of engaged work—softening cream cheese to precise consistency, preparing homemade salted caramel (or opening quality jarred caramel with no judgment), creaming butter and sugars to optimal aeration, carefully folding components to maintain structural integrity. This is active baking demanding your full presence.
Temps de Réfrigération: 2-4 hours of patient waiting, or ideally overnight, as dough firms and flavors meld. This chilling period isn’t optional convenience but essential chemistry—allowing flour to fully hydrate, butter to resolidify, and flavors to integrate into harmonious complexity.
Temps de Cuisson: 12-15 minutes per batch in a precisely heated oven where cookies transform from pale dough to golden perfection, their surfaces cracking to reveal the treasures within.
Temps Total: Approximately 4-6 hours from initial mixing to enjoying warm cookies, though spread across two days, the active involvement comprises perhaps 90 minutes—the rest unfolds through patient refrigeration and careful baking.
Rendement: This recipe produces approximately 24-30 substantial cookies (depending on sizing preference)—enough to share generously at gatherings, gift to grateful recipients, or hoard selfishly in your freezer for moments requiring extraordinary comfort.
Niveau de Difficulté: Advanced beginner to intermediate. The techniques are individually straightforward—creaming butter, folding dough, forming cookies—but their combination demands attention to detail. Cream cheese’s moisture can make dough sticky and challenging; caramel’s tendency to pool requires strategic placement; achieving the ideal texture between chewy center and crispy edges requires understanding your oven’s personality. Your first batch teaches you the process; your second reveals the nuances; your third approaches perfection.
The Hybrid Heritage
These cookies descend from multiple lineages. The American chocolate chip cookie provides structural foundation—that balance of crispy edges and soft centers through precise butter-to-sugar ratios and careful baking temperature. New York cheesecake contributes its signature tanginess and creamy richness through cream cheese incorporation—a technique more common in filled cookies but here integrated directly into dough. French caramel traditions supply the salted caramel element—that sophisticated interplay of burnt sugar’s bitterness, butter’s richness, and salt’s flavor-amplifying properties.
The genius lies not in each component individually but in their integration. Cream cheese’s acidity brightens the sweetness that could otherwise overwhelm. Caramel’s complex flavor—the result of hundreds of compounds formed during sugar caramelization—adds sophistication beyond simple sweetness. Salt, used strategically both within caramel and as finishing touch, performs its ancient magic of making every other flavor more intensely itself.
Ingrédients: The Symphony Components
Excellence begins with ingredient selection—each component contributing specific functional and flavor properties to the final cookie’s architecture and taste.
For the Cookie Dough:
- 1 cup (226g) unsalted butter, softened to 65-68°F—the structural and flavor foundation
- ¾ cup (150g) granulated sugar—provides sweetness and promotes spreading
- ½ cup (110g) light brown sugar, packed—adds moisture, chewiness, and subtle molasses complexity
- 8 oz (226g) cream cheese, softened to room temperature—the tangy richness distinguishing these from ordinary cookies
- 2 large eggs, room temperature—binding, moisture, and richness
- 2 teaspoons pure vanilla extract—aromatic depth and flavor enhancement
- 2¾ cups (345g) all-purpose flour—structural backbone
- 1 teaspoon baking soda—leavening and browning
- ½ teaspoon baking powder—additional lift and tender crumb
- ½ teaspoon fine sea salt—flavor enhancement
- 1 cup (170g) white chocolate chips—creamy sweetness complementing tangy cream cheese
For the Salted Caramel:
If making homemade (highly recommended for optimal flavor and texture control):
- 1 cup (200g) granulated sugar
- 6 tablespoons (85g) unsalted butter, cut into pieces
- ½ cup (120ml) heavy cream, room temperature
- 1 teaspoon flaky sea salt (Maldon, fleur de sel)
Alternatively: 1 cup high-quality jarred salted caramel (choose thick, spreadable consistency rather than sauce)
For Finishing:
- Flaky sea salt for sprinkling—the final flavor-amplifying touch
- Optional: additional caramel for drizzling post-baking
Ingredient Selection Philosophy:
Butter Considerations: European-style butter (82-84% butterfat versus American standard 80%) creates richer flavor and slightly different texture—the higher fat content produces more tender cookies with enhanced butter flavor. Either works beautifully; European butter simply intensifies the experience.
Cream Cheese Crucial: Full-fat brick-style cream cheese (Philadelphia or equivalent) is non-negotiable. Low-fat or whipped varieties contain different moisture ratios and stabilizers that fundamentally alter dough consistency. The cream cheese must be genuinely softened—leave at room temperature 2-3 hours or microwave in 10-second bursts—lumps won’t incorporate and will create textural inconsistencies.
Sugar Dynamics: The combination of granulated and brown sugar creates ideal cookie texture. Granulated sugar promotes spreading and crisp edges through its pure sucrose composition. Brown sugar, containing molasses, adds moisture and hygroscopic properties (attracting and retaining water), creating chewier centers. The ratio here balances these effects perfectly.
Flour Precision: Measure flour correctly—spoon into measuring cup and level with straight edge, or better yet, weigh for accuracy. Too much flour (from scooping directly into bag) creates dry, cakey cookies; too little produces flat, greasy results. This recipe’s flour amount accounts for cream cheese’s moisture and caramel’s liquid content.
Caramel Considerations: Homemade salted caramel offers superior control over flavor intensity and texture. The caramel should be thick enough to hold shape at room temperature but not so stiff it won’t swirl into dough. If using jarred caramel, choose varieties labeled “thick” or “spoonable” rather than thin sauces that will simply absorb into dough rather than creating distinct pockets.
Préparation: The Transformative Process
Creating salted caramel cheesecake cookies unfolds through methodical phases, each representing specific chemical and physical transformations building toward the final extraordinary result.
Phase 1: Salted Caramel Creation (If Making Homemade)
Step 1: The Sugar Metamorphosis
Pour 1 cup granulated sugar into heavy-bottomed saucepan, spreading evenly across bottom. Place over medium heat without stirring—this is crucial. Stirring causes crystallization, creating grainy rather than smooth caramel.
Watch as sugar begins melting at edges. When melting progresses noticeably (after 4-6 minutes), gently swirl pan—don’t stir with utensil—to distribute heat. The sugar will gradually transform from white granules to clear liquid to pale gold to rich amber.
Target color: deep amber approaching copper, like an old penny. This requires nerve—going dark enough for complex flavor without burning into acrid bitterness. The transformation from perfect to burnt occurs within 30 seconds once reaching optimal color, so vigilance becomes essential.
Step 2: Butter Integration
Once sugar reaches deep amber (approximately 350°F if using thermometer), immediately remove from heat and add butter pieces. The mixture will bubble violently—this is normal, though dramatic. Whisk rapidly until butter incorporates completely.
Step 3: Cream Emulsification
Slowly pour in room-temperature heavy cream while whisking constantly. Again, violent bubbling and steam—stand back slightly but continue whisking. The mixture will seem separated initially but will come together with persistent whisking.
Return to low heat briefly if needed, whisking until completely smooth and homogeneous. Remove from heat, stir in 1 teaspoon flaky sea salt. Pour into heat-safe container and cool to room temperature, then refrigerate until thick and spreadable (2-3 hours or overnight). Properly prepared caramel should be scoopable, holding shape without running—similar to very thick jam consistency.
Phase 2: Cookie Dough Architecture
Step 4: The Creaming Foundation
In large mixing bowl (stand mixer with paddle attachment ideal, though hand mixer works), beat softened butter on medium speed for 1-2 minutes until smooth and slightly fluffy. This initial butter beating creates air pockets that will help leaven cookies.
Add both sugars—granulated and brown. Beat on medium-high speed for 3-4 minutes. This creaming process incorporates air while dissolving sugar crystals into butter, creating light, fluffy mixture resembling whipped frosting. Proper creaming is essential—it creates cookie structure and determines final texture. Under-creamed dough produces dense, heavy cookies; over-creamed can create cookies that spread too much.
Scrape bowl sides and bottom midway through creaming to ensure even incorporation.
Step 5: Cream Cheese Integration—The Delicate Dance
Add softened cream cheese in chunks. Beat on medium speed for 2-3 minutes until completely smooth and no lumps remain. The mixture will initially look separated or curdled—don’t panic. Continue beating and it will come together into smooth, homogeneous emulsion.
This is the trickiest step—cream cheese’s moisture and tang must fully integrate without overworking once flour is added. Ensure complete smoothness now because you can’t mix vigorously later without developing gluten that creates tough cookies.
Step 6: Egg and Vanilla Enrichment
Add eggs one at a time, beating well after each addition until fully incorporated. Add vanilla extract with second egg. The mixture should appear smooth, thick, and creamy—like very rich frosting.
Step 7: Dry Ingredient Integration
In separate bowl, whisk together flour, baking soda, baking powder, and salt. This pre-mixing distributes leavening agents evenly, preventing pockets of excessive rising.
Add dry ingredients to wet mixture all at once. Using lowest mixer speed (or switching to wooden spoon for more control), mix just until flour disappears—visible streaks are fine. Stop immediately when no loose flour remains. Overmixing at this stage develops gluten, creating tough rather than tender cookies.
Step 8: White Chocolate Incorporation
Fold in white chocolate chips using rubber spatula. Distribute evenly throughout dough.
Step 9: Caramel Swirling—The Marbling Art
Remove salted caramel from refrigerator. It should be firm but scoopable. Drop tablespoon-sized dollops of caramel across dough surface—approximately 8-10 dollops scattered randomly.
Using butter knife or small offset spatula, swirl caramel through dough with figure-eight motions. Don’t overmix—you want distinct caramel ribbons visible throughout dough, not completely homogeneous tan mixture. The swirling creates those beautiful veins of caramel that will concentrate into pockets during baking.
Step 10: The Essential Chill
Cover dough bowl tightly with plastic wrap, pressing directly onto dough surface to prevent crust formation. Refrigerate minimum 2 hours, preferably 4 hours or overnight.
This chilling serves multiple critical functions: firms butter so cookies maintain shape rather than spreading into puddles; allows flour to fully hydrate, creating more cohesive dough; lets flavors meld and intensify; makes dough easier to handle and portion.
I cannot overstate this step’s importance. Skipping or shortening the chill produces flat, greasy cookies lacking proper texture. If you’re tempted to rush, resist. This is where patience transforms good cookies into exceptional ones.
Phase 3: The Baking Alchemy
Step 11: Oven Preparation and Cookie Portioning
Preheat oven to 350°F (175°C). Position racks in upper and lower thirds of oven. Line baking sheets with parchment paper or silicone baking mats.
Remove dough from refrigerator. It will be quite firm—this is correct. Using cookie scoop (2-tablespoon capacity for substantial cookies, or adjust size preference), portion dough onto prepared sheets. Space cookies 3 inches apart—they’ll spread considerably during baking.
If dough is too firm to scoop easily, let sit at room temperature 10-15 minutes until slightly softened but still cold. Working with very cold dough produces the best texture—those crispy edges and soft centers we’re seeking.
Step 12: The Transformation in Heat
Bake one sheet at a time (for most consistent results) or two sheets simultaneously with rotation. Bake 12-15 minutes, rotating sheet 180 degrees halfway through if baking single sheet, or swapping sheet positions and rotating if baking two.
Watch for visual cues: edges will turn golden brown and firm; centers will appear slightly underdone, even a bit puffy and pale. The surfaces will crack beautifully, revealing the cookie’s interior. Remove when edges are set and golden but centers still look soft—they’ll continue cooking on hot sheet during cooling (carryover cooking).
The timing depends on many variables: your oven’s accuracy, cookie size, how cold dough was, sheet pan thickness. Start checking at 11 minutes, then watch closely. The difference between perfect and overbaked is mere 1-2 minutes.
Step 13: The Crucial Cool-Down
Let cookies rest on baking sheet for 5 minutes after removing from oven. During this rest, they’ll firm up enough to transfer without breaking while centers set to ideal chewy consistency.
After 5 minutes, use thin metal spatula to transfer cookies to wire cooling rack. If cookies stick, they needed another minute on the sheet—be patient.
Step 14: The Finishing Flourish
While cookies are still warm (within first 2-3 minutes of rack time), sprinkle with flaky sea salt—just a few crystals per cookie. The residual warmth helps salt adhere while its minerals will bloom on the tongue during eating, amplifying every flavor.
Optional but stunning: drizzle with additional warmed salted caramel after cookies cool completely. This creates bakery-worthy presentation and intensifies caramel presence.
Petit Conseil Pro: The Secrets Behind Perfect Execution
Through countless batches—triumphs where cookies achieved that elusive perfect texture, and learning experiences where they emerged too flat, too cakey, or with caramel distribution issues—I’ve accumulated insights elevating good cookies to transcendent.
The Cream Cheese Temperature Truth
This bears repeating because it’s the most common failure point: cream cheese must be genuinely room temperature. Cold cream cheese creates lumps impossible to eliminate once flour is added. The test: press finger into cream cheese—it should indent easily without resistance. If it feels firm or cold, wait longer. When properly softened, it should be spreadable like soft butter.
The Caramel Consistency Calibration
Homemade caramel’s thickness determines how it performs in cookies. Too thin (sauce consistency) and it absorbs completely into dough, losing its identity. Too thick (candy-firm) and it doesn’t swirl or melt during baking. The target: thick honey or spreadable jam consistency at room temperature. If your caramel is too thin, return to stove and cook an additional 1-2 minutes to evaporate more moisture; if too thick, stir in tablespoon of cream to loosen.
The Swirling Strategy
When incorporating caramel, less is more regarding mixing. Overzealous swirling creates homogeneous tan dough lacking caramel pockets. You want visible ribbons and concentrated areas—these create those moments in eating where you hit pure caramel. Aim for marbled appearance, not uniform color.
The Size-Texture Relationship
Cookie size dramatically affects texture outcome. Larger cookies (3-tablespoon portions) develop more pronounced crispy-chewy contrast—crispy edges, molten centers. Smaller cookies (1-tablespoon portions) bake more evenly throughout, creating uniform texture. I prefer 2-tablespoon portions as optimal balance—substantial enough for textural variation yet manageable to eat.
The Underbaking Wisdom
These cookies finish cooking during rest time on hot baking sheet. What looks underdone in oven becomes perfect after 5 minutes of cooling. Cookies baked until centers appear “done” will be dry and cakey after cooling—a tragic outcome for such luxurious dough. Trust the process: remove when edges are golden and set but centers still look soft and slightly puffy.
The Overnight Advantage
While 2-hour minimum chill suffices, overnight refrigeration produces noticeably superior cookies. The extended cold period allows flour to fully hydrate, enzymes to break down starches into sugars (enhancing caramelization during baking), and flavors to meld completely. Whenever possible, mix dough a day ahead.
The Freezing Revelation
These cookies freeze brilliantly at two stages: as portioned dough balls (freeze on sheet until solid, transfer to freezer bag, bake directly from frozen adding 2-3 minutes to baking time), or as baked cookies (cool completely, freeze in layers separated by parchment, thaw at room temperature or warm gently in low oven). Having cookie dough in your freezer is having happiness in reserve—bake fresh cookies whenever the need arises.
Variations et Personnalisation: Exploring the Flavor Universe
Once you’ve mastered the foundational recipe, infinite variations await exploration—each adding new dimension while maintaining the core magic of cream cheese tanginess and caramel richness.
Dark Chocolate Variation: Replace white chocolate chips with dark chocolate chunks (60-70% cacao). The bitter notes complement salted caramel beautifully while cream cheese’s tang bridges the flavors. Consider adding ½ teaspoon espresso powder to dough for mocha undertones.
Pecan Praline Version: Add ¾ cup toasted, chopped pecans to dough along with chocolate chips. Replace half the salted caramel with homemade praline (caramelized sugar with toasted pecans). This creates Southern-inspired complexity—buttery pecans with caramel’s sweetness.
Brown Butter Elevation: Brown the butter before using (cook until milk solids turn golden and smell nutty, then cool to room temperature). This adds incredible depth—nutty, almost toffee-like notes that enhance caramel’s complexity. Account for moisture loss: add 2 tablespoons water when using browned butter.
Espresso Salted Caramel: Add 1 tablespoon instant espresso powder to caramel during preparation. Coffee and caramel are classic companions—the bitter coffee notes create sophisticated complexity while amplifying sweetness perception without adding sugar.
Turtle Cookie Remix: Add ½ cup toasted pecans and ½ cup dark chocolate chunks. Increase caramel swirl amount. Finish with extra caramel drizzle and sea salt. This approximates beloved turtle candy (caramel-pecan-chocolate combination) in cookie form.
Bourbon Caramel Sophistication: Add 2 tablespoons bourbon to caramel after removing from heat (the alcohol will mostly cook off but flavor remains). The oaky vanilla notes of bourbon complement caramel’s butterscotch character while adding adult sophistication.
Accompagnements Suggérés: The Complete Sensory Experience
These salted caramel cheesecake cookies are substantial enough to stand alone, yet certain pairings elevate them into transcendent dessert experiences.
Beverage Companions
Coffee Pairing: The classic choice. A robust, medium-dark roast coffee’s bitter notes provide perfect counterpoint to cookies’ sweetness. The tannic quality cleanses palate between bites, preventing sweetness fatigue. Cold brew’s smooth, less acidic profile also pairs beautifully—the cold coffee’s sweetness echoes caramel while cream cheese’s tang brightens overall impression.
Milk (The Nostalgic Classic): Never underestimate whole milk’s power—its fat content coats the palate, moderating sweetness while protein and minerals enhance flavor perception. The cookies’ richness practically demands milk’s refreshing simplicity. For adults seeking childhood comfort, this pairing cannot be surpassed.
Dessert Wine: Late harvest Riesling or Sauternes—these sweet wines possess acidity balancing cookies’ richness. The wine’s honeyed notes harmonize with caramel while sufficient acidity prevents cloying sweetness. Serve small portions—this is indulgence squared.
Bourbon or Rum: A small pour of quality bourbon (neat or on rocks) creates sophisticated dessert course. The spirit’s vanilla-caramel notes echo cookie flavors while alcohol cuts through richness. Dark rum works similarly, adding molasses depth.
Presentation and Service
Warm from Oven: Serve within 30 minutes of baking when they’re still slightly warm, edges crispy but centers molten. This is peak cookie experience—place on beautiful plate, perhaps with small scoop of vanilla ice cream slowly melting alongside.
Ice Cream Sandwich: Use two cooled cookies to sandwich premium vanilla, salted caramel, or coffee ice cream. Press gently until ice cream reaches cookie edges. Wrap in parchment and freeze 2 hours before serving. This transforms cookies into architectural dessert.
Plated Dessert: For dinner parties, present individually: place cookie on plate, add small scoop of crème fraîche or mascarpone, drizzle with caramel sauce, garnish with sea salt flakes and perhaps candied pecan. Suddenly, your cookie becomes restaurant-worthy finale.
Gift Giving: Layer cooled cookies in decorative tin or box with parchment between layers. Include card noting storage instructions and gentle reheating method (300°F for 5 minutes restores fresh-baked texture). These cookies communicate care and sophistication—perfect hostess gift or holiday present.
Seasonal Considerations
Fall/Winter Service: Serve slightly warm with hot apple cider or mulled wine. The warming spices complement caramel’s butterscotch notes while creating cozy, seasonal experience.
Spring/Summer Lightness: Serve at room temperature with iced coffee or cold milk. Consider adding fresh berries to plate—their tartness cuts richness while providing color contrast.
La Science Derrière la Magie: Understanding the Chemistry
For those who find satisfaction in understanding the “why” behind the “how,” exploring the biochemistry and physics underlying these cookies deepens both appreciation and troubleshooting capability.
The Maillard Reaction and Caramelization
Two distinct chemical processes create these cookies’ complex flavor and golden color:
Caramelization: Pure sugar heated above 320°F breaks down (pyrolysis) into hundreds of new compounds—some bitter, some nutty, some butterscotch-like. This occurs in both the caramel swirl and on cookie surfaces during baking.
Maillard Reaction: Amino acids (from butter, eggs, cream cheese) react with reducing sugars at temperatures above 285°F, creating savory, complex flavors and brown coloration. This is why these cookies taste more sophisticated than their ingredient list might suggest—the Maillard reaction creates umami depth balancing sweetness.
Gluten Development and Texture
The difference between tender and tough cookies often comes down to gluten—the protein network formed when wheat flour’s glutenin and gliadin proteins encounter water and mechanical mixing.
Minimal Mixing: This recipe specifies mixing just until flour disappears precisely to minimize gluten development. Overworking dough after flour addition creates strong gluten networks resulting in tough, cakey cookies rather than tender, chewy ones.
Fat’s Tenderizing Role: Butter and cream cheese coat flour particles, interfering with gluten formation—a process called “shortening.” This is why high-fat doughs produce tender results.
Spread and Structure
Cookie spread during baking results from complex interactions:
Initial Melting: As oven heat penetrates dough, butter melts. The liquid fat allows dough to flow outward.
Steam Leavening: Water in dough (from cream cheese, eggs, butter) vaporizes, creating steam that pushes dough upward and outward.
Structure Setting: As internal temperature reaches about 150°F, proteins coagulate and starches gelatinize, setting structure. Timing of this setting determines final shape—delayed setting creates flat cookies; early setting produces thick, cakey cookies.
Chilling’s Impact: Cold dough takes longer to heat, delaying butter melting. This limited spread time produces thicker cookies. Room-temperature dough spreads more before structure sets.
À Vos Tabliers: Your Cookie Journey Begins
The ingredients await in your pantry and refrigerator. The science and technique stand ready to guide your hands. Between you and salted caramel cheesecake cookies that will become legendary among your circle lies only commitment to process—the patience for overnight chilling, the attention to cream cheese temperature, the courage to remove cookies from oven when centers still appear underdone.
Your first batch may emerge slightly different from imagined perfection—perhaps a bit too flat, maybe with caramel that pooled rather than swirled, or with centers that set more firmly than the molten ideal. These are not failures but education. Each batch builds tactile knowledge that recipes cannot fully convey—how properly creamed butter feels, the exact shade of amber caramel should reach, that crucial moment when cookies transform from dough to deliciousness.
What draws you to this recipe? Is it nostalgia for cheesecake, fascination with caramel’s complexity, or simply hunger for something extraordinary? Whatever your motivation, document your journey—photograph your results, note your observations, refine your technique with each attempt.
Share your creations, your challenges, your variations in comments below. Did you brown the butter? Add bourbon to the caramel? Discover the perfect beverage pairing? Your experiences contribute to our collective knowledge, elevating everyone’s baking through shared wisdom.
The mixer awaits. The cream cheese softens on your counter. The caramel you’ll prepare (or open) promises liquid gold to thread through cookie dough. The only remaining ingredient is your willingness to engage with this beautiful, complex process—to trust that patience and attention yield rewards far exceeding the sum of mere ingredients.
À vos tabliers et bon appétit!