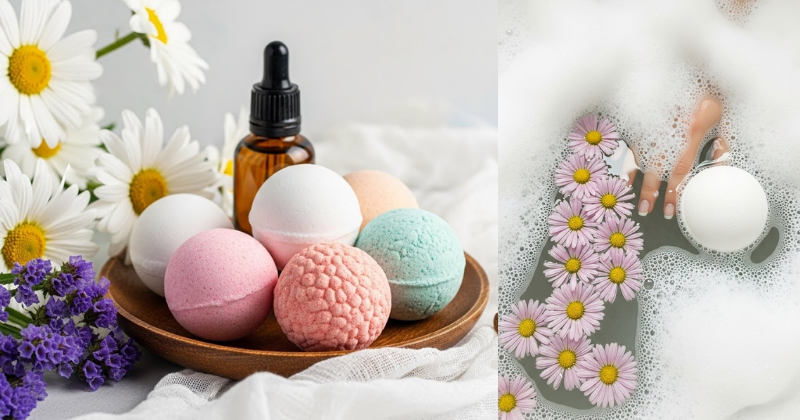
Are you tired of store-bought bath bombs that leave your skin irritated or contain a long list of questionable chemicals? If you love luxurious soaking but crave transparency and purity, it’s time to take control of your self-care routine! Making your own simple bath bomb recipe all-natural ingredients is a fun, achievable Home Tips & DIY project that guarantees a clean, fizzy, and skin-loving experience. This comprehensive guide will empower you to transform your tub time and discover the massive cost-saving benefits of crafting personalized, high-quality bath treats at home. Get ready to unlock the secrets to the perfect, natural fizz!

🛑 Important Disclaimer
Important Disclaimer: This article is for informational purposes only and should not replace professional advice. For health-related topics, consult healthcare providers. For financial or legal matters, seek qualified professional guidance. For safety procedures, verify current best practices and local regulations. Individual results may vary, and personal circumstances should always be considered when implementing any suggestions.
🧪 Section 1: Foundation First: The Science of the Fizz
Before mixing a single ingredient for your simple bath bomb recipe all-natural ingredients, it’s essential to build confidence with basic concepts about the chemical reaction that creates the famous fizz.
H3: Building Confidence with Basic Concepts: The Acid-Base Reaction
The magic of a bath bomb is a simple acid-base reaction that only occurs when the dry ingredients are exposed to water.
- The Acid: Citric Acid. This is a weak organic acid, naturally found in citrus fruits.
- The Base: Baking Soda (Sodium Bicarbonate). This is a crystalline salt.
- The Reaction: When both are dissolved in water ($\text{H}_2\text{O}$), they react to produce carbon dioxide ($\text{CO}_2$) gas, water, and a salt. The $\text{CO}_2$ is what creates the enjoyable, bubbling fizz:$$\text{C}_6\text{H}_8\text{O}_7 (\text{aq}) + 3\text{NaHCO}_3 (\text{aq}) \rightarrow \text{Na}_3\text{C}_6\text{H}_5\text{O}_7 (\text{aq}) + 3\text{H}_2\text{O} (\text{l}) + 3\text{CO}_2 (\text{g})$$
- The Ratio: The ratio of Baking Soda to Citric Acid should be approximately 2:1 (two parts Baking Soda to one part Citric Acid) by volume or weight for the best fizz and stability.
H3: Addressing Common Concerns: Why Use All-Natural Ingredients?
Many commercial bath bombs use synthetic dyes, harsh fragrances, and petroleum-based binding agents. This simple bath bomb recipe all-natural ingredients focuses solely on skin-friendly elements.
- Skin Safety: Substituting harsh colorants for natural mica or clays, and using pure essential oils instead of synthetic perfumes, drastically reduces the risk of skin irritation or allergic reactions, supporting gradual progress toward better skin health.
- Encouraging Reassurance for Beginners: Because we use simple, recognizable ingredients, this project is less intimidating than you might think. We prioritize safety considerations by using natural binders like cocoa butter instead of water-based sprays, which can prematurely trigger the fizz.
🥥 Section 2: Step-by-Step Process: The All-Natural Recipe
This step-by-step guidance ensures you have clear, actionable language to create stable, beautiful bath bombs.
Ingredients and Tool Requirements (Yields 4-6 Medium Bombs)
| Dry Ingredient (By Volume) | Quantity | Purpose | Tool Requirement |
| Baking Soda (Sodium Bicarbonate) | 1 cup | The Base/Fizzing Agent | Large Mixing Bowl |
| Citric Acid (Fine Grain) | 1/2 cup | The Acid/Fizzing Agent | Whisk and Sifter |
| Cornstarch or Arrowroot Powder | 1/4 cup | Filler, slows reaction, makes bath silky | Bath Bomb Molds (Metal or Plastic) |
| Wet Ingredient (By Weight) | Quantity | Purpose | Safety Consideration |
| Carrier Oil (Fractionated Coconut or Almond) | 1 Tbsp | Moisturizer and Binder | Wear Gloves |
| Cocoa or Shea Butter (Melted) | 1 Tbsp | Hardening Binder, Skin Softener | Glass bowl for melting |
| Essential Oil Blend (See Section 3) | $15 \text{-} 20 \text{ drops}$ | Scent, Aromatherapy (e.g., Lavender) |
Step-by-Step Process (Core Methods)
- Combine Dry Ingredients: In a large, dry bowl, thoroughly whisk and sift together the Baking Soda, Citric Acid, and Cornstarch. Sifting is vital—it breaks up clumps and ensures a homogeneous mix, leading to a better fizz.
- Combine Wet Ingredients: In a separate, small glass bowl, mix the Carrier Oil, melted Cocoa/Shea Butter, and your Essential Oil Blend.
- The Binding Stage (Timing and Planning Considerations): ACTION ALERT! Slowly drizzle or spray the wet mixture into the dry ingredients while continuously whisking with your other hand. This is the most crucial step! Adding the liquid too quickly will trigger the fizz. The dry mixture should gradually take on the consistency of slightly damp sand—it should hold its shape firmly when squeezed in your fist but still crumble slightly when poked.
- Mold and Press: Immediately press the mixture firmly into your bath bomb molds. Overfill each half, press them together tightly, and brush away any excess powder around the seam. The key to a non-cracking bomb is pressing firmly.
- Curing: Carefully unmold the bombs onto a towel or tray after about $1 \text{ minute}$ of pressing. Let the simple bath bomb recipe all-natural ingredients cure in a cool, dry place for a minimum of 24-48 hours until they are rock hard. Do not rush this step!
🌸 Section 3: Advanced Strategies: Customizing for Wellness
Now that you’ve mastered the basic simple bath bomb recipe all-natural ingredients, you can apply expert-level insights to customize your bath bombs for targeted wellness topics.
H3: Creative Solutions: Natural Colorants and Clay Boosts
Ditch the synthetic dyes and utilize natural powders to create beautiful colors and added benefits.
| Natural Additive | Quantity (Added in Step 1) | Color/Benefit | Ways to Customize Approach |
| Pink Kaolin Clay | 1 tsp | Gentle pink hue, detoxifying | Great for sensitive skin |
| Spirulina Powder | 1/2 tsp | Light green hue, rich in antioxidants | Use for a revitalizing bath |
| Dried Rose Petals/Lavender Buds | 1 tsp per bomb (placed in mold) | Texture and decoration | Encourage experimentation with herbal infusions |
H3: Customizing the Aromatherapy Blend
Use pure essential oils (EOs) to provide sustainable lifestyle changes for mental self-care.
| EO Blend (Drops) | Wellness Focus | Benefits |
| Lavender ($10$) + Chamomile ($5$) + Cedarwood ($5$) | Sleep & Relaxation | Calming, promotes deep rest |
| Sweet Orange ($10$) + Grapefruit ($5$) + Peppermint ($5$) | Energy & Mood Boost | Invigorating, great for morning baths |
| Eucalyptus ($10$) + Tea Tree ($5$) + Frankincense ($5$) | Muscle Relief & Immune | Clearing, anti-inflammatory support |
🔧 Section 4: Troubleshooting and Common Challenges
Making the simple bath bomb recipe all-natural ingredients is straightforward, but humidity is the ultimate enemy. Here are solutions to common Home Tips & DIY challenges.
Featured Snippet Potential: “Why did my homemade bath bombs crumble or fall apart after I unmolded them?”
Your homemade bath bombs crumbled or fell apart because the mixture was too dry, lacking sufficient binder (oil/butter), or they were unmolded too quickly before the structure could set. The simplest fix for a too-dry batch is to quickly re-mix the crumbled powder with a fine mist of rubbing alcohol (never water), adding moisture without triggering the fizz. Always press the mixture extremely firmly into the mold and allow a full 24-48 hours to cure.
Practical Troubleshooting Tips (DIY Focus)
- Problem: The mixture is mushy and fizzes when I touch it.
- Obstacle: You added the liquid too quickly, or there is too much humidity in the air.
- Solution: Alternative Approaches: Quickly add $1 \text{ tablespoon}$ of extra Baking Soda and $1/2 \text{ tablespoon}$ of extra Citric Acid to soak up the excess moisture and re-balance the $\text{pH}$. Work quickly and try to get the remaining mix into the molds immediately.
- Problem: The bath bombs are soft even after 24 hours.
- Obstacle: Too much oil or liquid was used, preventing the starches from hardening properly.
- Solution: Encouragement for Setbacks: Gently place the soft bombs back into the molds and let them cure for an extra $48 \text{ hours}$ in a location with lower humidity. Next time, measure your liquid binders precisely.
- Problem: The finished bath bomb sinks to the bottom instead of floating/fizzing on top.
- Obstacle: The bomb was packed too densely, or the cornstarch ratio is slightly off.
- Solution: Preventive Measures: While firm packing is necessary, you want the final mixture to have small pockets of air. Try filling the mold slightly more loosely. Ensure the water temperature in the bath is warm (not scalding hot) for the optimal reaction.
🚀 Section 5: Maximizing Results: Next Level Bath Experience
You’ve successfully crafted your simple bath bomb recipe all-natural ingredients. Here’s how to build upon basic success and ensure the longest shelf life and best results.
- Show How to Build Upon Basic Success: Layered Scents. For a complex, professional aroma, use two different essential oil blends. For instance, put a calming Lavender base mixture into one half of the mold and a bright Citrus blend into the other half. When the bomb fizzes, the scents meld together beautifully.
- Maintenance and Long-Term Considerations: The biggest threat to your cured bath bombs is moisture. Store your finished bombs individually wrapped in cling film or placed inside an airtight container in a dry, dark cabinet. This prevents them from absorbing ambient moisture, ensuring they last for $6 \text{-} 12 \text{ months}$ and keeping the oils potent.
- Suggest Complementary Strategies: Post-Bath Moisturizing: The all-natural ingredients in the bath bomb (oils and butters) already condition your skin, but immediately after leaving the tub, apply a DIY body butter (made with shea butter and jojoba oil). Applying moisture when the skin is damp seals in the hydration for maximum wellness benefits. (Internal Linking Opportunity: Check out our guide on DIY Eucalyptus Shower Steamers for Congestion Relief for non-bath days.)
✅ Conclusion: Your Capability to Create Pure Self-Care
You have successfully learned the simple bath bomb recipe all-natural ingredients and overcome the challenges of moisture and crumbling. By understanding the $2:1$ acid-base ratio and prioritizing natural oils and colors, you have transformed your Home Tips & DIY skills into the ability to create luxurious, personalized self-care products. This project proves your capability to succeed in controlling the ingredients that touch your skin, leading to healthier, happier bath times.
Ready to fill your tub with fizz? Which essential oil blend—the calming Lavender or the energizing Citrus—will you try first?