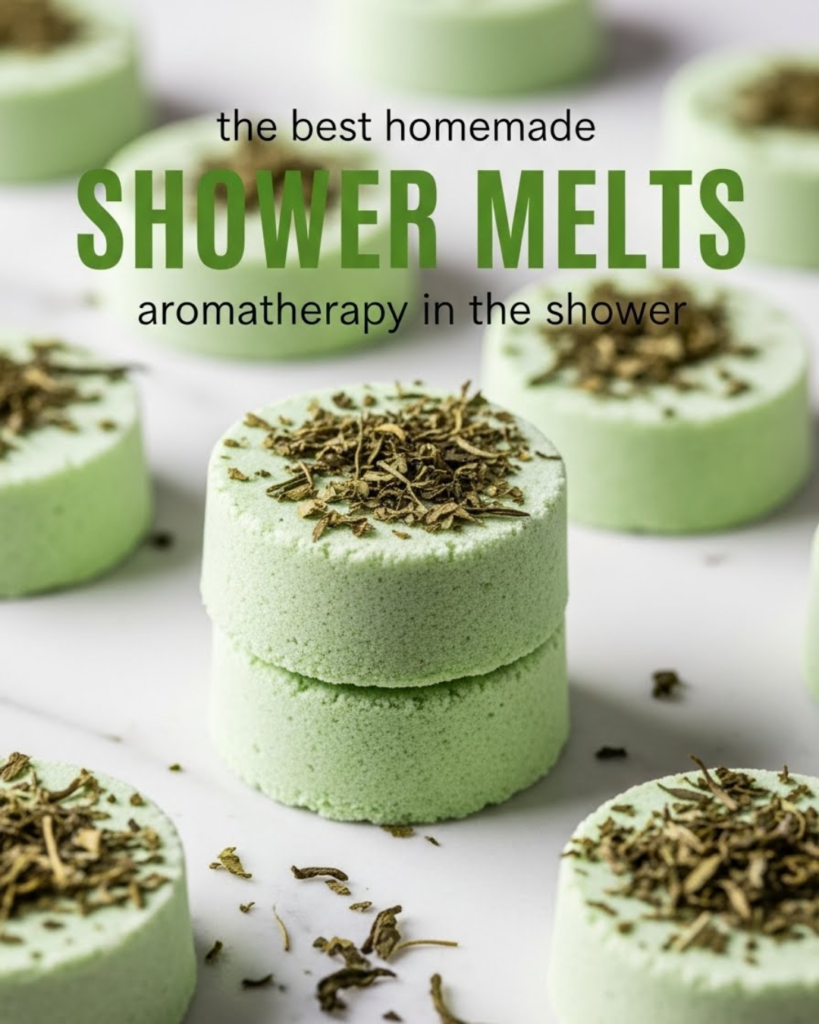
Learn how to make the best DIY shower melts for shower aromatherapy using essential oils. Discover a simple way to transform your daily shower into a spa.
Have you ever had one of those mornings where you feel like you’re moving through a fog, or perhaps a long day that leaves your mind racing at bedtime? We all deserve a moment of tranquility, but finding the time for a full spa day is often impossible. Imagine if you could “unlock” a professional aromatherapy experience every single time you stepped into your own bathroom. Today, you are going to discover how to create the best DIY shower melts for shower aromatherapy—tiny powerhouses of scent that dissolve in the steam to lift your mood, clear your sinuses, or help you drift into a peaceful sleep.
By mastering this simple craft, you will gain the confidence to eliminate synthetic air fresheners and replace them with natural, botanical wellness. This guide offers achievable, step-by-step guidance to help you create customized “shower bombs” using basic pantry staples. You have the capability to transform a mundane chore into a luxurious ritual. Get ready to discover how simple ingredients like baking soda and essential oils can achieve a total breakthrough for your mental clarity and physical relaxation!
Foundation: The Science of Steam and Scents
Before we start mixing, let’s build your confidence with the basic concepts of how aromatherapy works in the shower. Understanding the “why” will help you appreciate why the best DIY shower melts for shower aromatherapy are so effective.
How Aromatherapy Works with Steam
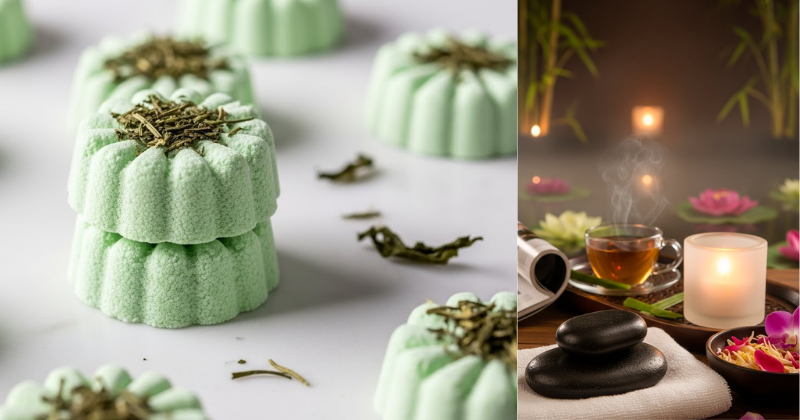
When you place a shower melt on the floor of your stall, the warm water causes it to slowly dissolve, releasing the essential oils trapped inside. The rising steam carries these microscopic oil droplets into the air, where they are inhaled and interact with your olfactory system. This system is directly linked to the limbic system—the part of the brain that manages emotions and memory—allowing for an almost instant shift in your state of mind.
The Core Ingredients
To achieve a high-quality result, you only need a few key components:
- Baking Soda: This serves as the structural base, holding the oils until they are ready to be released.
- Water: The binder that turns the powder into a moldable paste.
- Essential Oils: The “soul” of the melt, providing the therapeutic benefits.
- Optional Cornstarch: Helps the melt dissolve more slowly for a longer-lasting scent.
Reassurance for Beginners
If you have never made your own wellness products before, don’t worry! You are doing a great job by exploring natural alternatives. This process is much simpler than making bath bombs because we don’t need a complex chemical reaction to make them fizz. You have everything you need to succeed right in your kitchen.
Step-by-Step: Creating Your Custom Shower Elixirs
Ready to experience the transformation? Follow these manageable steps to craft your first batch. This is the core method for making the best DIY shower melts for shower aromatherapy with zero stress.
1. Gather Your Supplies
To create approximately 12 melts, you will need:
- 2 cups Baking Soda
- 1/2 cup Water (added slowly)
- 30-40 drops of High-Quality Essential Oils
- A Silicone Mold (ice cube trays or muffin tins work too!)
2. The Mixing Process
- Step 1: Place the baking soda in a glass bowl. If you are using cornstarch for a slower melt, mix in 1/2 cup now.
- Step 2: Add the water one tablespoon at a time. Whisk thoroughly after each addition.
- Step 3: Test the texture. It should feel like “damp sand”—when you squeeze a handful, it should hold its shape without crumbling or feeling “mushy.”
- Step 4: Add your essential oils and stir well to ensure the scent is distributed evenly.
- Step 5: Press the mixture firmly into your molds. The harder you press, the better they will stay together.
3. The Drying Phase
Let your melts dry for at least 24 to 48 hours. If you are in a rush, you can “bake” them in an oven at a very low temperature (around 175°F) for 45 minutes, but air-drying preserves the delicate essential oils better.
- Internal Link: While you wait for your melts to dry, why not try another quick wellness hack like discovering the Turmeric Water Benefits for your morning health routine?
Advanced Strategies: Pro Blends for Every Mood
Once you have the basic technique down, use these expert-level insights to customize your melts for specific health and wellness goals.
The “Morning Wake-Up” Blend
To fight morning grogginess, use a combination of Peppermint and Sweet Orange. Peppermint stimulates the mind, while citrus oils provide a boost of serotonin to start your day with a smile.
The “Sinus Soother” Variation
If you are feeling under the weather, a blend of Eucalyptus, Rosemary, and Tea Tree can achieve a total breakthrough for your breathing. The steam combined with these oils acts as a natural decongestant.
- Internal Link: For a complete lung-support routine, you might also enjoy our Herbal Tea Recipe for Lung Detox to use after your aromatic shower.
Featured Snippet: Where do you place a shower melt for the best results?
To get the best results from your DIY shower melts, place the tablet on the floor of the shower away from the direct stream of water. Ideally, it should be in a corner where it gets lightly splashed but not drenched. This allows it to dissolve slowly and steadily, releasing a consistent stream of aromatherapy throughout your entire shower rather than washing down the drain instantly.
Troubleshooting: Common Challenges and Solutions
Even the most achievable DIY projects can have a few hiccups. Here is how to handle them with an empowering mindset:
- “My melts are crumbling”: This usually means they didn’t have enough water or weren’t pressed hard enough into the mold.
- Solution: You can still use the crumbles! Just sprinkle them on the shower floor. Next time, add a few more drops of water until the “damp sand” texture is perfect.
- “The scent is too weak”: Essential oils can evaporate if the melts are left out too long.
- Fix: Always store your finished melts in an airtight glass jar. If they have already lost their scent, you can add 2 drops of oil directly onto the melt right before you step into the shower.
- “They are dissolving too fast”:
- Tip: Add 1/4 cup of Citric Acid to your next batch. While this makes them fizz, it also hardens the structure, making them more resilient to the water.
- Internal Link: If your shower floor gets a bit slippery from the oils, our guide on Making Your Own Non-Toxic Cleaning Wipes is the perfect solution for a quick post-shower wipe down.
Maximizing Results: Creating a Sanctuary
Now that you have the best DIY shower melts for shower aromatherapy, let’s build upon that success by optimizing your environment for maximum relaxation.
The “Aura” of the Bathroom
Lighting and sound play a huge role in how your brain processes the aromatherapy. Dim the lights and play soft nature sounds or binaural beats. When you step into that steam filled with lavender or eucalyptus, your body will recognize the signal to “shut down” the stress response.
Maintenance and Long-Term Use
To keep your sanctuary sparkling, drop a DIY Toilet Cleaner Pod into the bowl before you hop in the shower. By the time you are done with your aromatherapy session, the bathroom will be clean and smelling wonderful from top to bottom!
Conclusion: Reclaim Your Daily Ritual
You have now discovered how to make the best DIY shower melts for shower aromatherapy and, more importantly, you have the achievable steps to start today. You have moved from someone who just “takes a shower” to someone who curates a therapeutic experience. By following these methods—mixing the perfect texture, choosing synergistic oil blends, and storing them properly—you have achieved a strategy for better mental health and daily joy.
The journey to a spa-like home is a rewarding path of self-care. We encourage you to mix your first batch this weekend! You are more than capable of achieving a high-quality, professional-level wellness routine using simple, safe ingredients.