Salut les gourmands!
Have you ever stood in the grocery aisle, agonizing over the $15 price tag for a tiny jar of gourmet chocolate nut butter? I certainly have! That’s exactly how this obsession with making my own Dark Chocolate Coconut Almond Butter began. I craved that rich, decadent spread, but I wanted it without the excess sugar and suspicious additives. This recipe is the result of many delicious experiments—a perfect blend of intense dark chocolate, creamy toasted almonds, and a tropical hint of coconut. It’s more than just a spread; it’s a guilt-free pleasure, a superfood spread packed with healthy fats and antioxidants, and the ultimate way to transform your snacking game. Get ready to discover how easy it is to achieve this velvety smooth, deeply flavorful Dark Chocolate Coconut Almond Butter right in your own kitchen!
🥜 Recipe Overview: Dark Chocolate Coconut Almond Butter
Making homemade nut butter takes a bit of time, but the effort is almost entirely passive, thanks to your food processor. The result is a customizable, preservative-free dark chocolate almond butter that is far superior to anything store-bought.
| Feature | Detail |
| Prep Time | 10 minutes |
| Roasting Time | 15 minutes |
| Processing Time | 15-20 minutes |
| Yield | About 2 cups |
| Difficulty | Medium (Requires patience for processing) |
| Origin | A healthy obsession with gourmet spreads |
This Dark Chocolate Coconut Almond Butter aligns perfectly with the wellness topics trend towards clean, whole-food ingredients. We are taking raw almonds and transforming them into a luxurious superfood spread that offers both indulgence and nutritional benefits, making it an excellent example of sustainable lifestyle changes.
🌰 Ingredients: Quality is the Key to Flavor
Since this recipe has so few ingredients, the quality of each component directly impacts the final flavor. Invest in good quality dark chocolate and fresh almonds.
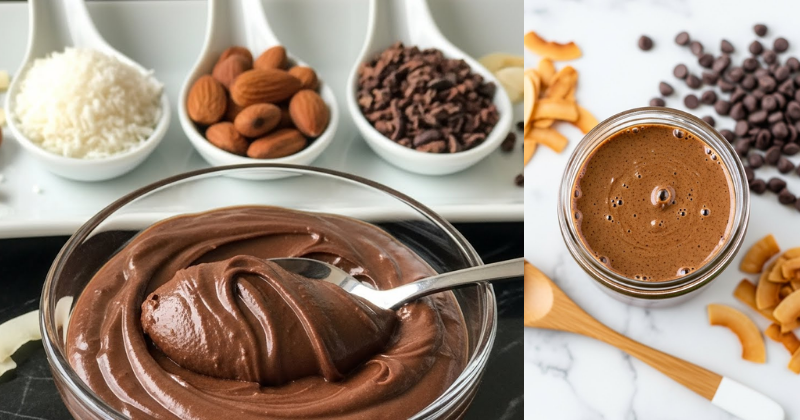
- 2 cups Raw Almonds (whole or slivered)
- 1/2 cup Shredded Unsweetened Coconut
- 1/4 cup Dark Chocolate chips or chopped Dark Chocolate Bar (at least 70% cocoa)
- 2 tbsp Coconut Oil (virgin or refined)
- 1/4 tsp Sea Salt
- 1 tbsp Maple Syrup or Honey (optional, adjust to taste)
H3: Ingredient Deep Dive: The Almond-to-Butter Transformation
The process of turning raw almonds into a smooth, creamy superfood spread relies on friction and heat.
- Almonds (Healthy Fats): Almonds are rich in monounsaturated fats, fiber, and Vitamin E. Roasting them is essential as the heat releases these oils, making the processing much smoother and imparting a deep, nutty flavor that is crucial for the final Dark Chocolate Coconut Almond Butter.
- Dark Chocolate (Antioxidants): Choosing dark chocolate (70% or higher) maximizes the antioxidant content and minimizes sugar. This contributes to the healthy aspect of the almond butter while providing a rich, satisfying cocoa flavor.
- Coconut Oil (Velvet Texture): A small amount of coconut oil helps the final blend achieve that coveted, velvety smooth texture and reinforces the coconut flavor.
🔪 Preparation: The Art of Processing Nut Butter
Patience is your most important tool here. The transformation from chopped nuts to a creamy, pourable superfood spread takes time in the food processor.
Step 1: Toasting for Deep Flavor
- Preheat your oven to $350^{\circ} \text{F}$ ($175^{\circ} \text{C}$).
- Spread the raw almonds and the shredded coconut in a single layer on a baking sheet.
- Toast for $10 \text{-} 15$ minutes, stirring halfway through. The almonds should be fragrant and slightly browned, and the coconut should be lightly toasted (watch carefully so it doesn’t burn!).
- Remove from the oven and allow them to cool for $5 \text{ minutes}$. This is a crucial practical tip for releasing the oils.
Step 2: The Nut Butter Transformation
- Transfer the warm, toasted almonds and coconut to a high-powered food processor fitted with the S-blade.
- Process continuously, scraping down the sides every minute or two. This is where the patience comes in! The mixture will go through four distinct stages:
- Stage 1 (0-3 minutes): Finely chopped powder.
- Stage 2 (3-7 minutes): Sticky, thick paste (it will look like it’s done, but it’s not!).
- Stage 3 (7-12 minutes): A dry, sandy ball forming around the blade. Keep processing!
- Stage 4 (12-20 minutes): The mixture will suddenly release its oil and transform into a smooth, liquid butter.
Step 3: Flavoring and Final Blend
- Once the butter is smooth and runny (Stage 4), add the melted dark chocolate, coconut oil, sea salt, and maple syrup (if using).
- Process for another $1 \text{-} 2$ minutes until everything is perfectly combined and the color is a uniform, deep chocolate brown.
- Taste and adjust the flavor—add more salt for contrast or more maple syrup for sweetness.
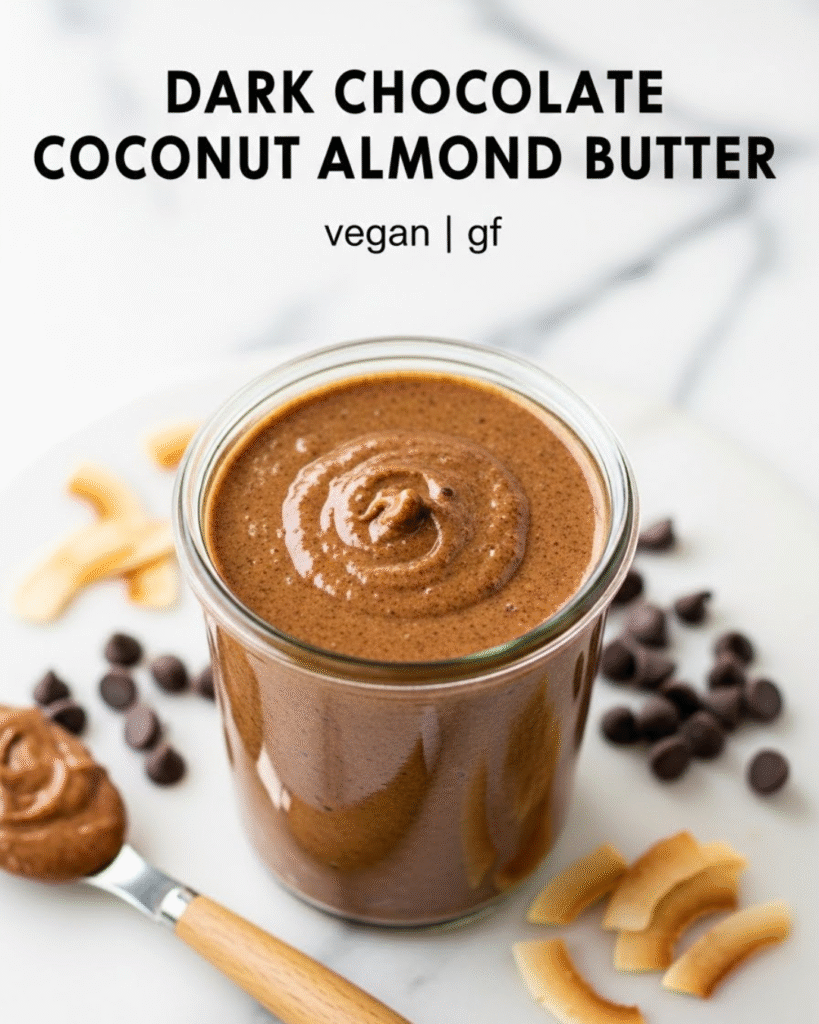
- Pour the finished Dark Chocolate Coconut Almond Butter into clean, air-tight jars. It will solidify slightly as it cools.
🥄 Petit conseil pro: Achieving Velvety Smoothness
While time is the main ingredient for smoothness, these personal cooking tips will guarantee a creamy texture worthy of a high-end gourmet shop.
- The Warm Blender Secret: Make sure the nuts are still slightly warm when you begin processing. Warm nuts release their oils faster and more completely than cold ones. If your food processor is struggling, run it for 5 minutes, give it a break, and try again. The machine’s heat will actually aid the process!
- The Coconut Oil Boost: While the recipe includes coconut oil, don’t be afraid to add another tablespoon if you find your blend is still too thick after 20 minutes of processing. Sometimes, the dryness of the almonds requires a little push to become a true superfood spread.
- Ask the Experts: Use a food processor over a blender if possible. Food processors are designed for the high torque needed to process thick mixtures like nut butter, ensuring a smoother, faster result. Blenders often struggle and can overheat.
🍓 Accompagnements Suggérés: Perfect Pairings
This rich Dark Chocolate Coconut Almond Butter is so decadent, it can be eaten by the spoonful! However, here are some great accompaniments that showcase its versatility.
- Classic Pairings: Spread it generously on warm toast, rice cakes, or, for an extra treat, on homemade banana bread.
- Fruit Dip: Use it as a dip for sliced apples, pears, or bananas. The fruit’s freshness balances the richness of the superfood spread beautifully.
- Breakfast Boost: Swirl a dollop into your morning oatmeal, or use it to flavor a post-workout protein shake. This simple step helps maintain a focus on healthy eating and clean fuel.
📝 Troubleshooting & Variations: Making the Spread Your Own
Don’t let minor issues hold you back! This dark chocolate almond butter recipe is flexible.
Featured Snippet Potential: “How should I store homemade almond butter and how long does it last?”
You should store homemade almond butter in a clean, airtight jar in the refrigerator. Because this superfood spread does not contain added preservatives, refrigerating it prevents the natural oils from going rancid. Properly stored Dark Chocolate Coconut Almond Butter will last for about 3-4 weeks. If you prefer a runnier texture, simply stir it well and let it sit at room temperature for 30 minutes before using.
Practical Troubleshooting Tips (Anecdotes and Advice)
- Problem: The food processor stopped and the mixture turned into a stiff ball (Stage 3).
- Obstacle: This is the dreaded “sand ball” stage! It looks like you’ve failed, but I promise, this is normal and necessary.
- Solution: Scrape down the sides of the bowl thoroughly, add $1 \text{ tbsp}$ of the coconut oil, and restart the processor. The added oil gives the friction process the push it needs to release the almonds’ natural oils and transform into butter.
- Problem: The coconut flavor is overpowering (Customization).
- Obstacle: Personal preference for a milder coconut note.
- Solution: Next time, substitute up to half of the shredded coconut with flax seeds or chia seeds (great superfood additions!). This provides the same texture but with a much milder flavor and a focus on wellness topics like added fiber.
- Problem: The dark chocolate didn’t fully melt into the butter.
- Obstacle: The almond butter mixture was too cool when the chocolate was added.
- Solution: Scoop the finished butter back into a heat-safe bowl, place it over the double boiler (turn the heat off, just use residual warmth), and stir until the chocolate streaks dissolve completely. Stir and chill again. This is an achievable fix!
🚀 Next-Level Tips: Maintenance and Long-Term Enjoyment
Mastering this Dark Chocolate Coconut Almond Butter recipe is a great step toward cost-saving benefits and better control over your ingredients.
- Maintenance and Long-Term Considerations: If you love making nut butters, consider using a vacuum sealer on your jars before storing them in the fridge. Removing the air will significantly delay oxidation and keep your superfood spread tasting fresh for longer, promoting a truly sustainable lifestyle change.
- Suggest Complementary Strategies: While you have your food processor out, use the opportunity to make other ingredients! Roast an extra batch of nuts and turn them into a simple, unsweetened almond flour for baking, maximizing your kitchen time. (Internal Linking Opportunity: Check out our recipe for “Gluten-Free Almond Flour Brownies.”)
- Inspire Continued Growth and Learning: Once you’ve achieved this rich, chocolatey Dark Chocolate Coconut Almond Butter, try making a blond butter next—use cashews and white chocolate chips for a completely different flavor profile. Your kitchen is now your personal nut butter lab!
✅ Conclusion: Your Capability to Master Gourmet Spreads
You have now unlocked the simple, yet rewarding, secret to making a gourmet, healthy Dark Chocolate Coconut Almond Butter. By embracing the process of roasting your own nuts and understanding the key stages of blending, you have achieved a creamy, richly flavored superfood spread that is packed with nutrition and free of preservatives.
Embrace the delicious, guilt-free luxury of your homemade creation. Your capability to succeed in mastering this and other DIY kitchen projects is clear!
Will you swirl your first spoonful into your morning oatmeal, or are you going to tackle that “sand ball” challenge with confidence on your next batch?
Bon appétit!