Unlock the secret to soft, healthy lips with this DIY Hydrating Lip Balm Recipe. Create a non-sticky, all-natural balm that protects and moisturizes perfectly today! Have you ever stood in the beauty aisle, staring at dozens of plastic tubes, only to realize you can’t pronounce half of the ingredients on the label? It is a common frustration. Many store-bought balms actually contain drying alcohols or petroleum-based waxes that leave you feeling like you need to reapply every ten minutes.
The good news is that you can take control of your skincare routine right in your own kitchen. This guide will show you how to transform simple, raw ingredients into a professional-grade balm that rivals expensive boutique brands. By making your own, you unlock the ability to customize scents, textures, and healing properties to suit your specific needs. Get ready to discover a sustainable, cost-effective, and incredibly rewarding way to achieve the perfect pout. Let’s dive into this achievable DIY project that will leave your lips—and your wallet—feeling amazing!
Foundation: Getting Started with Natural Lip Care
Before we start melting and mixing, it is important to understand why a DIY Hydrating Lip Balm Recipe (Non-Sticky & All-Natural) works so much better than synthetic alternatives. Your lips are unique; they don’t have oil glands like the rest of your skin, making them prone to dehydration. A high-quality balm serves two purposes: it provides deep hydration and creates a protective barrier to lock that moisture in.
Many beginners feel hesitant about making their own cosmetics, worrying about complex equipment or “mad scientist” chemistry. Rest assured, if you can melt butter on a stove, you can make this recipe. The beauty of this process lies in its simplicity and the purity of the components.
Understanding the Three Pillars of a Great Balm
To achieve that coveted non-sticky finish, we balance three specific types of ingredients:
- The Wax (The Structure): This provides the firmness so the balm doesn’t turn into a puddle in your pocket.
- The Butter (The Nourishment): Ingredients like Shea or Cocoa butter provide the creamy “glide” and deep vitamins.
- The Oil (The Hydration): Liquid oils like Jojoba or Sweet Almond oil penetrate the skin to heal from within.
Essential Tools and Safety
You won’t need a lab, but having a few specific items will make your “potion-making” much smoother. You will need a heat-safe glass measuring cup, a small saucepan (to create a double boiler), and a stirrer (a glass rod or even a clean wooden chopstick works perfectly). Always ensure your containers—whether tubes or small tins—are cleaned and dried thoroughly before you begin.
Step-by-Step Process: Crafting Your Perfect Balm
This process is quick, so it’s helpful to have your containers opened and ready before you turn on the heat. This recipe makes approximately six standard tubes or three small 0.5-ounce tins.
1. The “Golden Ratio” Mix
The secret to a non-sticky balm is the ratio of 1:1:1. Use one part wax, one part butter, and one part oil by weight. If you prefer a firmer balm (better for summer), add a tiny bit more wax. For a softer, glossier finish, add a few extra drops of oil.
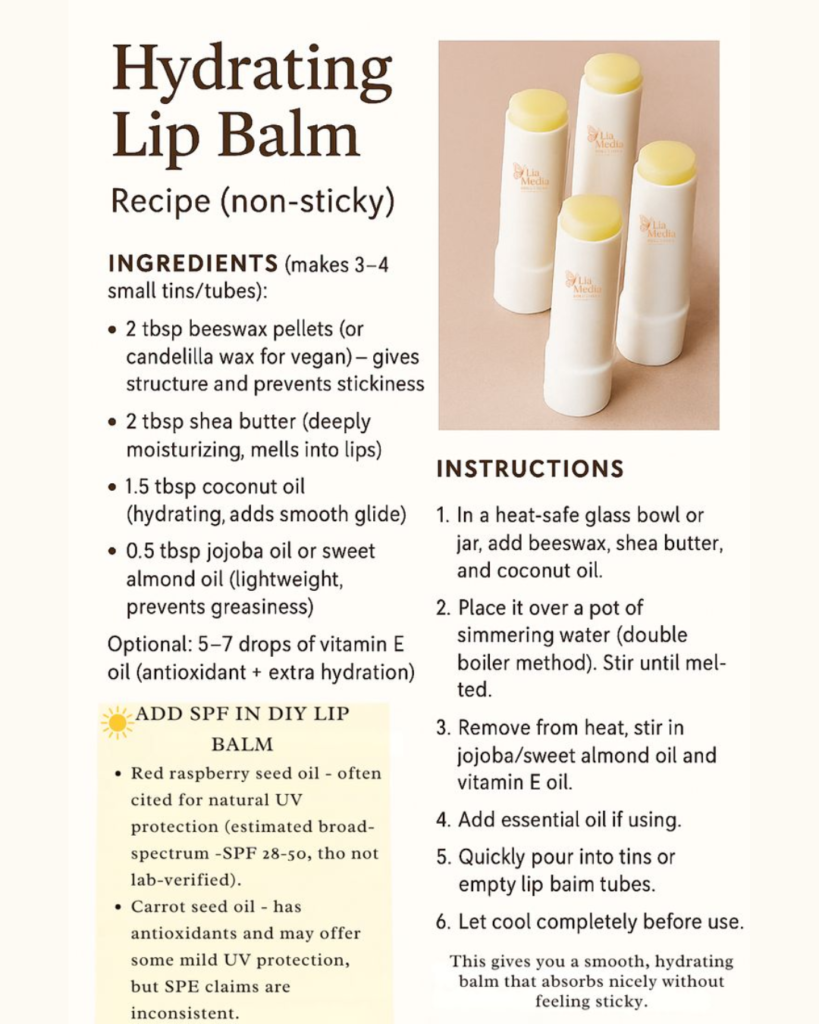
- 2 tablespoons Beeswax pellets (or Candelilla wax for a vegan version)
- 2 tablespoons Shea Butter
- 2 tablespoons Coconut Oil or Jojoba Oil
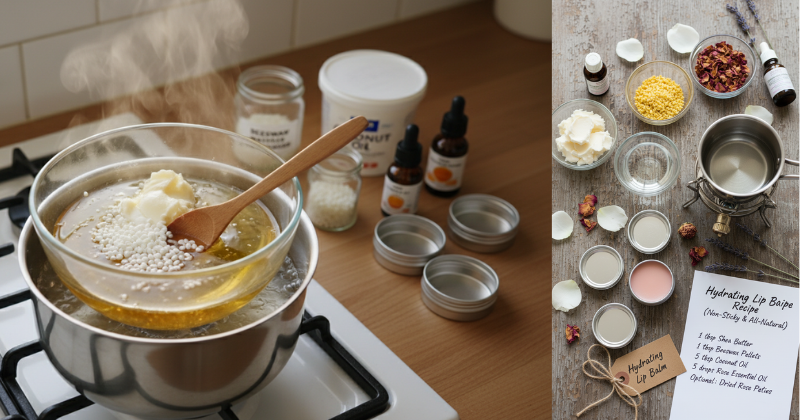
2. The Melting Method
Fill your saucepan with about an inch of water and place it over medium-low heat. Place your glass measuring cup inside the pan, creating a “double boiler.” Add your wax first, as it has the highest melting point. Once the wax is mostly liquid, add the Shea butter and coconut oil. Stir gently until the mixture is clear and uniform.
3. Adding the “Magic” (Essential Oils)
Once the mixture is fully melted, remove it from the heat. This is when you add your vitamin E oil (which acts as a natural antioxidant) and your essential oils. Adding them at the end ensures the heat doesn’t degrade the beneficial properties of the oils.
- Add 1/2 teaspoon Vitamin E oil
- Add 10-15 drops of Essential Oil (Peppermint, Lavender, or Sweet Orange are crowd favorites!)
4. The Pour and Set
Carefully pour the liquid into your containers. If you are using tubes, fill them just to the rim. You might see a small “sinkhole” form as they cool; you can top them off with a tiny bit of leftover liquid if needed. Let them sit undisturbed for at least two hours—resist the urge to touch them!
Advanced Strategies: Pro Tips for Customization
Once you have mastered the basic DIY Hydrating Lip Balm Recipe (Non-Sticky & All-Natural), you can begin to experiment like a true apothecary. There are endless ways to tailor your balm for different seasons or specific lip concerns.
Achieving a Tinted Glow
Want a “your-lips-but-better” tint? You can naturally color your balm using plant powders. A tiny pinch of Beetroot powder will give a lovely rose hue, while a bit of Alkanet root infused in your oil beforehand creates a deep berry red. The trick is to strain the oil through a coffee filter if you use raw roots to ensure the final balm remains smooth and grit-free.
Sun Protection and Healing
If you spend a lot of time outdoors, consider incorporating Red Raspberry Seed Oil. While not a replacement for medical-grade SPF, this oil has a naturally high SPF value and is packed with antioxidants. For extra healing power on cracked lips, swap half of your Shea butter for Mango butter, which is exceptionally high in fatty acids and helps with skin elasticity.
Flavor Profiles and Aromatherapy
Think beyond just “scent.” Using food-grade essential oils can turn your balm into a sensory experience.
- The “Morning Wake-up”: Peppermint and Eucalyptus.
- The “Tropical Escape”: Coconut oil base with a drop of Lime essential oil.
- The “Calm & Cozy”: Vanilla oleoresin and Lavender.
Troubleshooting: Common Challenges and Solutions
Even the most experienced DIYers run into a “bad batch” occasionally. If your balm isn’t quite right, don’t throw it out! Most issues can be fixed by simply re-melting the mixture.
“My balm is too hard and won’t spread.” This usually means there was a bit too much wax in the ratio. Place your tins or tubes (if they are heat-safe) back into a gentle water bath, melt them down, and stir in an extra teaspoon of your liquid carrier oil (like Jojoba).
“The texture is grainy or ‘gritty’.” This is a common issue with Shea butter. If Shea butter is cooled too slowly, the fats can separate and crystallize. To fix this, re-melt the balm and then place the finished tubes immediately into the refrigerator. Rapid cooling prevents those crystals from forming, ensuring a buttery-smooth finish.
“The essential oil scent is too weak.” Essential oils are volatile, meaning they evaporate. If you added them while the mixture was boiling hot, the scent might have literally vanished into the air. Always wait until the mixture has cooled slightly (but is still liquid) before adding your aromatics.
Maximizing Results: Longevity and Gifting
Now that you have achieved success with your DIY Hydrating Lip Balm Recipe (Non-Sticky & All-Natural), you’ll want to make sure your hard work lasts as long as possible. Because this recipe doesn’t contain water, it doesn’t require synthetic preservatives, but there are still best practices to follow.
- Storage: Keep your balms in a cool, dry place. Excessive heat (like leaving it in a hot car) will cause it to melt and may affect the texture when it re-solidifies.
- Shelf Life: Most DIY balms are best used within 6 to 9 months. The Vitamin E you added helps prevent the oils from going rancid, but fresh is always better!
- Gifting: These make incredible personalized gifts. You can buy printable labels online to create a “brand” for your balms. Wrap three different “flavors” in a small muslin bag for a thoughtful, eco-friendly present.
- Sustainable Swaps: Consider using cardboard push-up tubes or glass jars instead of plastic to make your beauty routine truly zero-waste.
Internal Linking Opportunities:
- How to Infuse Oils with Herbs for Advanced Skincare
- The Best Essential Oils for Sensitive Skin Types
- DIY Homemade Body Butter: A Complete Guide
Conclusion
Creating your own lip care is an empowering step toward a more natural, sustainable lifestyle. This DIY Hydrating Lip Balm Recipe (Non-Sticky & All-Natural) proves that you don’t need a massive budget or a degree in chemistry to achieve professional results. By choosing your own ingredients, you ensure that only the best, most nourishing elements touch your skin.
You’ve learned the foundations, the step-by-step process, and the pro secrets to troubleshooting. Now, the only thing left to do is start mixing! Remember, the first batch is just the beginning. Soon, you’ll be the go-to expert for friends and family seeking the perfect balm. You have the capability to create something beautiful, functional, and healthy—so get in the kitchen and start crafting!
Important Disclaimer: This article is for informational purposes only and should not replace professional advice. For health-related topics, consult healthcare providers. For financial or legal matters, seek qualified professional guidance. For safety procedures, verify current best practices and local regulations. Individual results may vary, and personal circumstances should always be considered when implementing any suggestions.