Learn how to make DIY Aroma Stones with this easy guide. Discover how to create beautiful, passive essential oil diffusers to freshen your home naturally.
Have you ever walked into a room and felt instantly transported by a gentle, wafting scent, only to realize there wasn’t a noisy plug-in or a dangerous candle in sight? We have all experienced the power of fragrance to shift our mood, but many commercial air fresheners rely on synthetic chemicals that can overwhelm the senses. If you are looking for a beautiful, sustainable, and heat-free way to enjoy your favorite scents, you are in the right place. Creating DIY Aroma Stones is a fantastic home project that combines the tactile joy of crafting with the therapeutic benefits of aromatherapy.
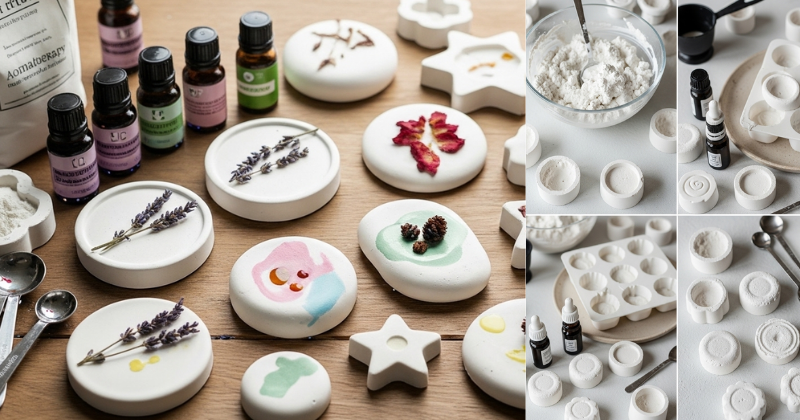
In this comprehensive article, you will discover how to transform simple household ingredients into elegant scent diffusers. These stones act as porous vessels, soaking up essential oils and releasing them slowly into the air. This transformation doesn’t just improve your home’s atmosphere; it empowers you to take control of your environment using natural materials. By the end of this guide, you’ll feel ready to achieve a spa-like ambiance in any corner of your house, from your bedside table to your car. Let’s unlock the creative potential of DIY Aroma Stones!
Section 1: Foundation and Benefits of Aroma Stones (H2)
Before we start mixing, it is important to build your confidence with the basic concepts of passive diffusion. Unlike electric diffusers that use water vapor or candles that use heat, DIY Aroma Stones work through simple evaporation. This makes them one of the safest ways to scent a room, especially if you have curious pets or small children.
Many beginners hesitate, wondering if a handmade stone can really compete with high-tech gadgets. The beauty of these stones lies in their simplicity. They are made from porous materials—typically a blend of flour, salt, or plaster—that “drink” the essential oils and hold them within their structure. This project is an achievable, cost-saving alternative to expensive ceramic diffusers, providing the satisfaction of a job well done while decluttering your home of plastic spray bottles.
H3: Why Choose Passive Diffusion?
Passive diffusion is perfect for small spaces like closets, bathrooms, or office desks. It provides a subtle, “close-range” scent rather than filling a whole house. This makes natural scent stones ideal for people who are sensitive to strong, overwhelming fragrances but still want a touch of freshness in their personal space.
H3: Materials and Reassurance for Beginners
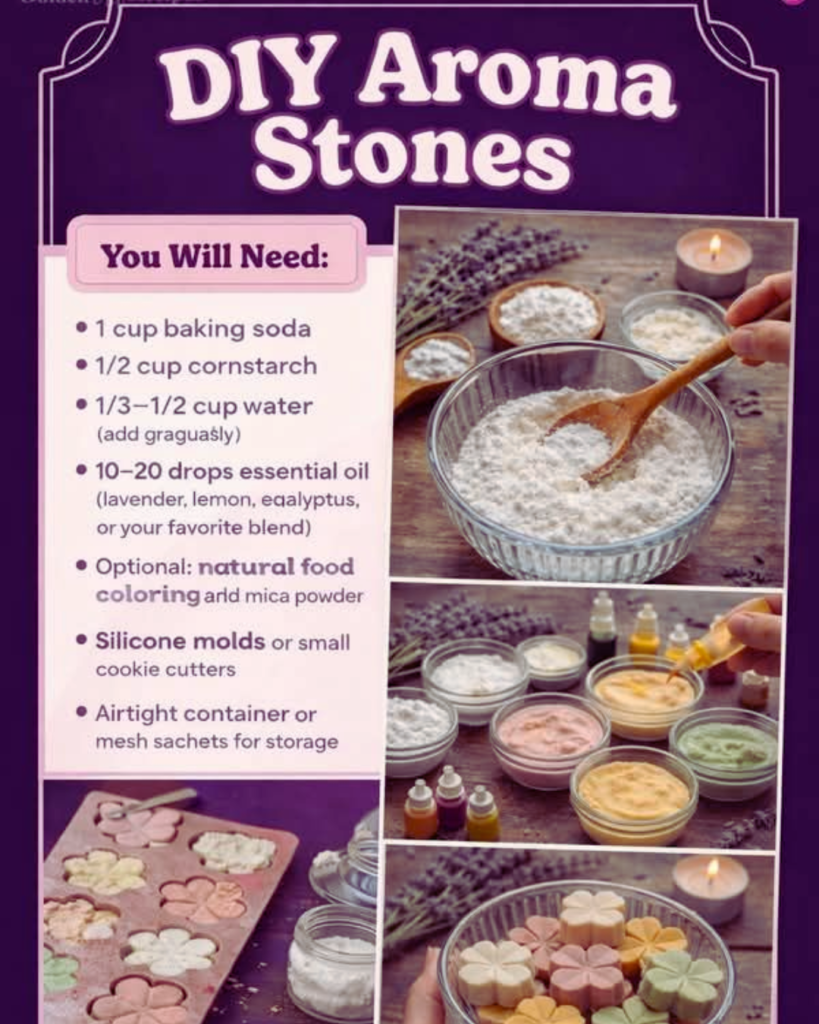
You likely already have the tools required in your kitchen! For the most common method, you’ll need:
- All-purpose flour: To provide bulk and structure.
- Salt: To act as a preservative and add texture.
- Warm water: To bind the dough.
- Essential oils: Your choice for the “aroma” part of the stones. Don’t worry about being an artist; the natural, irregular look of a “stone” is part of the charm!
Section 2: Step-by-Step Process: The “Salt Dough” Method (H2)
Are you ready to create your first batch? This core method is designed to be manageable, using clear, actionable language to guide you through the process. Think of this as “playdough for adults” that leaves your house smelling incredible.
Phase 1: Mixing the Base
- Combine Dry Ingredients: In a large mixing bowl, stir together 1 cup of flour and 1/2 cup of salt.
- Add Water Gradually: Slowly pour in 1/2 cup of warm water while stirring. You are looking for a firm, non-sticky dough.
- Knead for Smoothness: Turn the dough onto a flat surface and knead it for about 2 minutes. This activates the binders and ensures your DIY Aroma Stones won’t crack as they dry.
Phase 2: Shaping and Customizing
- Form the Stones: Pinch off small pieces of dough and roll them into spheres, or flatten them into “river stones.” You can also use cookie cutters for more uniform shapes.
- Add Texture: Use a stamp, a piece of lace, or even a real leaf from your [Backyard Garden] to press designs into the surface. This creates more surface area for the oil to sit in.
- The Drying Process: Place your stones on a parchment-lined tray. You can let them air-dry for 2-3 days, or bake them at a very low temperature (around 200°F) for 1-2 hours until they are rock hard.
Phase 3: Activating the Aroma
Once the stones are completely cool and dry, they are ready for action! Place 3–5 drops of your chosen essential oil directly onto the stone. The liquid will disappear into the pores almost instantly.
Section 3: Advanced Strategies and Pro Tips (H2)
Once you’ve mastered the basic salt dough, you can share expert-level insights by experimenting with different materials and aesthetics. There are ways to customize your approach to match any decor style.
- The Plaster of Paris Upgrade: For a professional, chalky white finish that looks like high-end ceramic, try using Plaster of Paris. Mix the plaster according to the package directions and pour it into silicone molds. These stones are extremely porous and hold scent for a long time.
- Natural Colorants: Instead of plain water, use strong hibiscus tea for a pink hue or matcha powder for a soft green. This keeps your homemade diffusers entirely natural and eco-friendly.
- The Essential Oil Blend: For a “Stress Relief” stone, try a mix of Lavender and Bergamot. For a “Morning Boost,” go with Peppermint and Sweet Orange.
H3: Where to Use Your Stones
Think beyond the living room! These stones are incredible as:
- Drawer Fresheners: Tuck a small stone into your dresser to keep clothes smelling like fresh laundry.
- Car Diffusers: Place a stone in your cup holder or clip it to a vent for a chemical-free car scent.
- Gift Sets: Pair a few stones with a small bottle of [DIY Lavender Oil] for a thoughtful, handmade gift.
Section 4: Troubleshooting Common Challenges (H2)
Even the simplest DIY projects can have setbacks. Address these frequent obstacles with these solutions to ensure your success.
- Problem: “My stones are cracking while drying.”
- Solution: This usually happens if the dough was too dry or if they were dried too quickly in a hot oven. Next time, add a teaspoon more water and let them air-dry in a cool spot.
- Problem: “The scent doesn’t last very long.”
- Solution: Remember that DIY Aroma Stones are passive diffusers. You will need to “refresh” them every 3–4 days with a few more drops of oil. Also, ensure you are using high-quality, undiluted essential oils.
- Problem: “The stones feel sticky.”
- Solution: This means they aren’t fully dry yet. Give them another 24 hours in a dry area. If you live in a humid climate, using a desiccant or a fan can help speed up the process.
Preventive Measures
To prevent mold (especially in salt-based stones), ensure they are dried completely before adding any oil. Store unused stones in an airtight container to prevent them from absorbing moisture from the air.
Section 5: Maximizing Results and Next Level Tips (H2)
To build upon your basic success, think about how these stones fit into a larger [Sustainable Home] lifestyle. You can inspire continued growth by integrating them into your daily wellness rituals.
- Rotating Scents: Use specific stones for specific moods. Have a “Focus Stone” on your desk with Rosemary oil and a “Sleep Stone” by your bed with Cedarwood.
- Maintenance: Over time, oils can build up. If your stone stops absorbing liquid, gently sand the surface with fine-grit sandpaper to reopen the pores.
- Complementary Strategies: Use your aroma stones alongside other [Natural Cleaning Hacks]. A fresh-smelling room feels even better when the surfaces are cleaned with vinegar and lemon!
- Terrarium Styling: Place your stones inside a glass bowl with some dried moss or decorative pebbles to create a beautiful “scent altar” that doubles as home decor.
Conclusion (H2)
You have successfully unlocked the secret to a naturally fragrant home! By making your own DIY Aroma Stones, you are taking a massive step toward a toxin-free environment while saving money on disposable air fresheners. This project proves that you have the capability to transform simple, everyday materials into something beautiful and functional.
Summarize your transformative takeaways: you’ve learned the foundation of passive diffusion, mastered the salt-dough method, and discovered how to troubleshoot like a pro. These stones are an empowering way to reclaim your space and achieve the peaceful atmosphere you deserve. So, grab your flour and your favorite oils—it’s time to start crafting. You’ve got this!