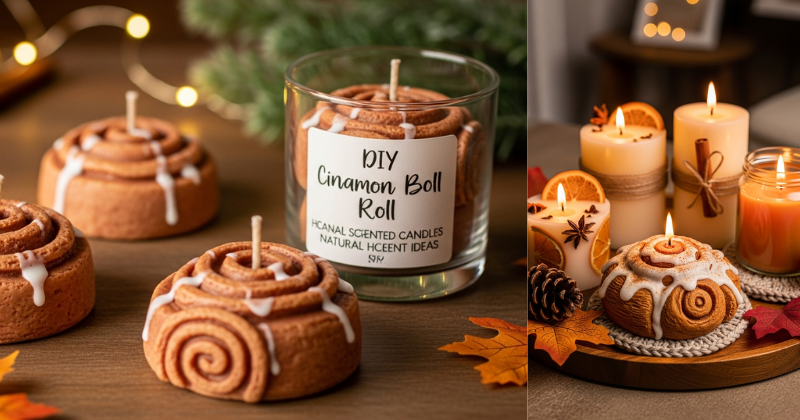
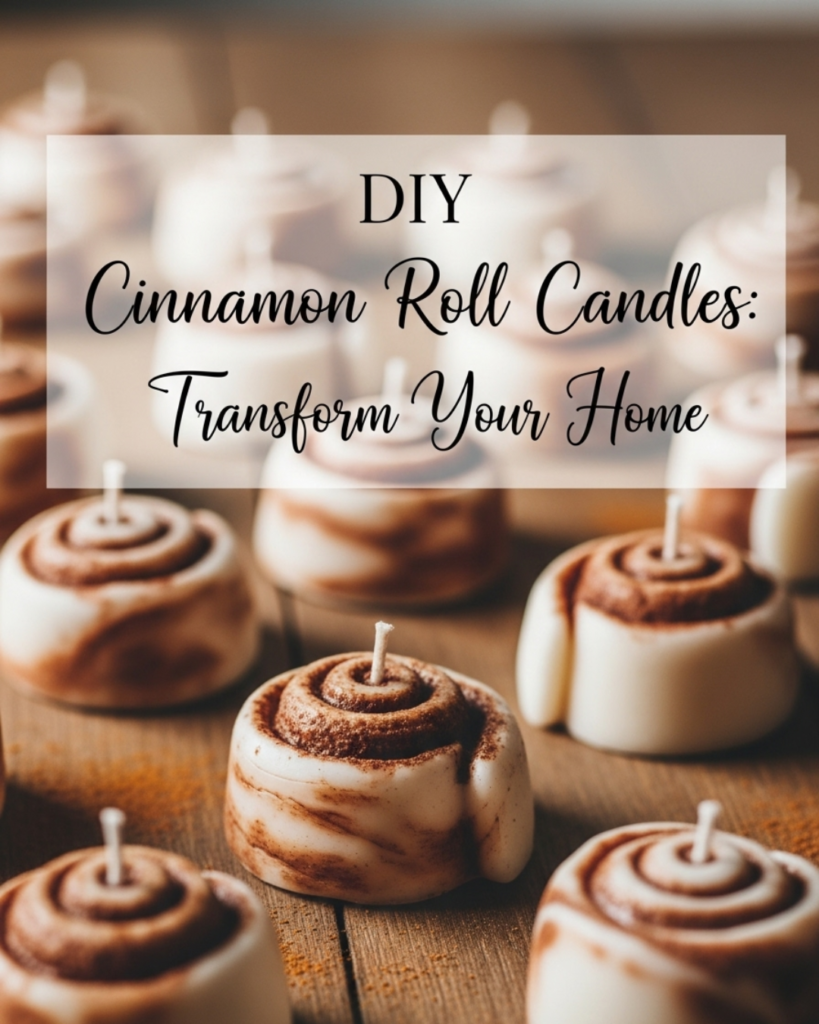
Create DIY cinnamon roll candles to transform your home with cozy, sweet aromas. Learn how to make these adorable, realistic-looking candles with our easy guide today!
There is nothing quite like the smell of fresh cinnamon rolls wafting through the house to make a space feel instantly welcoming. That blend of spicy cinnamon, warm dough, and sugary icing creates a sense of comfort that few other scents can match. But you don’t have to preheat the oven every time you want to enjoy that fragrance. By making DIY cinnamon roll candles, you can capture that bakery-fresh essence in a decorative piece that lasts for weeks. These candles are not just functional; they are conversation starters that add a whimsical, handmade charm to your kitchen or living room.
In this comprehensive guide, we are going to walk you through the delightful process of crafting your own dessert-inspired candles. You will discover how to manipulate wax to create realistic “dough” textures and how to use fragrance oils to achieve that perfect gourmand scent. Whether you are a seasoned crafter or looking for [easy DIY self-care projects], this tutorial will empower you to achieve professional results. You have the creative capability to transform your home’s atmosphere—let’s get rolling!
Foundation: Candle Making Basics for Beginners
Before we start “baking” with wax, it is important to build your confidence with the basic materials. Making DIY cinnamon roll candles is a bit different from pouring a standard jar candle, as it involves working with wax in a pliable state.
Choosing the Right Wax
For these candles, you generally want a wax that is easy to mold but holds detail well.
- Soy Wax: Great for containers and has a clean burn, but can be soft.
- Beeswax: Very firm and holds shapes beautifully, though it has a natural honey scent.
- Paraffin or Pillar Blends: Often the best for beginners because they are designed to be molded and hold a high fragrance load.
Essential Tools and Safety
Safety is the most important part of any home project. Always use a double boiler to melt your wax; never put a pot of wax directly over a flame, as it can reach a flashpoint and ignite. You will also need a thermometer to ensure you add your fragrance at the right temperature (usually around 180°F) to ensure the oil binds correctly with the wax. If you’ve been learning about [DIY non-toxic cleaning recipes], you’ll appreciate that using natural soy wax and lead-free wicks keeps your home’s air quality clean and healthy.
Addressing Common Hesitations
You might worry that the “roll” shape looks too complicated. Don’t be intimidated! The beauty of a cinnamon roll is that it isn’t perfect. Real rolls have lumps, bumps, and varying swirls. Your hand-rolled wax version will look even more authentic if it has a bit of character. You are fully capable of mastering this technique on your first try!
Step-by-Step: Crafting the Perfect Roll
Ready to transform your space? Follow these manageable steps to create your realistic DIY cinnamon roll candles.
1. Melting and Scenting the “Dough”
- Melt: Heat about 1 pound of pillar wax in your double boiler until it is fully liquid.
- Scent: Add your cinnamon roll fragrance oil. For a strong “hot throw” (the scent when burning), aim for 1 ounce of oil per pound of wax.
- Color: Add a tiny amount of light brown or “biscuit” colored wax dye. Remember, wax dries lighter than it looks when liquid!
2. Creating the Swirl
This is where the magic happens. You aren’t pouring this into a mold; you are “rolling” it.
- Pouring the Sheet: Pour the melted wax onto a cookie sheet lined with parchment paper. Let it cool until it is no longer liquid but still warm and flexible—like a sheet of fruit leather.
- The Cinnamon Layer: Sprinkle a little bit of actual ground cinnamon (or dark brown mica powder) over the surface.
- The Roll: Carefully peel the wax sheet up and roll it tightly into a cylinder. While it’s still warm, use a knife to slice “cinnamon roll” rounds from the cylinder.
3. Adding the Wick and “Icing”
- Wicking: Use a skewer to poke a hole through the center of your roll and insert a pre-tabbed wick.
- Icing: Melt a small amount of white wax (without brown dye). Let it cool until it starts to thicken into a “slushy” consistency.
- Drizzle: Use a spoon to drizzle the white wax over your cinnamon roll slices. It will harden to look just like vanilla glaze!
Advanced Strategies: Pro Tips for Realism
Once you have the basic roll down, you can share expert-level insights by adding details that make your candles look good enough to eat.
Texture and “Dusting”
To achieve an expert-level finish, use a stiff-bristled brush to lightly “stipple” the sides of the wax roll while it’s still slightly warm. This creates a porous look that mimics baked bread. You can also lightly dust the top of your finished candle with a tiny bit of real cocoa powder or extra cinnamon to give it that “just out of the oven” matte finish.
Customizing the Scent Profile
Why stick to a plain roll when you can get creative?
- Apple Cinnamon: Add a few drops of apple fragrance to the “dough” wax.
- Pumpkin Spice: Perfect for autumn, pair your candles with [seasonal gardening considerations] and fall decor.
- Coffee Pairing: These candles go beautifully in a gift basket with a bag of beans or a [Rose Vanilla Sleep Latte] kit for a friend.
Featured Snippet: How do you make a candle look like a cinnamon roll?
To make a candle look like a cinnamon roll, pour melted, scented wax onto a parchment-lined tray to create a thin sheet. Once the wax is flexible but not liquid, sprinkle with cinnamon-colored mica or real cinnamon, roll the sheet into a log, and slice it into rounds. Finally, drizzle thickened white wax over the top to mimic icing and insert a wick through the center.
Troubleshooting: Common Challenges and Solutions
DIY projects occasionally have hiccups, but every obstacle has an encouraging solution!
“My wax sheet cracked when I tried to roll it.”
- The Solution: The wax was too cold. If this happens, don’t worry! Put the cracked pieces back in your double boiler, melt them down, and try again. Timing is everything. You want the wax to be the consistency of a soft fruit snack.
“The icing is sliding right off the roll.”
- Alternative Approach: Your “dough” roll might be too cold and smooth. Use a toothpick to lightly score the top of the roll before drizzling the icing. This gives the “glaze” something to grip onto.
“I can’t get the wick to stay straight.”
- Preventive Measures: Use a wick centering tool or even a couple of popsicle sticks taped together to hold the wick in place while the “icing” wax hardens.
Maximizing Results: Next Level Presentation
To build upon your basic success, think about how to display and maintain your beautiful new creations.
Decorative Containers
While these candles look great on their own (sitting on a heat-safe ceramic plate), you can also place them in upcycled tins or jars. If you have been following our guide on [9 everyday items you can turn into beautiful home decor], an old tart tin or a shallow glass jar makes the perfect “baking dish” for your candle.
Long-Term Care
Because these are “naked” candles (not in a jar), they can collect dust. Keep them in a cool, dry place. If they get dusty, use a soft cloth dampened with a bit of water and a drop of soap from your [DIY non-toxic cleaning recipes] to gently wipe the surface. This keeps the colors vibrant and the scent fresh.
Complementary Home Tips
Pair your cinnamon scents with other cozy home upgrades. For example, if you are working to [freshen a musty closet naturally], the spicy notes of cinnamon can help mask odors and create a sense of cleanliness throughout the house.
Conclusion
Making DIY cinnamon roll candles is a rewarding way to blend art with atmosphere. You have discovered that you have the capability to succeed in creating something beautiful and functional from scratch. By choosing to craft your own home scents, you achieve a space that is uniquely yours—filled with the cozy, sweet aromas that make every day feel like a special occasion.
You’ve got this! Start by melting a small batch of wax today and practicing your “rolling” technique. You will be amazed at how quickly your home transforms into a comforting sanctuary.