Meta Description: Learn how to locate arterial pulses using key anatomical landmarks. Discover pulse points, clinical relevance, and step-by-step techniques for accurate assessment.
Understanding how to locate arterial pulses is a fundamental clinical skill used in both medical practice and everyday health awareness. Whether you’re a student, healthcare professional, or simply curious about your body, knowing where and how to feel a pulse can provide valuable insights into circulation and cardiovascular health.
Arterial pulse points reflect the rhythmic beating of the heart as blood is pumped through the arteries. By learning the key anatomical landmarks, you can accurately assess pulse rate, rhythm, and strength.
In this guide, you’ll discover the major arterial pulse sites, how to locate them step by step, and practical tips to improve your accuracy and confidence.
What Is an Arterial Pulse?
An arterial pulse is the palpable expansion of an artery as blood is pushed through it with each heartbeat.
What the pulse tells you
By assessing a pulse, you can evaluate:
- Heart rate (beats per minute)
- Rhythm (regular or irregular)
- Strength (strong, weak, or thready)
- Circulatory status
Why pulse assessment matters
Pulse examination is used in:
- Routine health checks
- Emergency assessment
- Monitoring fitness levels
- Evaluating circulation
Featured Snippet: Where are the main arterial pulse points located?
The main arterial pulse points are located at the wrist (radial), neck (carotid), elbow (brachial), groin (femoral), behind the knee (popliteal), ankle (posterior tibial), and foot (dorsalis pedis).
Major Arterial Pulse Points and Their Landmarks
1. Radial Pulse (Wrist)
Location
- On the thumb side of the wrist
- Just below the base of the thumb
How to find it
- Turn the palm facing upward
- Place your index and middle fingers on the wrist
- Slide toward the thumb side
- Press gently until you feel the pulse
Clinical use
- Most commonly used pulse
- Ideal for self-monitoring
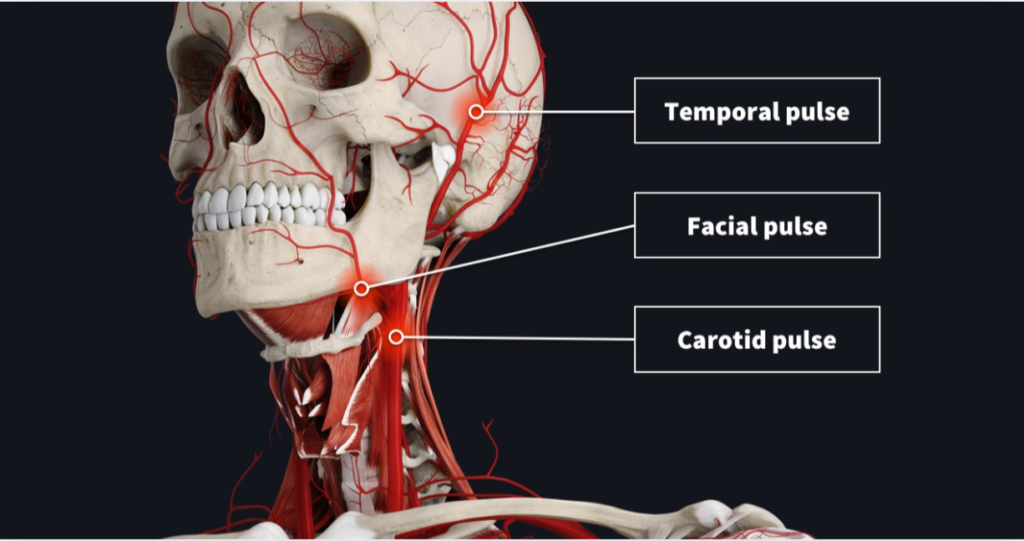
2. Carotid Pulse (Neck)
Location
- On either side of the neck
- Between the trachea and sternocleidomastoid muscle
How to find it
- Place your fingers beside the windpipe
- Gently press inward
- Feel for a strong pulse
Important caution
- Never press both sides at once
- Avoid excessive pressure
Clinical use
- Used in emergencies
- Strong central pulse
3. Brachial Pulse (Inner Elbow)
Location
- Inside the elbow crease (antecubital fossa)
- Closer to the inner side of the arm
How to find it
- Extend the arm slightly
- Place fingers in the inner elbow
- Press gently
Clinical use
- Blood pressure measurement
- Common in infants
4. Femoral Pulse (Groin)
Location
- In the groin area
- Below the inguinal ligament
How to find it
- Locate the midpoint between hip bone and pubic bone
- Press firmly but gently
Clinical use
- Evaluates central circulation
- Used in emergency situations
5. Popliteal Pulse (Behind the Knee)
Location
- Behind the knee in the popliteal fossa
How to find it
- Bend the knee slightly
- Place both hands around the knee
- Press deeply in the center
Clinical use
- Assesses lower limb circulation
- Can be difficult to detect
6. Posterior Tibial Pulse (Ankle)
Location
- Behind the inner ankle bone (medial malleolus)
How to find it
- Place fingers behind the ankle bone
- Apply gentle pressure
Clinical use
- Evaluates blood flow to the foot
7. Dorsalis Pedis Pulse (Top of Foot)
Location
- On the top of the foot
- Between the first and second toes
How to find it
- Slide fingers along the top of the foot
- Move toward the center
- Apply light pressure
Clinical use
- Important for vascular assessment
- Common in diabetes monitoring
Step-by-Step Guide to Checking a Pulse
Step 1: Use the correct fingers
- Use your index and middle fingers
- Avoid using your thumb (it has its own pulse)
Step 2: Apply gentle pressure
- Start light
- Increase gradually if needed
Step 3: Count the pulse
- Count for 30 seconds and multiply by 2
- Or count for 60 seconds for more accuracy
Step 4: Evaluate rhythm and strength
- Regular vs irregular rhythm
- Strong vs weak pulse
Advanced Tips for Accurate Pulse Assessment
Choose the appropriate site
- Radial for routine checks
- Carotid for emergencies
- Lower limb pulses for circulation issues
Ensure proper positioning
- Stay relaxed
- Avoid measuring immediately after activity
Practice consistently
Accuracy improves with repetition and experience.
Common Challenges and Troubleshooting
Difficulty finding the pulse
- Adjust finger position
- Reduce pressure if pressing too hard
- Try another pulse site
Weak pulse
- May indicate low blood pressure or poor circulation
- Compare both sides
Irregular pulse
- Could suggest rhythm abnormalities
- Should be evaluated medically if persistent
Internal Linking Opportunities
This topic connects well with:
- Cardiovascular system anatomy and function
- Blood pressure monitoring techniques
- Signs of poor circulation
- Emergency response and first aid basics
- Heart rate monitoring and fitness tracking
Conclusion
Learning how to locate arterial pulses using key anatomical landmarks is a valuable and practical skill. It allows you to better understand your cardiovascular system and recognize important signs related to circulation and heart function.
With practice, you can confidently identify different pulse points, assess heart rate, and notice changes in rhythm or strength.
By mastering these simple techniques, you gain a powerful tool for everyday health awareness and clinical understanding.
Important Disclaimer: This article is for informational purposes only and should not replace professional advice. For health-related topics, consult healthcare providers. Individual results may vary.